AFU or copy to USB drive
The
The external drive must be formatted with one of the following file systems:
|
|
|
|
|
|
|
Only the first attached USB drive is used for automatic file upload. If more than one USB drive is attached before
File transfer to a USB drive occurs in one of the following ways. This section describes the procedures.
- AFU to a USB drive
- One-time copy/move of all recorded files to USB drive
- Manually copy recorded files to USB drive
- View available USB storage space
- Safely eject the USB drive
Only one copy or move to USB operation is permitted at a time, even though the UI may appear to let you start a second one. Please wait until the first is complete before starting a new operation.
AFU to a USB drive
This procedure assumes you have completed the steps in Enable and set timing for AFU and wish to continue with configuration of upload to a USB drive.
To configure automatic upload to a USB drive:
- Insert the properly formatted USB drive into one of the
- Select External USB Drive from the protocol drop down list in the Automatic File Upload configuration page; the lower half of the page reflects the selection.
- If your Automatic File Upload setting conflicts with your new USB drive setting, a message is displayed.
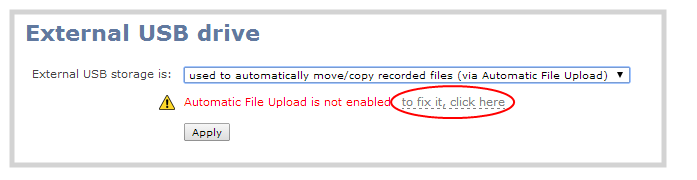
- Click the fix link.
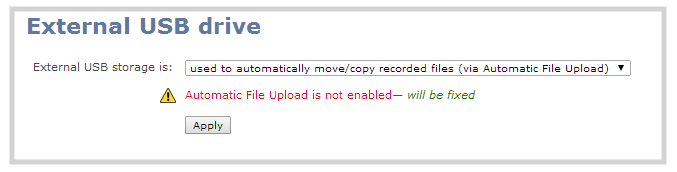
Using the fix link disables any other type of automatic file upload you have configured. When you are done with USB uploads, return to the Automatic File Upload configuration page and re-configure FTP, RSYNC, or CIFS.
After clicking the fix link, the text changes to "will be fixed", however changes are saved only after clicking Apply.
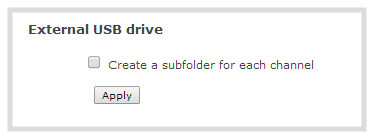
- Select Create a subfolder for each channel to have recordings organized by channel.
- Click Apply; the changes are saved.
One-time copy/move of all recorded files to USB drive
When configured to make a one-time copy of files, the
The file currently being recorded (if any) cannot be transferred until recording is completed.
This procedure is separate from automatic file upload and does not need any pre-configuration in the automatic file upload page.
Ideally only USB drives with visible activity indicators should be used.
To configure a one-time copy of all recorded files to a USB drive:
- Login to the Admin panel as admin. See Connect to the Admin panel.
- Select the External USB Drive link in the Configuration section; the External USB Drive configuration page is displayed.
- Select used for one-time move/copy of the recorded files (upon insertion) from the drop down list.
![]()
- Select the appropriate check boxes based on the descriptions provided in the following table. If your USB drive does not have activity indicators it is suggested you select either remove after copying or mark file as downloaded so you know when the transfer is complete.
One-Time Transfer/Copy to External USB Drive Options
| Name | Description |
|---|---|
| create subfolder with serial number (<serial>) | If checked, the transfer process creates a sub-folder with the |
| create subfolder for each channel | If checked, the transfer process creates a sub-folder for each channel and recorder (within the subfolder for the serial number, if that option is also selected). Files are copied to their respective folders. |
| remove after copying | If checked, the file(s) are removed after being copied to the USB drive. Checking this box makes the transfer a move instead of a copy. |
| mark file as downloaded | If checked, the files that are downloaded are marked with a downloaded icon when viewing file lists. This has no effect if remove after copying is checked. |
| ignore already downloaded files | If checked, files that were previously downloaded or marked as downloaded are not included in subsequent downloads. |
- Click Apply; the changes are saved.
If a conflict is reported regarding the Automatic file upload, go to the Automatic File Upload configuration page and disable automatic file upload or switch it to a non-USB based upload type. Repeat the steps above.
- Insert the properly formatted USB drive into one of the
- When the activity light stops flashing, remove the USB drive.
- If your USB drive does not have activity indicators:
- Check the
- Safely eject the USB drive when you are satisfied all files have been copied, or if you see the USB drive is out of storage space (View available USB storage space).
- Check the
Manually copy recorded files to USB drive
You can manually copy recorder files to a USB drive connected to
This procedure is separate from automatic file upload and does not need any pre-configuration in the automatic file upload page.
To manually copy recorded files to a USB drive:
- Login to the Admin panel as admin. See Connect to the Admin panel.
- Select the External USB Drive link in the Configuration section; the External USB Drive configuration page is displayed.
- Select used to manually move/copy selected files via the Admin panel from the drop down list.
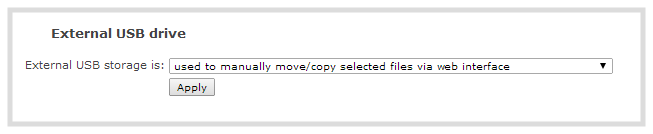
- Click Apply; the changes are saved.
If a conflict is reported regarding the Automatic file upload, go to the Automatic File Upload configuration page and disable automatic file upload or switch it to a non-USB based upload type. Repeat the steps above.
- Insert your USB drive in an available USB port on the
- To download files for a specific channel:
- Select the desired channel from the Channels list
- Click the Files Archive link for the selected Channel
- To download files for a recorder:
- Select the desired recorder from the Recorders list
- Select the check box next to the files you wish to download. In the example below the topmost file is still recording and cannot be downloaded.
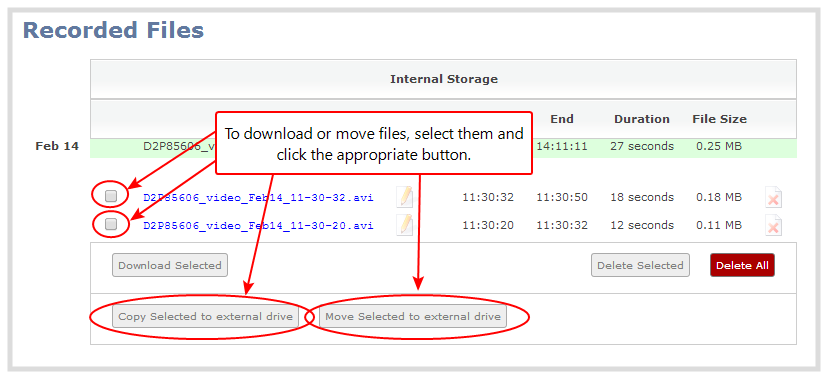
- To copy the files to the USB drive:
- Click Copy Selected to external drive
- To move the files to the USB drive (i.e. erase the files after the copy)
- Click Move Selected to external drive
- Repeat the steps to select a channel or recorder and copy or move files to the external drive until you have copied all the files you wish.
- Follow the steps to Safely eject the USB drive.
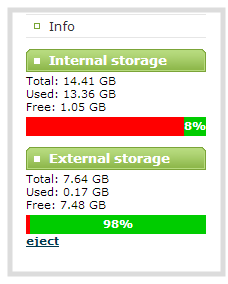
View available USB storage space
When you insert a USB drive in an available port of
To see the available USB storage space:
- Login to the Admin panel as admin. See Connect to the Admin panel.
- Insert your USB drive in an available USB port on the
- Scroll to the bottom of the Admin panel page; external USB storage is displayed under internal storage space.
Safely eject the USB drive
When you have completed work with the USB drive you can safely eject it by using the link at the bottom of the Admin panel page.
To safely eject the USB drive:
- Login to the Admin panel as admin. See Connect to the Admin panel.
- Scroll to the bottom of the Admin panel page; click the eject link below external storage space.
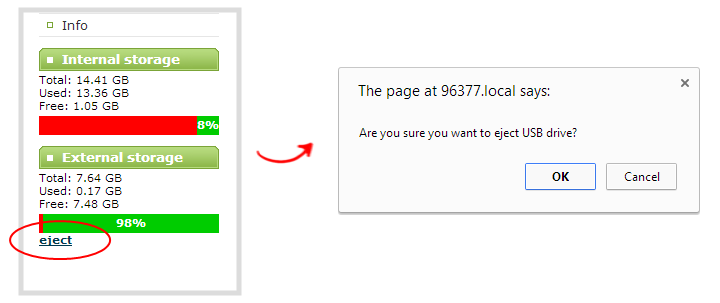
- When prompted, click OK to confirm that you want to eject the USB drive.
- Disconnect the USB drive from the
