Add a text overlay (custom channel)
Adding a static or dynamic text overlay to your custom channel is an easy way to customize your stream.
This topic covers:
You can add an overlay to a layout on an existing
Custom overlay text (static)
In a custom layout, you can manually input your overlay text, such as date and time, channel name or other personalized text. This text remains static and requires manually editing within the custom layout to change.
To add custom overlay text to your layout:
- Login to the Admin panel as admin. See Connect to the Admin panel.
- Follow the steps in Custom channel layout editor or Create a local custom channel or layout to get to the channel layout editor.
- From the channel layout editor, click Add item; a drop down box appears. (If you have any other items already in your layout, the new item appears at the top of the list.)
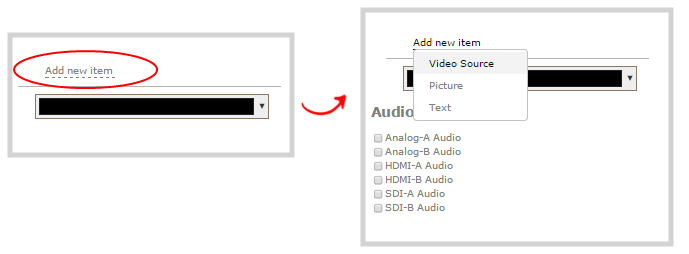
- Use the item type drop down box to select Text; the Text settings box appears and the layout area is updated with the text overlay.
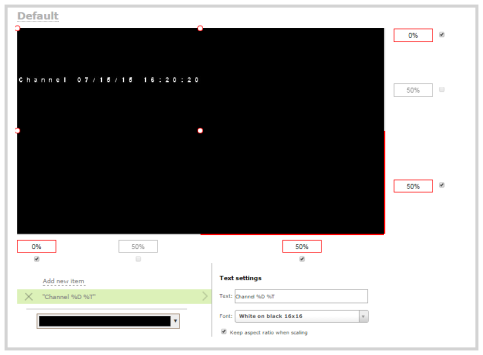
- In the Text field, specify the overlay text you want to add to the layout. Use your own text and see the Overlay text chortcut codes table provided at the end of this procedure to add any combination of the shortcut codes.
For example: Use this string:%A %B %d, %G. Live streaming channel Auto A.
to obtain these results (Thursday February 26, 2015. Live streaming channel Auto A.):
- Use the font drop down to select the size of your text.
- For best results, select the Keep aspect ratio when scaling checkbox from the Text settings box. (This is selected by default.)
- In the layout area, use the mouse or the manual position value fields to position and resize your text overlay. (You may first need to change the height of the text box handles before you can proceed with resizing or positoning.) See the note below for more information on positioning techniques.
- If needed, re-order the items in your layout by clicking and dragging items in the item list (under the Add new item link).
For example, if you added your overlay text before adding a video source, the video source conceals the overlay text. To fix it, drag the overlay text item above the video source item in the list, or vice-versa.
- When your layout is complete, scroll to the bottom of the page and click Save to save your work.
| Field | Value | Example |
|---|---|---|
| date | %F | 2012-01-26 |
| year | %G | 2012 |
| month (01) | %m | 01 |
| month (Jan) | %b | Jan |
| month (January) | %B | January |
| day of the month | %d | 26 |
| weekday (Thu) | %a | Thu |
| weekday (Thursday) | %A | Thursday |
| time | %T | 08:40:45 |
| hour | %k | 08 |
| minute | %M | 40 |
| second | %S | 45 |
| millisecond | %#m | 378 |
| channel name | %c | Camera Feed 1 |
Custom overlay text (dynamic)
If you intend your overlay text to change throughout the course of your streaming and/or recording program, you can use Networked VGA Grid's HTTP API to insert and update system-wide variables in your dynamic text field as required. For example, you may insert a system variable into your layout to represent GPS co-ordinates and then use a script to continuously update the co-ordinates contained in your variable as the exact physical location in your stream changes over time.
System variable commands can be issued at a frequency of 5 per second, and up to 6 variables may be set in a single command. After issuing a set command, all channels using the specified variable(s) are updated.
See Control with HTTP commands to learn how to configure system variables for custom overlay text.
To insert a system variable into your overlay text:
- Access the overlay text feature in your custom layout by following steps 1–5 in Custom overlay text (static) above.
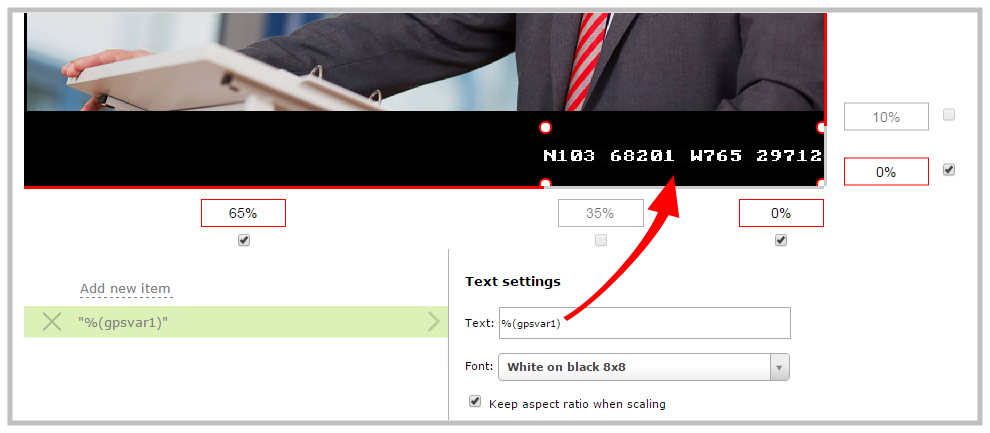
For example, in the layout below, "gpsvar1" (variable name) contains the text "N103 68201 W765 29712". Inserting the variable name in the text overlay field displays the variable's value in the custom layout.
To insert the "gpsvar1" variable into your custom layout, simple type %(gpsvar1) into the Text field under the Text settings header.
The font size of a system variable may change within a text label depending on each variable's character count. To maintain a consistent font size within text labels, it is recommended you keep all system variable values set to the same character count (e.g. 10 characters saved to each system variable).
Other things you may want to add to your layout:
- Add a video source (custom channel)
- Add an audio source (custom channel)
- Add an image (custom channel)
- Delete or move a layout (custom channel)
- Set the background color (custom channel)
- Rename a layout (custom channel)
A note about item positioning and sizing
There are four ways to position and size items in the layout area
- using the mouse
- using the keyboard
- using the manual positioning values with percents
- using the manual positioning values with pixels
To use the mouse:
Click and drag to move the item. Click and drag the red and white circles to resize the item as you wish. Using this method you can make quick changes that are in increments of approximately 5% of the width or height of your layout area. For more refined movements, hold the down the Ctrl key on your keyboard while dragging the item with the mouse.
To use the keyboard:
Use the arrow keys on the keyboard to move the item up, down, left or right in the layout. Changes are in increments of approximately 5% of the height or width of the layout area. Make more refined movements by holding down the Ctrl key on your keyboard while pressing the up, down, left or right keys. You can also hold the Shift key while using the arrow keys to control the size of the item on the layout. Hold both Ctrl and Shift for fine-grained size control.
Using percents:
Specify a whole number, followed by a percent sign (e.g. 4%) in any of the manual positioning fields. See Resize and position layout items using percents or pixels (custom channel) for more information.
Using pixels:
If you need to specify an exact amount in pixels (rather than percent) you can type a pixel value in any of the positioning value squares followed by the characters px (e.g. 56px). You can mix and match pixels and percents changing only the boxes you want to use pixel values. At any time you can switch back to percents by typing a percent. See Resize and position layout items using percents or pixels (custom channel) for more information.
