Networked VGA Grid User Guide
You are here: Maintenance > Storage disk maintenance

Storage disk maintenance

Your Networked VGA Grid is equipped with one or more hard drives for storage of recordings. Occasionally, maintenance is required for these disks. This section describes procedures for the following topics:

Check disk storage space

Networked VGA Grid has a finite amount of storage . By default, the standalone and networked version have 3 TB of storage. This storage space holds a lot of recordings, but it can get full. It’s a good idea to monitor your current disk usage.

If available storage is low, consider removing some unneeded recordings or setting up an automatic file transfer with deletion after transfer. See Recorded files and File and recording transfer.

Disk space can also be checked via the Epiphan Live control interface. See Networked VGA Grid User Guide You are here: Start here > Epiphan Live > Streaming, recording and monitoring using the Dashboard interface > Configuring Dashboard panels for visual confidence monitoringStreaming, recording and monitoring using the Dashboard interfaceUnderstanding the Dashboard interfaceConfiguring Dashboard panels for visual confidence monitoringMonitoring video and audio sourcesControlling streaming and recording using Epiphan LiveConfiguring Dashboard panels for visual confidence monitoringYou can customize each Dashboard panel to display a specific channel, or source. Epiphan Live allows you to configure up to 8 different panels for comprehensive live preview confidence monitoring of channels and sources. Note that when Dashboard panels are configured, other users idle on the Dashboard interface must refresh the page in their web browser to display the updated panels.The limit of 8 live preview panels applies across all other open instances of Epiphan Live (additional users may access Epiphan Live simultaneously from separate locations, for example, or an operator may accidentally open a duplicate Epiphan Live interface.)You can also display the following set of basic system information in your panels:CPU load (%).Quantity of streaming connections.The current streaming bandwidth (bitrate).Automatic file upload status (enabled or disabled). See File and recording transfer.Storage available on your Networked VGA Grid.To configure your Dashboard panels:Log in to Epiphan Live (see Accessing Epiphan Live).Click the drop down box under your desired panel (text says "None" if the panel is not yet configured), and select a channel, source or output from the dropdown menu. Control streaming and recording directly from the Dashboard panel! When a channel is applied to a Dashboard panel, streaming and recording control buttons appear under the panel.Click Save in the upper-right corner of the page to preserve your changes (if you don't save, then your panel configuration changes are lost when you refresh or navigate away from the Dashboard).You can navigate between 3 separate sets of Dashboard panels by clicking the circle icons above the first row of panels. You can also configure each panel set to display either 2 or 4 panels by clicking the 2x/4x icons above the upper-right Dashboard panel. for more information.

To check disk storage space:

  1. Login to the Admin panel as admin or operator. See Connect to the Admin panel.
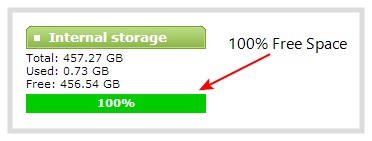
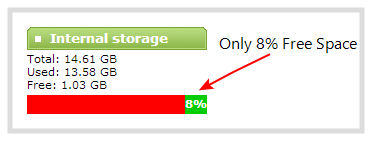
  1. Check the Internal Storage section at the bottom of the menu column. The bar will be mostly green if there is lots of space left, or mostly red if storage space is nearly full.
  1. If available storage is low, take action to remove files as discussed in Recorded files and File and recording transfer.

Schedule disk check

A disk maintenance schedule is used to check the system storage drives for errors. Two values are supplied, one to specify the number of system restarts that should occur before disk check, and the second to specify the number of months before performing a disk check. The disk check happens based on whichever event occurs first.

For example, let's say the restart setting is set to 50 and the months setting is set to 6. If six months pass and less than 50 restarts happened, a disk check will occur on the next restart. However if you do 50 restarts in one month, the disk check will happen after the fiftieth restart.

Disk check occurs during start up and can cause a lengthy delay in starting up the system.

To set the disk check schedule:

  1. Login to the Admin panel as admin. See Connect to the Admin panel.
  1. Select the Disk Check link in the Configuration menu; the disk maintenance page opens.
  2. Set the number of restarts to occur before the next check. Set to 0 if you don’t want to force a disk check after a specific number of restarts.
  3. Set the number of months to pass before the next check. Set to 0 if you don’t want to force a disk check after a specific number of months.
  4. Click Save.

Perform disk check

A disk maintenance schedule is used to periodically check the system storage drives for errors. If you prefer, you can run the disk check manually at a time that is convenient for you.

Running the disk check manually resets the timers for the scheduled disk check (i.e. next check won’t happen automatically until either the number of restarts or months passes).

If the system is recording when you start a disk check, it will stop recording and resume after the check is complete. Frames presented during the disk check are not part of any recording.

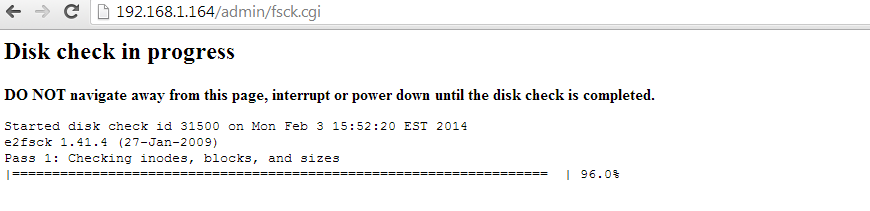
To start a manual disk check:

  1. Login to the Admin panel as admin. See Connect to the Admin panel.
  1. Select the Disk Check link in the Configuration menu; the disk maintenance page opens.
  2. Click the Check Now button; a new page opens showing you the progress of the disk check.

Do not interrupt power to the system during the disk check.

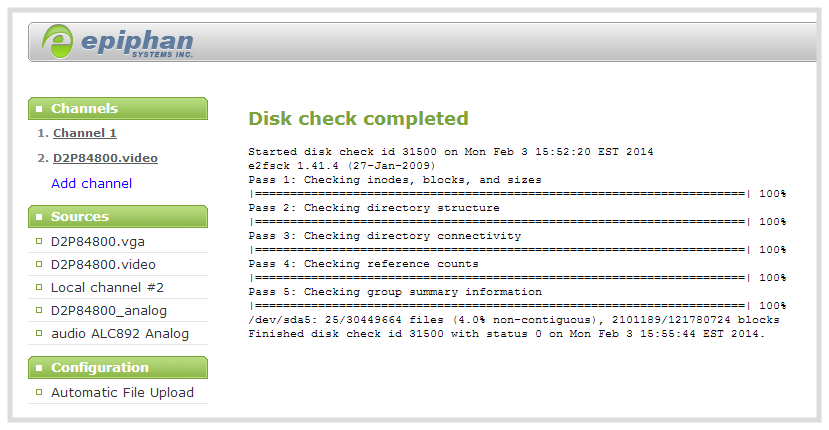
  1. When the disk check is complete, the main page returns and a summary is shown.

  1. If any unrecoverable errors are detected, contact Epiphan support.

Rebuild storage disks

Rebuilding the storage disk set is a destructive process that erases everything from the disks. Proceed with caution.

To rebuild the storage disks (erasing all data):

  1. Login to the Admin panel as admin. See Connect to the Admin panel.
  1. Select the Disk Check link in the Configuration menu; the disk maintenance page opens.
  2. Scroll to the bottom of the page to the Internal Storage section:

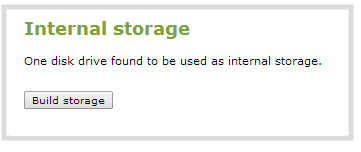
  1. Click Build Storage; you are asked to confirm that you want to erase the storage drives and rebuild.

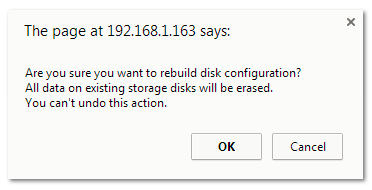
  1. Click OK on the confirmation dialog; a message appears indicating the rebuild is underway. Internal storage is not available during rebuild. You are unable to save any recordings.

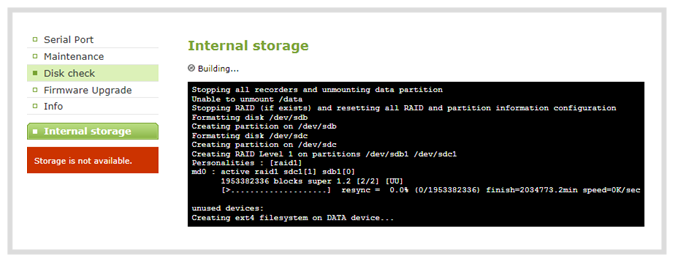
The rebuild takes less than 5 minutes, the page automatically refreshes to provide the current status.

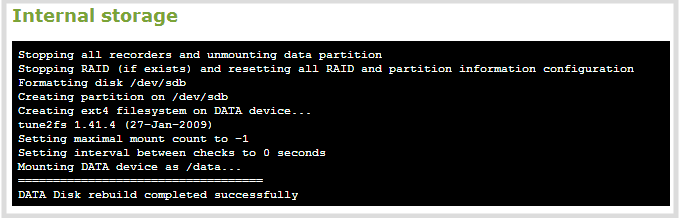
  1. When the rebuild is complete, the message box indicates whether or not it was successful.

  1. In the unlikely event that the rebuild was not successful, you may try it again, and if still not successful, contact Epiphan support.