Networked VGA Grid User Guide
AFU using RSync
This procedure assumes you have completed the steps in Enable and set timing for AFU and wish to continue with configuration of upload using RSync.
To configure upload using RSync:
- Select RSync Client from the protocol drop down list in the Automatic File Upload configuration page; the lower half of the page reflects the selection.
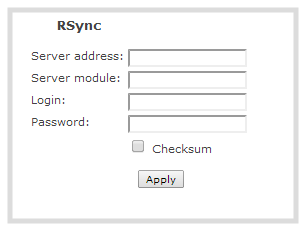
- Specify the target Server address. If your
- Specify the Server module. This is the name of the shared folder on the server. If needed, request this value from your network administrator.
- Specify a username for the RSync Server in the Login field. The user must have write permissions for the module.
- Specify the password for the user in the Password field; the value is masked by dots.
- If desired, select the Checksum check box to add a checksum validation to the transfer between the
- Click Apply; if there are any problems the system notifies you with a message: One or more parameter values are not valid and those were not applied!
The following table describes the options applicable to configuring upload to an RSync server.
RSync Automatic File Upload Configuration Options
| Name | Description / Options |
|---|---|
| Server address | The IP address (or fully qualified domain name) of the RSync server. |
| Server module | The name of the shared folder on the RSync server. |
| Login | Username for the RSync server. |
| Password | Password for the RSync user. |
| Checksum | Select to enable checksum checking during file transfer. This increases the time taken to transfer, but also increases reliability of the transfer. |
