Configure encoding (HD Encoder channels)
You can modify the encoding settings for each HD Encoder channel you create. These settings let you perfect your stream by selecting the right frame size, bit rate, audio/video codecs, and more.
The VGA Grid Concentrator is used to configure the encoding settings for each HD Encoder channel. This centralized approach lets you configure multiple HD Encoders from a single point of entry.
Before starting this section you should have already created your HD Encoder channel. See Create an HD Encoder channel.
These instructions are for HD Encoder channels only, for local custom channels, see Configure encoding (custom local channels).
This section covers the following configuration items for HD Encoder channels:
- Configure video codec
- Enable DVI source and set frame size
- Enable S-Video source and set frame size
- Fine tune stream settings
- Configure audio codec
- Codec and file format compatibility
Configure video codec
VGA Grid HD Encoders can stream video to the VGA Grid Concentrator in one of two ways:
- a stream from either a DVI or an S-Video source; or
- a picture in picture stream of both a DVI and an S-Video source.
The basic encoding settings are the same regardless of the configuration of sources, however more configuration options are available if a picture in picture layout is chosen..
To configure the video codec complete these steps in the VGA Grid's Admin panel:
- Login to the Admin panel as admin. See Connect to the Admin panel.
- Click the Encoding link for your HD Encoder channel; the stream configuration page opens.
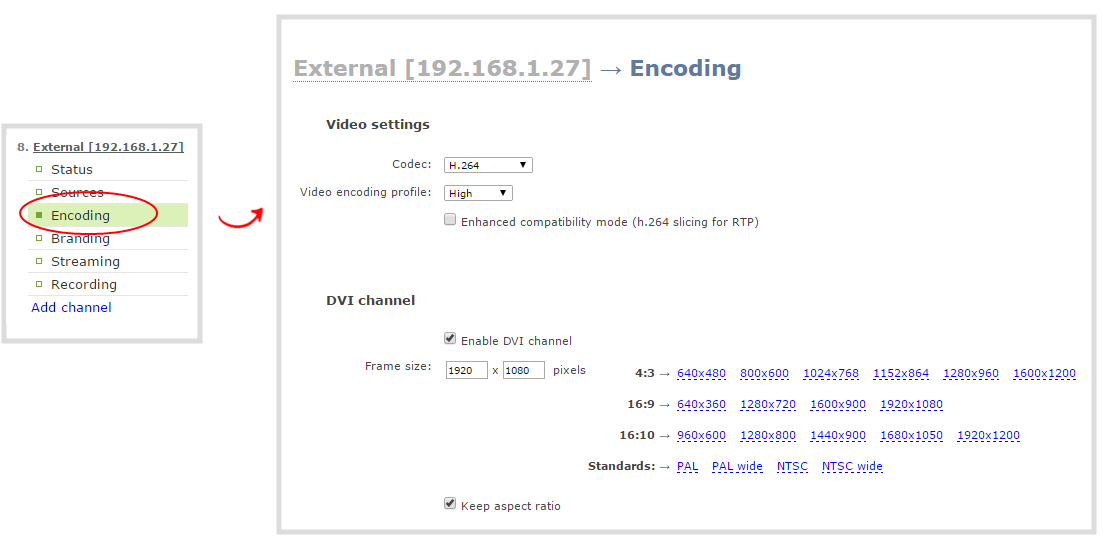
- Scroll to the Video settings section.
- Click the Codec drop-down menu to change the size and speed of the compression and decompression and the quality of the image. Choose one of the following options from the Codec drop-down menu.
| Value | Description |
|---|---|
| H.264 | H.264 is the default value and provides high quality video while using low bandwidth. This is the preferred codec for the system. |
| Motion JPEG | This is suitable for live streaming and video, however may have low quality images while using high bandwidth. Motion JPEG does not support audio. |
| MPEG-4 | This may be suitable for presentations. Provides good image quality, while using moderate bandwidth. |
If the selected codec is H.264 (default), click Video encoding profile to limit or include video formats that are supported. Choose one of the following:
| Value | Description |
|---|---|
| Baseline | Choose this option when streaming to an application that requires robustness and cannot tolerate data loss, for example video-conferencing. |
| Main | Choose this option for standard-definition broadcasts. This is the default. |
| High | Choose this option when video is viewed for broadcast and disk storage applications, particularly for high definition television application such as Blu-ray disk storage format and HDTV broadcast service. |
- If using the H.264 video codec, check the Enhanced compatability mode checkbox if you will be using RTP for streaming. This provides operating stability when the video and audio stream are not supported by the viewer’s equipment. When this feature is enabled, each frame is sub divided into one or more slices. Each slice is self-contained, all information for decoding is available within the slice. This is valuable when packet size exceeds the maximum allowable amount. Therefore losing a slice will not impact the entire frame.
Packet slicing adds to overhead and impacts compression efficiency. This checkbox can only be set when the H.264 codec is selected.
- If all your changes are complete, scroll to the bottom of the page and click Apply.
Enable DVI source and set frame size
If your VGA Grid HD Encoder has a DVI source connected to it, you'll need to enable DVI transmission from the HD Encoder channel's encoding setup page.
Frame size greatly affects the amount of bandwidth needed to transmit your stream. The larger the frame size, the more bandwidth you need to stream it. So you may want to keep the frame size the same as your source, or you may want to apply upscaling, downscaling, stretching, or black bar framing, depending on your needs.
For example:
- if the input signal resolution is 1920×1080 (a 16:9 aspect ratio)
- and stream frame size is set to another 16:9 frame size such as 1280×720,
the smaller stream frame size causes the system to downscale the image and use less bandwidth to transmit.
Or if you have a widescreen/HD format source but need a 4:3 output frame size, you can add black bars to the top and bottom of the frame.
To enable the DVI source and set a frame size, complete these steps in the VGA Grid's Admin panel:
- Login to the Admin panel as admin. See Connect to the Admin panel.
- Click the Encoding link for your HD Encoder channel; the stream configuration page opens.
- Scroll to the DVI Channel section.
- Check the Enable DVI channel checkbox; the DVI settings section expands.
- Set the Frame size values to reflect the dimensions required for your stream. Some suggested values cover popular resolutions of cameras and display devices such as monitors, but you may also specify something custom:

- Type a frame size in the field.; or
- Select an option from the sizes shown, the dimensions will appear in the frame size field.
Scaling occurs automatically (no extra configuration needed) when you make the dimensions larger, smaller, or a different aspect ratio than the source.
- Check the Keep aspect ratio checkbox if you want to ensure your source is not stretched. Without this checkbox selected, your source will be stretched to fit the selected stream aspect ratio.
When keep aspect ratio is enabled, if your source and stream aspect ratios differ, your source is centered in the frame and matte bars are added to the top and bottom or left and right sides to make up the difference. SeeRemove black bars (matte) from the video.
- If all your changes are complete, scroll to the bottom of the page and click Apply.
Enable S-Video source and set frame size
If your VGA Grid HD Encoder has an S-Video source connected to it, you'll need to enable S-Video transmission from the HD Encoder channel's encoding setup page.
To enable the S-Video source and set a frame size, complete these steps in the VGA Grid's Admin panel:
- Login to the Admin panel as admin. See Connect to the Admin panel.
- Click the Encoding link for your HD Encoder channel; the stream configuration page opens.
- Scroll to the Video Channel section.
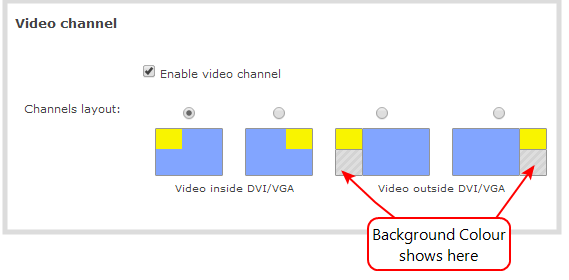
- Select the Enable video channel check box, if not already selected.

- Specify the type of video signal coming from the S-Video source. The options are S-Video or Composite.
- Set the Frame size to reflect the same dimensions as your sharing destination. Default values cover common sharing destinations such as websites or choose one of the following.
- Type a frame size in the field; or
- Select an option from the sizes shown, the dimensions will appear in the frame size field.
Making the stream dimensions larger, smaller, or a different aspect ratio than the source takes some processing power, so it’s always best to leave at the value detected by the system unless you know it is wrong or know you need to scale the size.
- Check the Keep aspect ratio check box to preserve the aspect ratio when scaling a frame size.
If you choose to keep the aspect ratio of the source and your selected output frame size aspect ratio is wider than the source aspect ratio, bars will appear on the sides of the video. If the frame size aspect ratio is taller than the source, bars will appear at the top and bottom of the output. See Remove black bars (matte) from the video.
- If all your changes are complete, scroll to the bottom of the page and click Apply.
Configure picture in picture
If you have both a DVI and an S-Video source attached to your VGA Grid HD Encoder, you can create a picture in picture layout to stream both sources to the VGA Grid Concentrator. You have four basic options to choose from:
- S-Video inside the top left side of the the DVI
- S-Video inside the top right side of the DVI
- S-Video to the left of the DVI
- S-Video to the right of the DVI
In the last two cases, a colored background matte (default color is black) is displayed in the blank area where no picture is shown. See Select the background color for your HD Encoder channel for instructions on changing the background matte color.
To configure picture in picture,, complete these steps in the VGA Grid's Admin panel:
- Login to the Admin panel as admin. See Connect to the Admin panel.
- Click the Encoding link for your HD Encoder channel; the stream configuration page opens.
- Ensure both DVI Channel and Video Channel sections are selected.
- Scroll to the Video Channel section.
- Select one of the picture in picture options.
Hardware limits the position of the S-Video picture to align with a multiple of 32 pixels. As a result, it's possible there is a small gap between the DVI/VGA and S-Video streams, or that the S-Video stream is not perfectly right-aligned when superimposed over the DVI/VGA stream.
- Adjust the Video channel and DVI Channel frame sizes as needed to acheive the desired stream.
- Click Apply.
Note that the maximum frame size supported by VGA Grid HD Encoders is 1920×1200. If the DVI source frame size is already 1900×1200, the S-Video source cannot be streamed beside the DVI source.
Fine tune stream settings
Along with video/audio codecs and frame size, there are other configurable stream settings that affect quality and bandwidth. Like with frame size selection, values for these settings can be a tradeoff between bandwidth available and quality for stream viewers.
A table at the end of this section provides additional guidance for these settings.
If you have only configured an S-Video source, the fine tune settings are in the S-Video section of the encoding page, otherwise they are in the DVI section of the encoding page.
To fine tune your stream's settings
- Login to the Admin panel as admin. See Connect to the Admin panel.
- Click Encoding for the your channel; the encoding configuration page opens.
- Scroll to the Key frame interval setting.
- Click the Key frame interval drop-down box to choose how often a key frame (a frame that contains all the pixels) is sent when streaming the video. The longer the key frame interval the smaller the video file size, and vice versa.
- If desired, change the Limit frame rate. The default should be adequate in most applications. While decreasing the limit may improve system performance, you may need to test different values to balance video smoothness and processing power.
- If using H.264 or MPEG4 video codecs, you can increase or decrease image quality by increasing or decreasing the target Bitrate value, although in most cases auto is the best value. Video with a high level of motion and high resolution, such as a sporting event, requires a high bitrate.
- If all your changes are complete, scroll to the bottom of the page and click Apply.
Stream settings guidance
| Key frame interval | The key frame interval feature specifies how often a key frame (a frame that contains all the pixels) is sent when streaming the video. This setting also impacts how quickly a video moves through the frames when a viewer uses the search function of their media player. Increasing the number of seconds between key frames can significantly reduce your bandwidth and system resource usage with minor impact to your video quality. A good rule of thumb is to keep the interval between 2 to 3 seconds and decrease the key frame interval as the motion increases. Try different settings and note changes in the video quality. If your video quality is poor and jittery you may need to decrease the interval between key frames. If you have unlimited bandwidth and system resources you can choose an option to stream key frames only. | ||||||||||||
| Frame rate | Frame rate reflects the number of images captured by the device per second. Reducing the frame rate reduces bandwidth usage, and vice versa. The system's ability to maintain a set frame rate is based on several factors, for example:
When adjusting the frame rate, you may need to try different values to achieve the best outcome. The following table provides the performance expectations when typical settings are used. Performance expectations
| ||||||||||||
| Bitrate | In general, higher bitrate mean higher image quality in the stream, at the cost of higher bandwidth needed to transmit it. For comparison against something you are likely familiar with, an HD Blu-ray video is typically in the range of 20 mbps, standard-definition DVD is usually 6 mbps. If you don't know what value to use, a good place to start is 5000 kbps (slightly less than a typical DVD). Test to see how this works for your viewers and adjust. |
Configure audio codec
If your VGA Grid HD Encoder has an attached audio source your stream will by default use the AAC audio codec at 48 kHz. You can modify this setting to best match your streaming or post-processing needs.
To configure your stream's audio codec
- Login to the Admin panel as admin. See Connect to the Admin panel.
- Click Encoding for the your channel; the encoding configuration page opens.
- Scroll to the Audio settings section.
- Ensure the Enable audio checkbox is checked.
- Choose an audio codec from the Audio format drop-down menu. A table at the end of this procedure gives details about each option.
- Select stereo or mono from the Audio channels drop-down, depending on your needs.
- Select an Audio bitrate from the drop-down menu. The table at the end of this procedure gives some guidance on audio bitrates.
- If all your changes are complete, scroll to the bottom of the page and click Apply.
Audio codecs and bitrate guidance
| Value | Description |
|---|---|
| AAC | AAC is the default audio codec. |
| MP3 | MP3 provides a common audio format for audio storage. Flash (FLV) doesn't support 48 kHz MP3 audio. When selecting this value you'll need to use a media player (or install ASF browser plugins) to preview your channel. |
| PCM | Pulse Code Modulation (PCM) is a standard for digital audio in computer and other devices such as, digital telephone systems. Flash (FLV) doesn't support 48 kHz PCM audio. When selecting this value you'll need to use a media player (or install ASF browser plugins) to preview your channel. |
| G.711 8KHz (a-Law) | Used primarily in North America for streaming and recording voice. This codec uses only 64 kbps of bandwidth. |
| G.711 8KHz (µ-Law) | Used in counties outside North America. |
Codec and file format compatibility
Not all streaming and recording prootocols support all combinations of video and audio codecs. Use the tables below to determine what settings work for your streaming and recording needs.
The following table displays the compatibility between the video/audio codecs and formats supported for streaming.
| Video Codec selected | Audio Codec selected | RTSP | FLV | ASF | MPEG-TS | MJPEG |
|---|---|---|---|---|---|---|
| H.264 | No audio codec | ü | ü | ü | ü | |
| H.264 | LPCM | ü | ü | ü | ||
| H.264 | MP3 | ü | ü | ü | ü | |
| H.264 | AAC | ü | ü | ü | ü | |
| MPEG-4 | No audio codec | ü | ||||
| MPEG-4 | LPCM | ü | ||||
| MPEG-4 | MP3 | ü | ||||
| MPEG-4 | AAC | ü | ||||
| MJPEG | No audio codec | ü |
The following table displays the compatibility between the video/audio codecs and formats supported for recording.
| Video Codec selected | Audio Codec selected | MP4 | AVI | MOV | MPEG-TS |
|---|---|---|---|---|---|
| H.264 | No audio codec | ü | ü | ü | ü |
| H.264 | PCM | ü | ü | ü | |
| H.264 | MP3 | ü | ü | ü | ü |
| H.264 | AAC | ü | ü | ü | ü |
| MPEG-4 | No audio codec | ü | ü | ü | |
| MPEG-4 | LPCM | ü | ü | ü | |
| MPEG-4 | MP3 | ü | ü | ü | |
| MPEG-4 | AAC | ü | ü | ü | |
| MJPEG | No audio codec | ü | ü | ü | ü |
