Switching while live streaming and recording
The Switcher interface lets you easily live switch between custom layouts with the simple press of a button.
To switch a layout while live streaming and/or recording:
- Log in to Epiphan Live; the Dashboard view opens by default. See Accessing Epiphan Live.
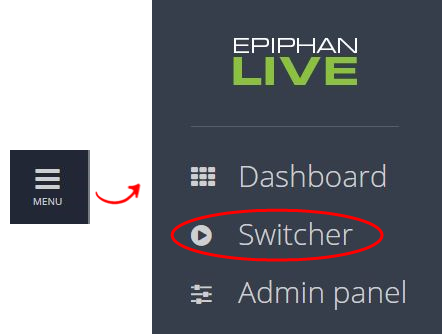
- Click the Menu icon in the upper-right corner of the Dashboard screen and click Switcher to navigate to the Switcher interface.
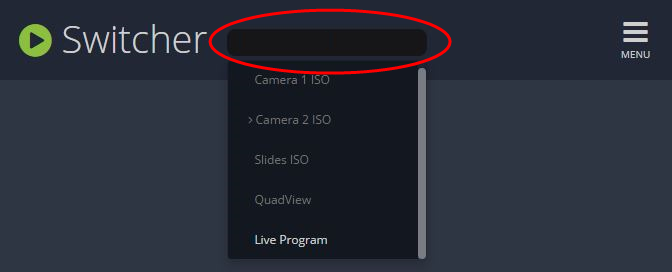
- Click the text box next to the "Switcher" header and select your desired channel from the dropdown list (the text box will appear blank if this is your first time configuring the Switcher interface). Note that in the channel dropdown list, channels containing only a single layout are grayed-out and are not selectable.
After selecting your channel from the dropdown, the Switcher interface appears with all of your channel's layouts displayed along the bottom of the page.
The layout currently being streaming and/or recorded is displayed in the Live view panel on the right side of the interface (see Networked VGA Grid User Guide You are here: Start here > Epiphan Live > Live switching using the Switcher interface > Understanding the Switcher interfaceLive switching using the Switcher interfaceUnderstanding the Switcher interfaceSwitching while live streaming and recordingUnderstanding the Switcher interface The Switcher view is a simple interface used to seamlessly switch between a channel's custom layouts while live streaming and/or recording. (See Create a local custom channel or layout for more information on creating custom layouts.)The Switcher interface is accessed from the Menu button in the Dashboard interface (see Networked VGA Grid User Guide You are here: Start here > Epiphan Live > Streaming, recording and monitoring using the Dashboard interface > Understanding the Dashboard interfaceStreaming, recording and monitoring using the Dashboard interfaceUnderstanding the Dashboard interfaceConfiguring Dashboard panels for visual confidence monitoringMonitoring video and audio sourcesControlling streaming and recording using Epiphan LiveUnderstanding the Dashboard interfaceYou are first presented with the Dashboard interface upon logging in to Epiphan Live. The Dashboard interface contains many helpful elements used for confidence monitoring and streaming/recording control, described in the Elements in the Dashboard interface table below. The Dashboard view is responsive and automatically adjusts and repositions its elements to fit cleanly within any size web browser window.Elements in the Dashboard interfaceNumberTitleDescription1Dashboard header iconsWarning – This icon displays only if there are any configuration errors in your channels, sources, streams or recordings. Clicking the icon displays more detail about the errors.Save – Saves any Dashboard layout changes. Note that you need to press Save to preserve your layout setting. When a layout is saved, all other operators and administrators will see your configured Dashboard layout when they log in or refresh their Epiphan Live page.Menu – When clicked, displays links to the Switcher view and Admin panel.2Dashboard monitoring panels Configurable panels used for confidence monitoring. You can set each panel to display a source, channel, output or basic system information. Note that the Dashboard monitoring panels appears blank by default when logging in for the first time. 3Dashboard panel navigation iconsClick to navigate between three different sets of Dashboard monitoring panels. The illuminated icon represents your currently displayed panel set.4Dashboard panel set quantity icons2x – Changes the quanity of Dashboard panels per set to 2 (as in the screen shot above).4x – Changes the quantity of Dashboard panels per set to 4.5Video inputsDisplays a list of your video inputs configured in the Admin panel and includes basic status information for each input.6ChannelsDisplays a list of your channels configured in the Admin panel and includes streaming and recording control buttons for each channel.7Audio inputsDisplays a list of your audio inputs configured in the Admin panel. Includes basic status information and a VU meter for each input.8RecordersDisplays a list of your recorders configured in the Admin panel and includes a recording control button for each recorder.).The Switcher view is responsive and automatically adjusts and reposition its elements to fit cleanly within any size web browser window.See the Elements in the Switcher view table below for a description of each visual element in the Switcher interface.Elements in the Switcher viewNumberTitleDescription1Channel selectorSelect from a list of channels (configured via the Admin panel) to display custom layouts specific to your selected channel. Note that when a channel is selected, you can only switch between layouts within that channel.2Menu iconDisplays links to the Dashboard view and the Admin panel when clicked.3Preview panelDisplays a preview of a selected layout, outlined with a green border. When the Switch button is clicked, this preview layout becomes the live layout. See Networked VGA Grid User Guide You are here: Start here > Epiphan Live > Live switching using the Switcher interface > Switching while live streaming and recordingLive switching using the Switcher interfaceUnderstanding the Switcher interfaceSwitching while live streaming and recordingSwitching while live streaming and recordingThe Switcher interface lets you easily live switch between custom layouts with the simple press of a button.To switch a layout while live streaming and/or recording:Log in to Epiphan Live; the Dashboard view opens by default. See Accessing Epiphan Live.Click the Menu icon in the upper-right corner of the Dashboard screen and click Switcher to navigate to the Switcher interface.Click the text box next to the "Switcher" header and select your desired channel from the dropdown list (the text box will appear blank if this is your first time configuring the Switcher interface). Note that in the channel dropdown list, channels containing only a single layout are grayed-out and are not selectable.After selecting your channel from the dropdown, the Switcher interface appears with all of your channel's layouts displayed along the bottom of the page. The layout currently being streaming and/or recorded is displayed in the Live view panel on the right side of the interface (see Understanding the Switcher interface).Click your desired layout at the bottom of the page to dock it in the Preview panel. This is the layout that will be used next in your program.Click the Switch button in the center of the screen to apply your layout in the Preview panel into your live stream/recording program.From here, you can prepare to apply another layout to your program by selecting a new layout from the list and docking it into the Preview panel.Networked VGA Grid User Guide You are here: Start here > Epiphan Live > Live switching using the Switcher interface > Switching while live streaming and recordingLive switching using the Switcher interfaceUnderstanding the Switcher interfaceSwitching while live streaming and recordingSwitching while live streaming and recordingThe Switcher interface lets you easily live switch between custom layouts with the simple press of a button.To switch a layout while live streaming and/or recording:Log in to Epiphan Live; the Dashboard view opens by default. See Accessing Epiphan Live.Click the Menu icon in the upper-right corner of the Dashboard screen and click Switcher to navigate to the Switcher interface.Click the text box next to the "Switcher" header and select your desired channel from the dropdown list (the text box will appear blank if this is your first time configuring the Switcher interface). Note that in the channel dropdown list, channels containing only a single layout are grayed-out and are not selectable.After selecting your channel from the dropdown, the Switcher interface appears with all of your channel's layouts displayed along the bottom of the page. The layout currently being streaming and/or recorded is displayed in the Live view panel on the right side of the interface (see Understanding the Switcher interface).Click your desired layout at the bottom of the page to dock it in the Preview panel. This is the layout that will be used next in your program.Click the Switch button in the center of the screen to apply your layout in the Preview panel into your live stream/recording program.From here, you can prepare to apply another layout to your program by selecting a new layout from the list and docking it into the Preview panel.4Live view panelDisplays the layout currently being streamed and/or recorded, outlined with a red border. When the Switch button is clicked, this live layout is replaced with the layout in the Preview panel.5Layout selection panelDisplays small previews for all layouts contained within your selected channel. Click a layout from this list to add it to the Preview panel. Note that the layout selected for the Preview panel has a green border and the layout in the Live view panel has a red border.6Switch buttonWhen clicked, the layout in the Preview panel replaces the layout in the Live view panel, and is immediately reflected in your streaming and/or recording.).
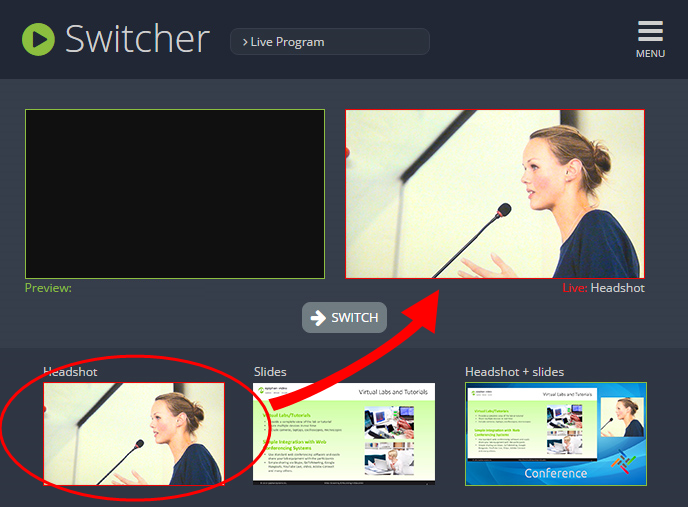
- Click your desired layout at the bottom of the page to dock it in the Preview panel. This is the layout that will be used next in your program.
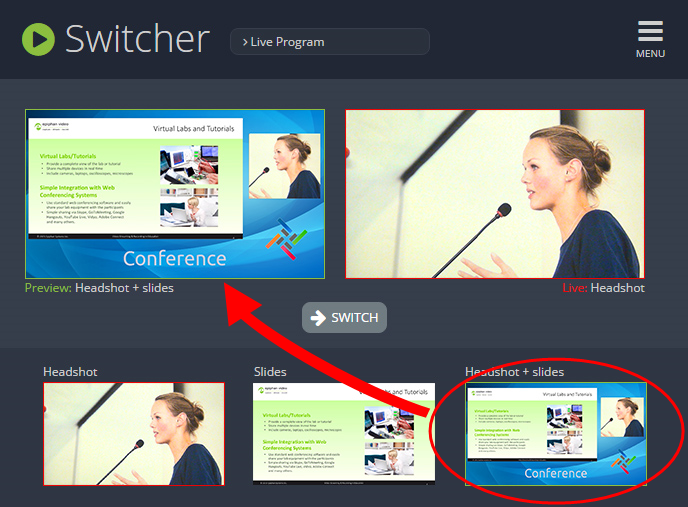
- Click the Switch button in the center of the screen to apply your layout in the Preview panel into your live stream/recording program.
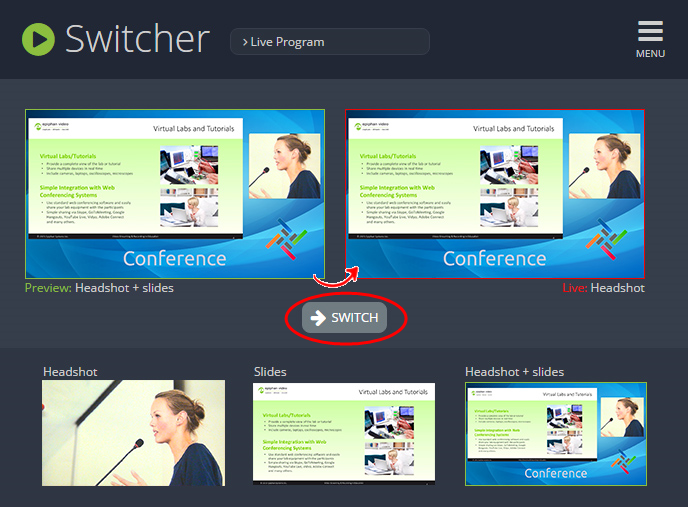
From here, you can prepare to apply another layout to your program by selecting a new layout from the list and docking it into the Preview panel.
