Configure a source
Generally the captured stream doesn't require any additional configuration, but if needed, you can log into the Admin panel to make configuration changes.
To configure a source:
- Login to the Admin panel as admin. See Connect to the Admin panel.
- Ensure a source is connected to the input port, see Connect a source.
From the Admin panel, scroll to the Sources menu option.
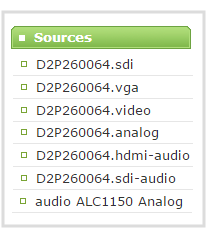
- Click the source link for your source (
- If desired, scroll to the bottom of the source configuration page to see the video Snapshot.
- Make note of the name of the source, or optionally, change the source name to reflect the data it is capturing. You'll need to know this name to add the source to a channel. See Create a simple channel.
- In most cases the video is ready to add to a channel and broadcast. If fine adjustments are required, refer to the table below to make minor configuration changes.
DVI and HDMI signals
Although many options can be listed on the .vga (DVI) source configuration page, only certain ones are applicable to DVI or HDMI signals. When you have a digital source connected, the page indicates that most changes are not configurable.
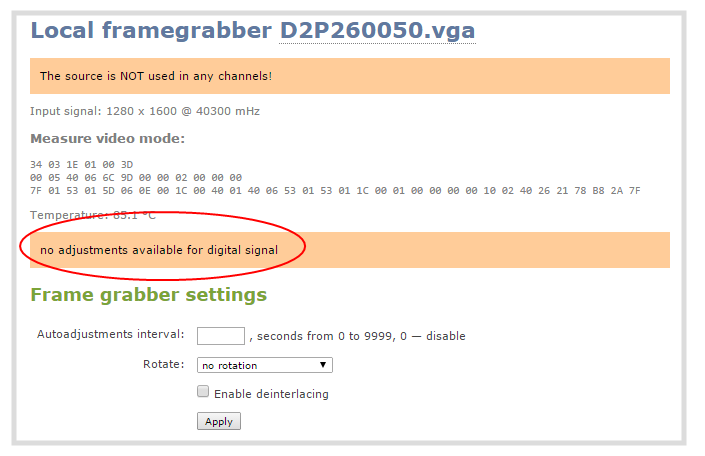
The following values are configurable for digital sources connected to the DVI port:
| Value | Description |
|---|---|
| When a source is setup, the system automatically detects and adjusts the image capture settings at start up and continues to adjust every 60 seconds during operation. To change the number of seconds between update, enter a value, or 0 to disable the feature, otherwise the default of 60 seconds is set. | |
| Rotate | This feature is useful when a source captures video that is rotated 90⁰ or is displayed upside down. Choose one of the following values to change the video orientation while streaming:
Note that rotating a source can result in "No Signal" if the rotated image is outside the bounds of the display. |
| Enable deinterlacing | Enable this feature to convert an interlaced source signal to a non-interlaced signal. |
The following options are available for DVI and HDMI signals via the HDMI port:
| Value | Description |
|---|---|
| Rotate | This feature is useful when a source captures video that is rotated 90⁰ or is displayed upside down. Choose one of the following values to change the video orientation while streaming:
Note that rotating a source can result in "No Signal" if the rotated image is outside the bounds of the display. |
| Enable deinterlacing | Enable this feature to convert an interlaced source signal to a non-interlaced signal. |
| Image | This menu allows you to choose a custom no-signal image for the channel. The drop-down list gives you the option to choose the default image or any image you have uploaded through the Add a No Signal image to a source |
| Timeout | The timeout represents the number of seconds after losing the signal that the no-signal is displayed. You may change this number to adjust how soon you wish the no-signal image to appear after the signal disappears. |
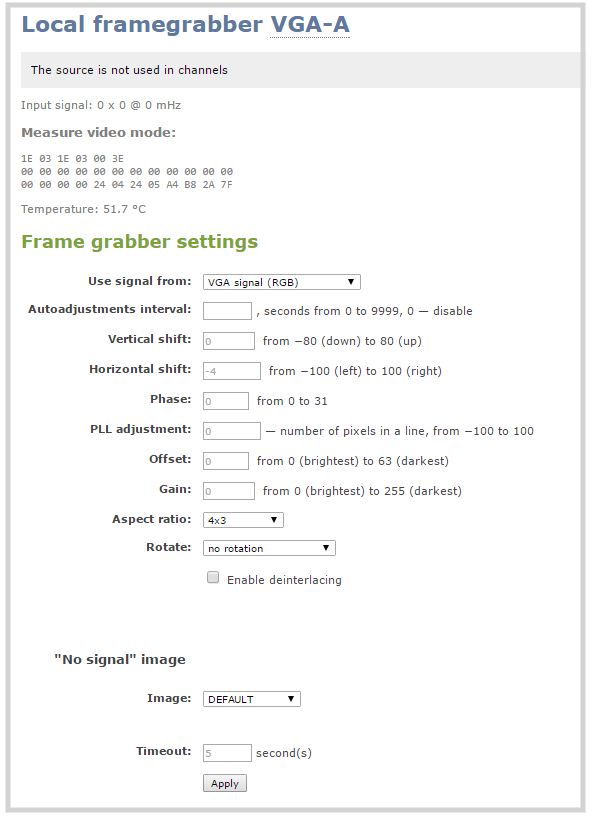
VGA signals (coming in via DVI port)
The following values are configurable for VGA signals coming in via a VGA/DVI port.
| Value | Description |
|---|---|
| Use signal from | Specify the native color space of the signal source, either RGB or YUV. The following values are available:
Configurable for VGA sources only. |
| When a source is setup, the system automatically detects and adjusts the image capture settings at start up and continues to adjust every 60 seconds during operation. To change the number of seconds between update, enter a value, or 0 to disable the feature, otherwise the default of 60 seconds is set. | |
Vertical shift | When an image is not aligned in the window, use this feature to move an image up or down on the screen. The values range from 20 (moves the image up) to – 20 (moves the image down). |
Horizontal shift | When an image is not aligned in the window, use this feature to move an image left or right on the screen. The values range from -999 (moves the image to the left) to 999 (moves the image to the right). |
Phase | Specifies phase adjustments for VGA signals. Generally not used unless value is provided by Epiphan support. Configurable for VGA sources only. |
PLL adjustment | Changing the value adjusts the horizontal resolution of the image. Adjust the value using small increments until the image is sharper. The value ranges from 0-999 to 999. Configurable for VGA sources only. |
Offset | The Offset and Gain parameters function as contrast control for an image. The Offset controls the darker parts of the image and the gain controls the bright parts of the image. Adjust both values to optimize image quality. Adjust the values using small increments until the image is sharper. If you set Offset to a high value, set a high value for the gain to balance the two. Configurable for VGA sources only. |
Gain | The Gain and Offset parameters function as contrast control for an image. The Gain controls the bright parts of the image and Offset controls the darker parts of the image. Adjust both values to optimize image quality. Adjust the values using small increments until the image is sharper. If you set Offset to a high value, set a high value for the Gain to balance the two. Configurable for VGA sources only. |
| Aspect Ratio | Sets the aspect ratio of the captured image. The default is 4:3. Set the value to Wide mode when capturing images that have a wide aspect ratio. Using the incorrect setting causes the image to be distorted or stretched. Configurable for VGA sources only. |
HSync threshold | Adjust horizontal sync detection. Configurable for VGA sources only. |
VSync threshold | Adjust vertical sync detection. Configurable for VGA sources only. |
| Rotate | This feature is useful when a source captures video that is rotated 90⁰ or is displayed upside down. Choose one of the following values to change the video orientation while streaming:
Note that rotating a source can result in "No Signal" if the rotated image is outside the bounds of the display. |
| Enable deinterlacing | Enable this feature to convert an interlaced source signal to a non-interlaced signal. |
| Image | This menu allows you to choose a custom no-signal image for the channel. The drop-down list gives you the option to choose the default image or any image you have uploaded through the Add a No Signal image to a source process. |
| Timeout | The timeout represents the number of seconds after losing the signal that the no-signal is displayed. You may change this number to adjust how soon you wish the no-signal image to appear after the signal disappears. |
SDI signals
The following options are available for signals via the SDI port.
| Value | Description |
|---|---|
| Rotate | This feature is useful when a source captures video that is rotated 90⁰ or is displayed upside down. Choose one of the following values to change the video orientation while streaming:
Note that rotating a source can result in "No Signal" if the rotated image is outside the bounds of the display. |
| Enable deinterlacing | Enable this feature to convert an interlaced source signal to a non-interlaced signal. |
| Image | This menu allows you to choose a custom no-signal image for the channel. The drop-down list gives you the option to choose the default image or any image you have uploaded through the Add a No Signal image to a source |
| Timeout | The timeout represents the number of seconds after losing the signal that the no-signal is displayed. You may change this number to adjust how soon you wish the no-signal image to appear after the signal disappears. |
RTSP sources
RTSP sources are configured for connection to your Standalone VGA Grid using the Source URL, Username and Password specific to your selected RTSP source. (See Connect an RTSP source for more information).
RTSP sources can be further configured with a Preferred transport protocol (either UDP or TCP) and a custom "No signal" image. (See Add a No Signal image to a source ).
