Resize and position layout items using percents or pixels (custom channel)
You can position and resize layout items (images, overlay text, sources) using the percent/pixel adjustment boxes in a channel's custom layout. See Resize layout items and Position layout items.
There are 3 adjustment boxes along your layout's horizontal axis and another 3 boxes along the vertical axis. You can enter percent or pixel values into checked adjustment boxes (bordered with red) to position and resize your item(s).
![]()
Percent values are used in adjustment boxes by default, and can be converted to pixels by simply overwriting the percent value in a given adjustment box and replacing it with a pixel value.
When entering percent values, ensure the suffix "%" is added to your value (i.e. "20%").
When entering pixel values, ensure the suffix "px" is added to your value (i.e. "200px"). A layout item's total pixel dimensions are a reflection of your channel's frame size, as configured in your encoding settings (see Configure encoding ).
Unchecked boxes are grayed-out in color and are not directly editable but dynamically change their values to reflect a 100% total of either the horizontal or vertical axis, depending on values entered in adjacent adjustment boxes. See the Adjustment boxes for item resizing and positioning table below for more information.

The values contained in checked boxes (bordered with red) are anchored and do not dynamically adjust their values.
Adjustment boxes for item resizing and positioning
| Item | Description |
|---|---|
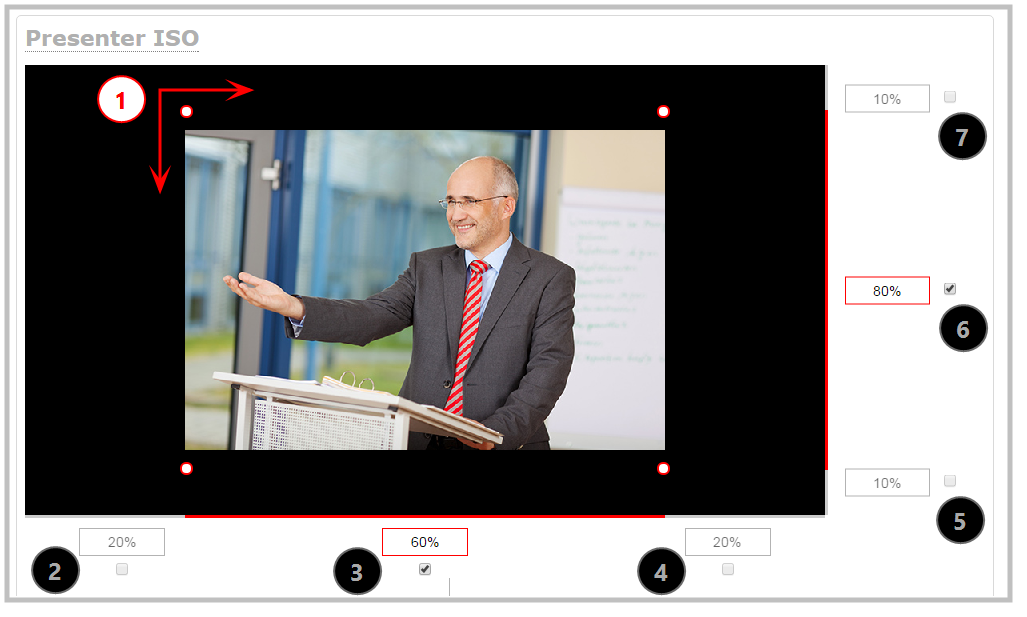
| 1 | The area of your layout item. The 4 red/white dots represent the boundaries of your layout item. There may be some black space between your item and its boundaries if Keep aspect ratio when scaling is enabled (see Add an image (custom channel)). |
| 2 | The percentage of blank space (or number of pixels) from left to right on the layout's horizontal axis. (I.e. the item is displaced 20%, or 200px, to the right). |
| 3 | If using percents, this value is the item's percentage of total width on the layout's horizontal axis. (I.e. the item takes up 60% of the layout's width – represented by a thin red bar above the percent box). If using pixels, this value is the item's width, in pixels, with a maximum pixel width (i.e. frame size) identified in your channel's encoding settings Configure encoding . |
| 4 | The percentage of blank space (or number of pixels) from right to left on the layout's horizontal axis. (I.e. the item is displaced 20%, or 200px, to the left). |
| 5 | The percentage of blank space (or number of pixels) from the bottom upward on the layout's horizontal axis. (I.e. the item is displaced 10%, or 100px, from the bottom up). |
| 6 | If using percents, this is the items percentage of total height on the layout's vertical axis. (I.e. the item takes up 80% of the layout's height – represented by a thin red bar to the left of the percent box). If using pixels, this value is the item's height, in pixels, with a maximum pixel width (i.e. frame size) identified in your channel's encoding settings Configure encoding . |
| 7 | The percentage of blank space (or number of pixels) from the top downward on the layout's vertical axis. (I.e. the item is displaced 10%, or 200px, from the top down). |
Resize layout items
The easiest way to resize a layout item is to use the center adjustment boxes (annotated as #3 and #6 in the image above) on each of the horizontal and vertical axes to set your item's width and height respectively. You can also use your mouse cursor to select the corners and manipulate them into the size you want. Hold the shift key while doing so to keep the frame size constant. If you need to crop your image, see Add a video source (custom channel).
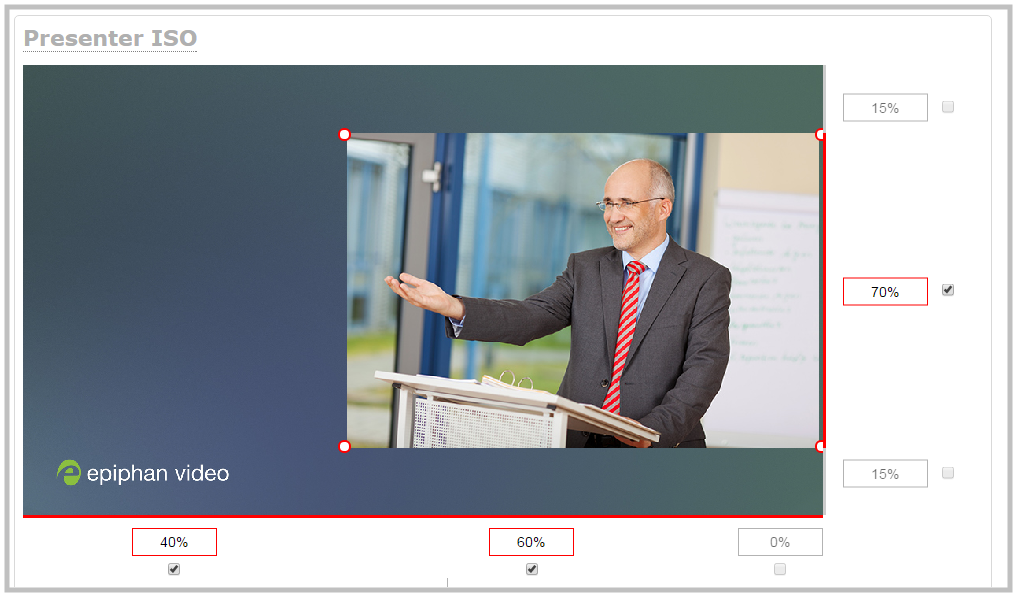
In the example above, the presenter video source is resized to 60% of the layout's width and 70% of the layout's height (with aspect ratio maintained). (Alternatively, pixels could be used to resize the layout item in a similar fashion.)
An important consideration when resizing layout items
Your item will resize automatically if both left and right (or top and bottom) adjustment boxes contain values (percents or pixels) that exceed the total of 100% (if using percents), or maximum pixel count (if using pixels) for the corresponding horizontal (or vertical) axis.
For example, if you originally set the width of an item to 50% of the layout area (or 960 pixels, assuming your item has a maximum width of 1920 pixels in this example) with no values entered in the left and right adjustment boxes (i.e. the left and right boxes are deselected), the item automatically centers itself in the layout area with the left and right percents at 25% each (remember – percents are used by default in the layout editor, even if pixels are used in adjacent boxes). Combined with the 50% (960px) width of the image, these two 25% (480px) values total 100% (1920px) of the layout's horizontal axis.
If you instead decide to enable the left and right percent boxes and change their values to 30% each (instead of the current 25%), then the image's width shrinks from 50% (960px) to 40% (750px) to accommodate the change and maintain a total layout width of 100% (1920px).
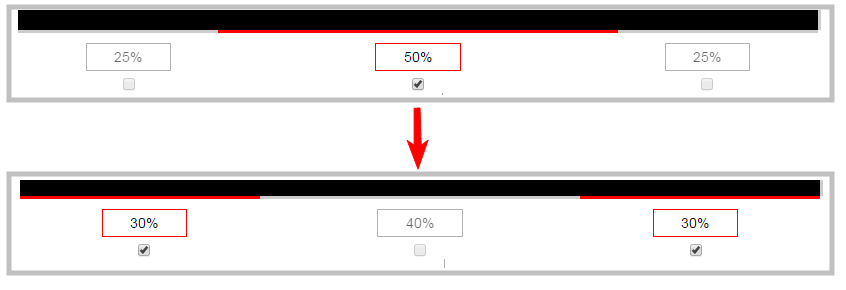
Setting the left and right (or top and bottom) percent values so the axis total among the three percent boxes exceeds 100% will always result in the center percent box value automatically reducing itself to maintain the 100% total, shrinking your selected layout item in the process.
Position layout items
Items are positioned in a custom layout by entering values into the left/right and top/bottom adjustment boxes (identified as #2/4 and #5/7 respectively in the Adjustment boxes for item resizing and positioning table above). The values entered into these boxes represent a portion of the total percentage (or pixels) of the layout's width or height.
Alternatively, you can position your layout items using the keyboard by selecting the item with your mouse cursor, and pressing the arrow keys to move the selected item by 5% in any direction.
You can also position your item with additional keyboard precision by holding Ctrl and pressing the arrow keys to nudge your item by a very small fraction in the direction of your choice.
Note that there is no one way to move and resize your layout items. The examples below are simply descriptions of one or two ways one might resize and/or position layout items.
Example 1: horizontal positioning using percents
To position your item along the horizontal axis, first resize your items if desired (as described in Resize layout items), then enter a percent or pixel value into either the left or the right adjustment box to shift your layout item.
For example, using percents to move a layout item with a 60% width as far to the right of the layout area as possible, you would need to enter 40% into the left percent box to push the item to the right. The layout item originally takes up 60% of the layout width, so this added 40% shift pushes the item as far to the right as possible (I.e. 100% of the horizontal axis).
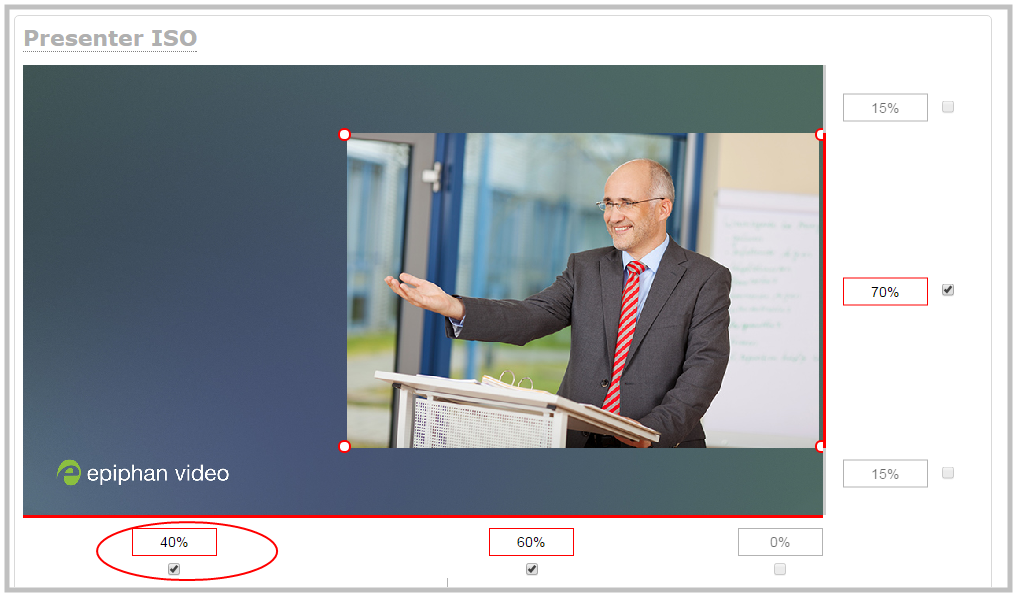
The right adjustment box automatically sets itself to 0% to reflect that there is more no room remaining to maneuver the image along the horizontal axis any further. (Alternatively, you could reposition the image in the exact same way by instead setting the right percent box to 0%).
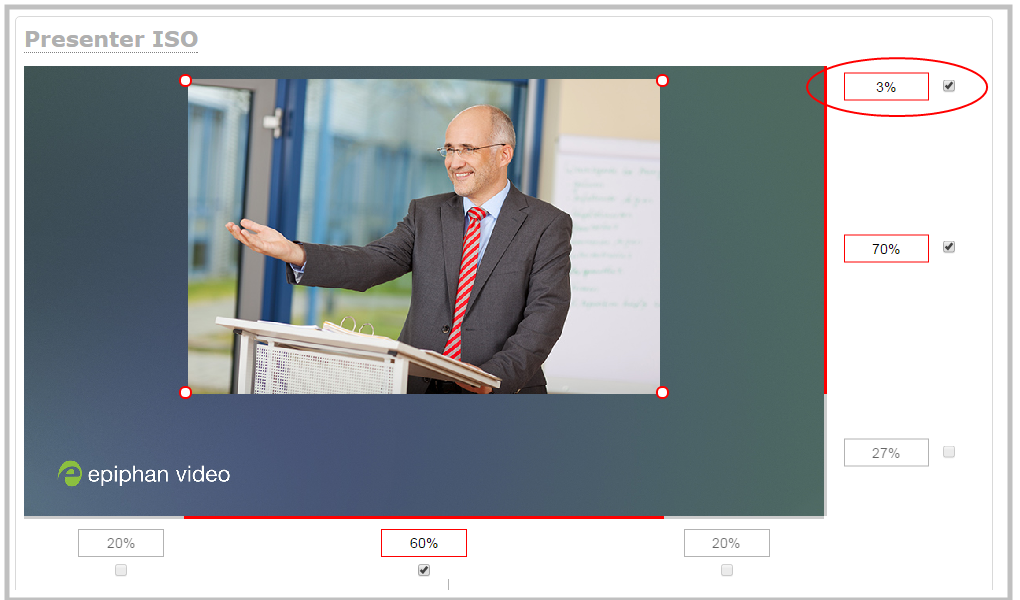
Example 2: vertical positioning using pixels
To position your layout item along the vertical axis, enter a percent or pixel value into either the top or the bottom adjustment box to shift your layout item downward or upward, respectively.
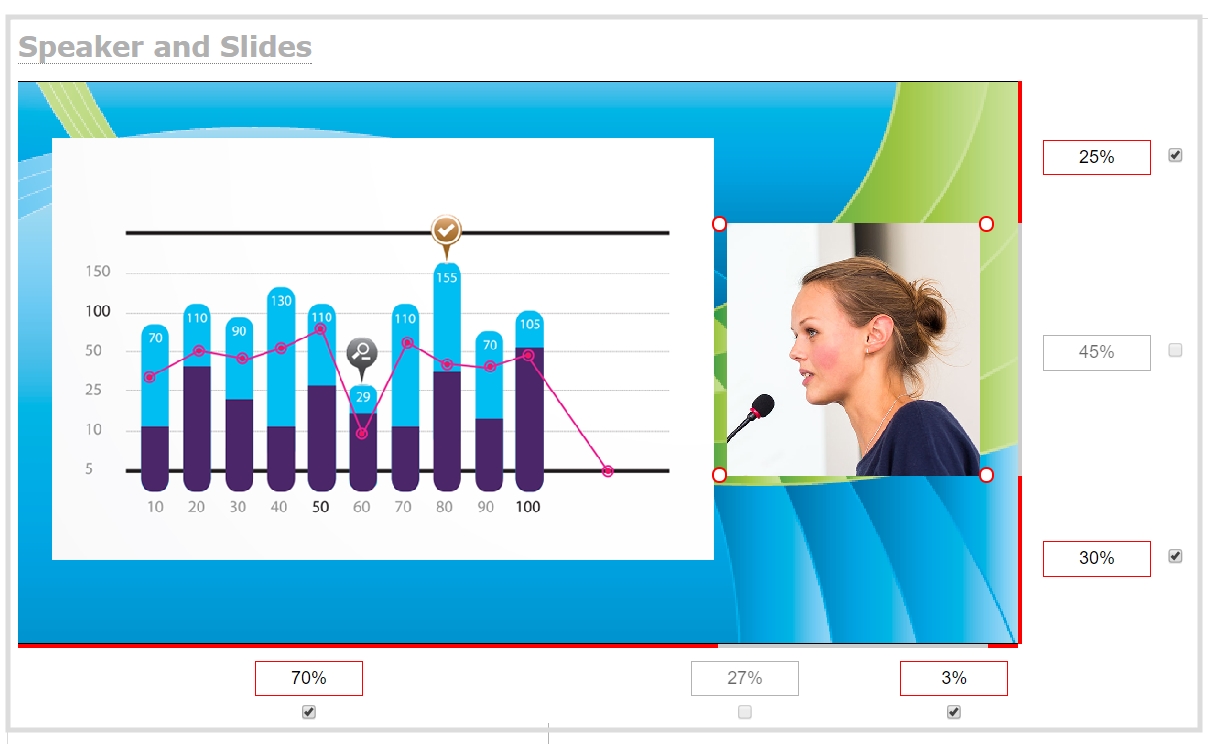
For example, using pixels to move a layout item that is set to 756px in height to the top of the layout while leaving a small margin of background (say 25px), you could either enter "25px" into the top percent box (to specify the small margin from the top down) or enter 27% into the bottom percent box (to specify a 27% margin from the bottom up – added to the item's 70% height this leaves a 3% margin above your layout item.)
As mentioned above, there is no one particular way to use the adjustment boxes for resizing and positioning of your layout items. The layout editor interface is flexible enough to allow you to manipulate your layout items any way you see fit. Create the perfect layout for your audience– using percents, pixels, your keyboard or any combination thereof!
An example of using pixels and percents to created a fully configured custom layout with two sources and a background image.