While single-camera streaming to Facebook Live can be accomplished with ease using Epiphan’s Webcaster X1 for Facebook Live device, there are those who’d like to stream to Facebook Live while also switching between more than one video source or camera.
It’s easy to stream a multi-source live production to Facebook Live using Epiphan’s powerful all-in-one live production switcher devices, Pearl and Pearl-2. However—some video content professionals do not require all the features that these versatile appliances offer, or perhaps instead prefer a lower-cost solution that fits within a budget. Luckily, an alternate solution is available in these cases.
This page guides you through the process of using popular live streaming platform OBS Studio (free to use) with Epiphan AV.io video grabbers to live stream a affordable multi-source setup to Facebook Live.
To stream a multi-source production to Facebook Live, you need the following:
- A Facebook account with administrator access to a Page, Event, or Group.
- One of Epiphan’s easy-to-use AV.io video grabbers: AV.io 4K, AV.io HD, or AV.io SDI.
- One or more additional video sources, such as an integrated or USB webcam, (or even a second HD camera attached to another AV.io video grabber).
- A capture computer, preferably also with a dedicated graphics card. (You can use a Mac, Windows or Linux-based computer.)
- Open Broadcaster Software (OBS) Studio.
- Network connection for streaming.
You’ll first need to connect your AV.io video grabber to capture the video signals from your camera or video source. Repeat this step for any additional AV.io devices you’d like to use in your setup.
- Connect your HDMI™, SDI, DVI or VGA source to your AV.io capture device using a cable that matches the signal type. (i.e. an HDMI source would connect using an HDMI cable).
- Connect a USB 3.0 cable from the bottom of the AV.io device to a USB 3.0 port on your capture computer. (A USB 3.0 cable is supplied with every AV.io video grabber).
AV.io video grabbers do not require any driver installation or configuration. AV.io devices work with the UVC/UAC drivers already installed on your Windows, Mac, or Linux computer and are therefore sensed as web cams when connected.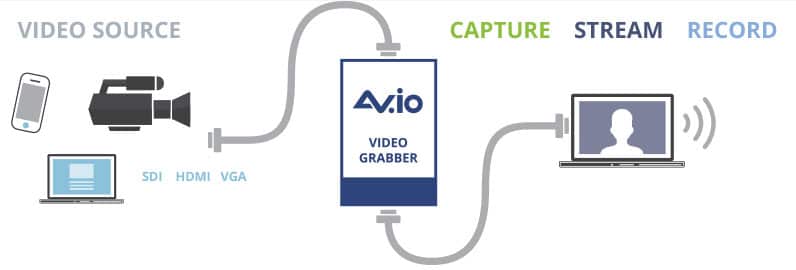
This How-to article uses OBS Studio 17.0.0 (released December 24th, 2016). Download OBS Studio here: https://obsproject.com/download then install and start the application.
We recommend OBS Studio in particular because it is open-source and therefore free to use. Our testing also indicates OBS Studio as an effective and reliable encoding/streaming/recording application.
.Next you’ll need to add your AV.io device as a video source to your OBS Studio scenes. Repeat this step for any additional AV.io devices used in your live production.
- With a scene selected in the Scenes section at the bottom of the OBS Studio window, click the + sign in the Sources pane, then Video Capture Device; the Create/Select Source dialog appears.
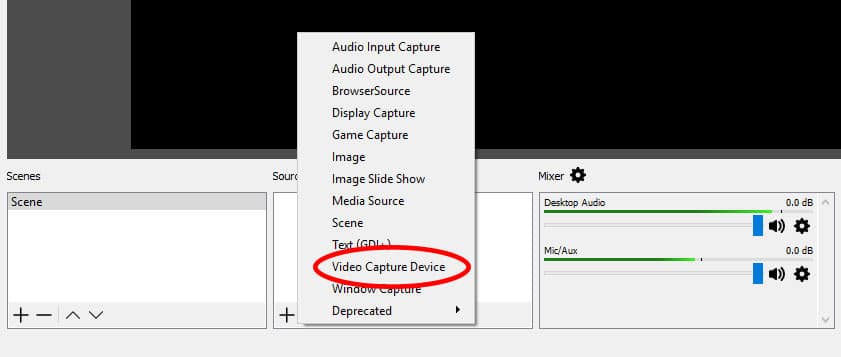
- Give your new source a name (like “AV.io HD”) and click OK.
- Set the following options and leave the remaining settings at defaults (see image below):
– Device: <The name of your AV.io device, as listed> (e.g. “AV.io HD Video”)
– Resolution/FPS Type: Custom
– Resolution: 1280x720
– Use custom audio device: Checked
– Audio Device: <The name of your AV.io device, as listed> (e.g. “AV.io HD Audio”)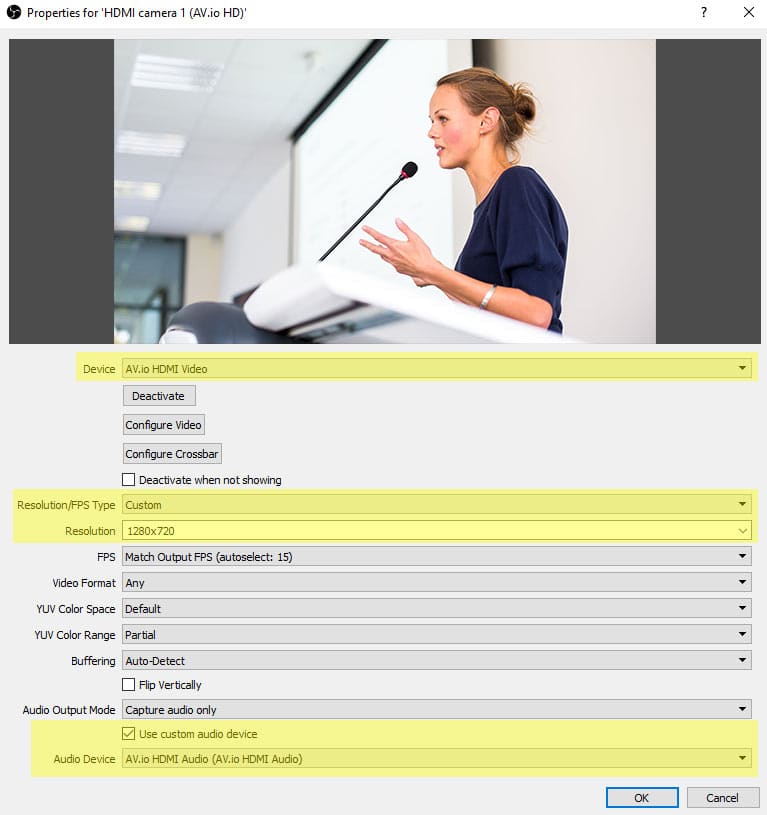
- Click OK.
After adding your AV.io video grabber as a source, you’ll next need to create a new scene repeat the process for any additional sources you’d like to use in your live production.
What other kinds of sources can I add in OBS Studio
OBS Studio allows you to add the following types of sources in your scenes for multi-source streaming:
- Display sources (e.g. monitors attached to your capture computer),
- Media files (like video files or recordings),
- Image files (e.g. backgrounds or overlay text),
- Game capture devices (i.e. video game applications),
- Video capture devices*, and more.
*The “Video capture devices” category includes things like webcams, capture cards, or any type of video device connected to your computer. Therefore, all AV.io capture devices (AV.io 4K, AV.io SDI and AV.io HD) fall under this category.
Create a new scene by clicking the + sign in the Scenes pane and rename the scene to your liking. When you’re production is live, you’ll be switching between these scenes containing your sources.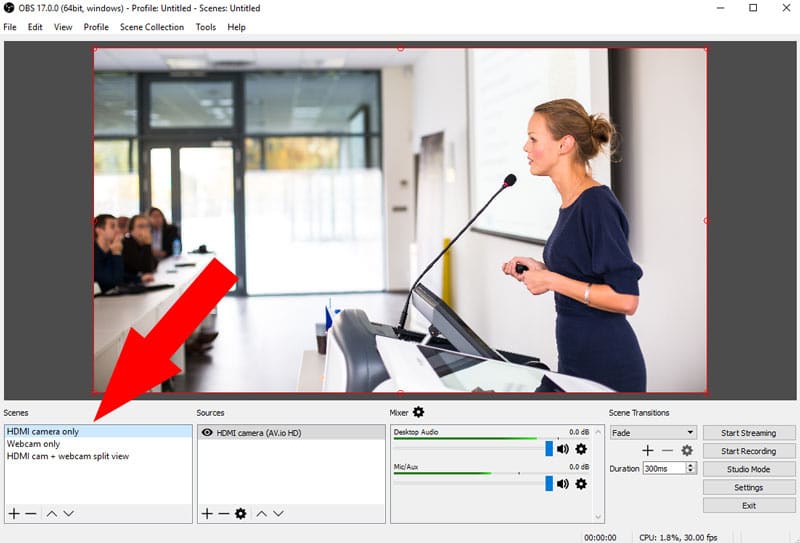
You’ll now need to collect a unique “stream key” from your Facebook page. OBS Studio uses this unique key to communicate with Facebook Live and live stream your production.
- In a web browser, navigate to your Facebook Page, Event, or Group.
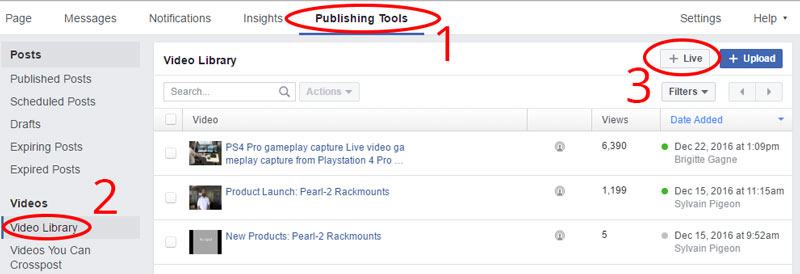
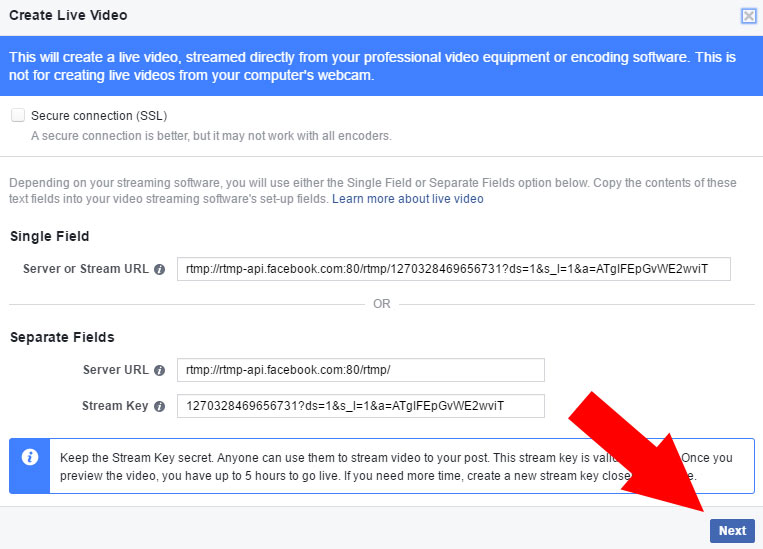
- At the top of the web page, click Publishing Tools, then Videos, and then click +Live; the live stream configuration window appears.
- Copy or make note of the Stream key. (The Server URL field can be safely ignored; OBS Studio doesn’t require this particular information.) Leave this page open in your browser, as you’ll need to return in Step 6.
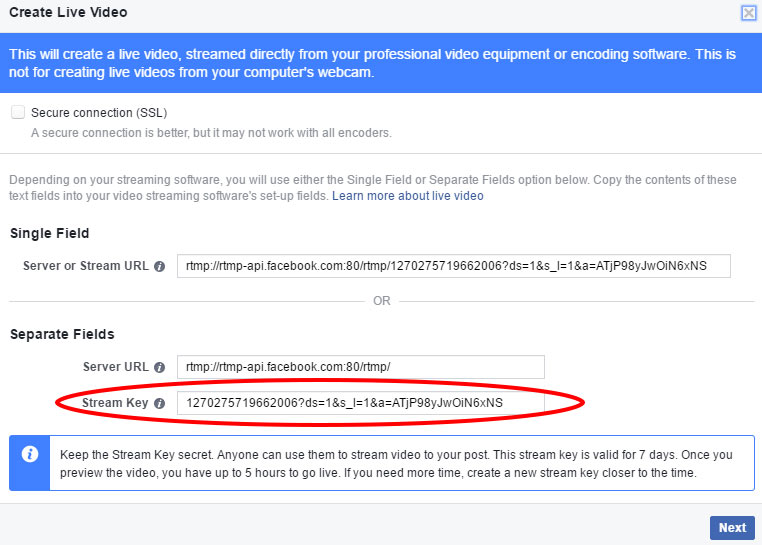
The Facebook Live stream key you just found now needs to be entered into OBS Studio.
- Click the Settings button in the lower-right corner of the OBS Studio interface to open the Settings window.
- Click Stream, then select Facebook Live from the Service drop-down menu and paste your key into the Stream Key field.

With your Facebook Live key copied into OBS Studio, you now need to configure some basic encoding settings for your live stream.
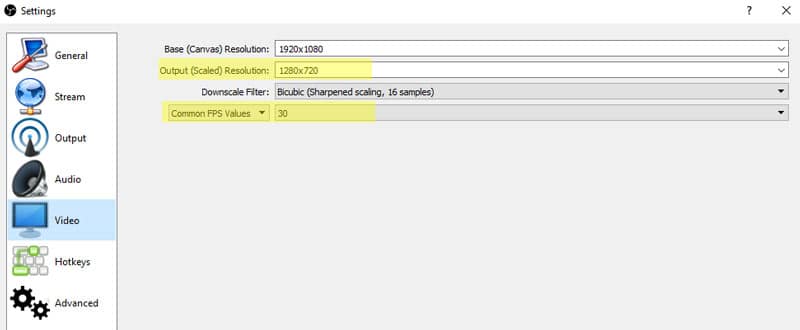
- Within the OBS Studio Settings window, click Video, then enter 1280x720 into the Output (Scaled) Resolution field and 30 into the FPS field.
- Click Output, and set your desired bitrate in the Video Bitrate field (Facebook Live supports a maximum bitrate of 4000 kbps). If you’re streaming audio, set the Audio Bitrate to 128.

-
- At this point, all other values (codec, colorspace, etc) can be left at default. However, you can still choose to configure any additional settings, such as audio, if desired.
What are the main defaults I should be aware of?
OBS Studio 17.0.0 has the following defaults for values not mentioned above (you do not need to alter these values to stream to Facebook Live):
- Audio:
- Audio sample rate: 44.1khz
- Channels: Stereo
- Video:
- Downscale filter: Bicubic (sharpened scaling, 16 samples)
- Streaming:
- Output Mode: Simple
- Encoder: Software (x264)
- Advanced:
- Process priority: Normal
- Renderer: Direct3D 11
- Color Format: NV 12
- YUV Color Space: 601
- YUV Color Range: Partial
- Automatically Reconnect: Enabled; 10 seconds Retry Delay; 20 Maximum Retries
In the OBS Studio main view, click Start Streaming to push the stream to Facebook Live. You are not live streaming at this point; you need to preview and confirm the stream via Facebook before the stream is actually published (see Step 9 below).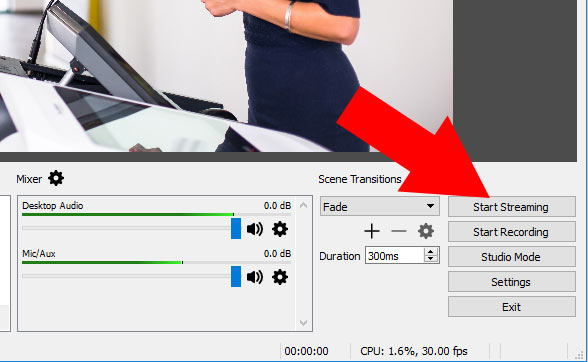
Now that your production is configured and broadcasting to Facebook Live, you need to return to your Facebook page and perform some final verification before the stream is formally published.
- From your Facebook browser window or tab, click the Next button at the bottom-right corner of the window to open the preview page.
- Verify that your stream is coming through correctly, and when satisfied, use the fields on this page to add a video title, keywords, and accompanying text to post alongside your live stream.
 If you receive a “Stream is offline” message, make sure you started streaming from OBS Studio (see Step 8 above). If you still have issues, ensure the stream key was copied correctly.
- If your stream will last for longer than 90 minutes, click the Advanced tab and click the This video is a continuous live video checkbox. Ignore this step if your stream will not last longer than 90 minutes.
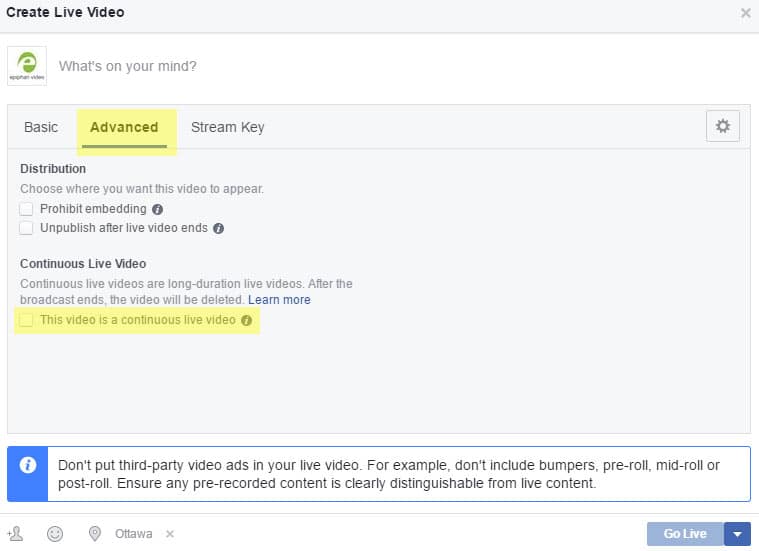
- When you’re ready to start live streaming to your Facebook followers, click the Go Live button at the bottom-right corner of the page. (Note that the Go Live button remains disabled until a valid stream sent from OBS Studio is detected.)
The Result
Congratulations—you’re now streaming a multi-source live production! Switch between scenes containing your camera/video source (connected to your AV.io capture device) and any other sources to create a dynamic live event for your Facebook followers.
When your live event is complete, simply return to OBS Studio and click Stop Streaming to end the stream.
