
Avoid these five live video streaming production blunders for better video streaming results.
Anybody who’s done live video streaming knows that once you click that “go live” button that’s it – you’re live! People are watching and may even start commenting.
Although everybody likes watching gag reels of bloopers, here are five live video streaming production blunders that are best to avoid.
1. Not enough pre-production planning (aka the wreck!)
Having a plan is the backbone that supports your onscreen talent and helps you reach your ultimate goal. Sure, there’s an element of “anything can happen” when you’re live. That’s part of the appeal. But without some idea of the marks to hit, your stars will likely lose some luster and get lost in the Milky Way.
Live streaming production needs some degree of planning upfront. If not, you could end up at a location without power, be missing equipment, or worse. So these are some items to consider ahead of time:
- What’s the theme, goal or purpose?
- What’s the location and time? Is it indoors or outdoors, night or day, a quiet studio setting or a bustling café? And do you need permission to film there?
- Make an equipment list to account for things like cameras, tripods, lighting (especially if you’re not outdoors), microphones, cables, AC power, extra batteries, tape and scissors, whatever you need.
- Onscreen talent and signed release forms if you’re not the only one in front of the camera.
- A friendly crew. (Ok, any person willing to help is better than no crew, but it’s way better if they’re friendly.)
- Other items including things like scripts, props, backgrounds, seating, etc.

2. Not enough upload bandwidth (and I didn’t quite get around to testing a live stream)
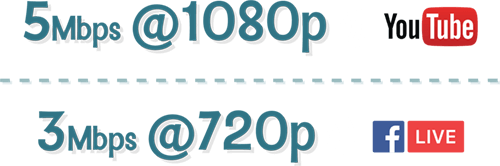
This blunder can stop you right in your tracks. Without enough bandwidth, your live stream can randomly freeze during the broadcast (buffering), drop content, and appear choppy. You need at least 5 Mbps upload bandwidth to stream at 1080p to YouTube and at least 3 Mbps to stream at 720p to Facebook Live. And those amounts assume that nobody else uses some of that upload bandwidth while you’re streaming live! If you can, testing the Internet service at the venue before your live event is best. If you can’t, then at least confirm that there should be enough upload bandwidth available to you. For more, see Live Streaming bandwidth – how much do I need?
If you’re using a video streaming product like Epiphan Pearl or Pearl-2, you can stream your live webcast to more than one service at the same time (i.e. multi-streaming). In that case, you’ll need to account for the extra bandwidth.
Tip: Aim to stream using the frame size recommended by your CDN (such as YouTube or Facebook) rather than sending a larger frame size and relying on your CDN to downscale. The larger the frame size, the more bandwidth you need to stream it.
3. Poor sound or the audio is out of sync
Bad audio can greatly impact your live video streaming event. Common issues include: too much background noise, not enough volume, or too much volume which causes the audio to distort. If your camera or live video streaming setup supports using external microphones, you can choose the right microphone for the job. For example, a lavaliere mic used in a noisy location significantly reduces background noises from being picked up in your live stream. But if you’re limited to using the built-in microphone in your camera, you may need to choose a quieter location or live stream at a time when it’s less noisy.
Another consideration is to choose the right audio codec and sample rate. If you’re audio is out of sync, then look at your audio codec selection. Also look at the codec requirements of the Content Distribution Network (CDN) or service like YouTube and Facebook Live to make sure you’re using the settings they recommend.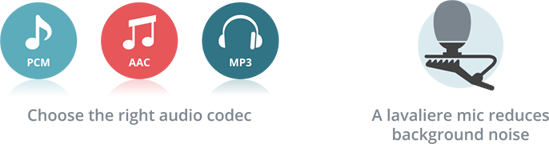
4. DSLR cameras with HDMI output problems
Essential to any live streaming setup is your camera. Some DSLR cameras are marketed as supporting HDMI video out, but don’t actually deliver what you need for live video streaming.
Some cameras have dirty HDMI output, for example the Canon G7x MK.II. This means the on-screen display appears in the HDMI output and there’s no way to turn it off. Another common complaint is there’s no audio sent with the HDMI output, like the Canon T5i and T6i, or the Nikon D3200 and D600. And in some of the older generation cameras, or cameras designed primarily as still image cameras, the HDMI outputs are only good to play back recorded video and won’t send live video out for streaming, like the Olympus OM-D E-M5 Mark II.
It sure would be easier to choose the right camera if the specifications listed by the manufacturer made the HDMI output capabilities clear, but that’s often not the case. So do your research. Don’t find out the hard way after purchasing the camera that it doesn’t deliver the HDMI output you need for live streaming. For instance, the Panasonic GH4 is a DSLR that outputs clean, HDMI video at 1080p with audio. Or choose a good camcorder, such as the Canon EOS C100 or HD G20.
Once you’ve selected a camera, you can pair that with an Epiphan Video AV.io video capture card for live streaming on Microsoft Lync, Skype, PS4, or many other applications.
5. Bad lighting
You can cover over a lot of other issues, like a low-quality camera, with a few well-placed lights. Using a basic 3-point lighting setup and learning to use the white balance on your camera will greatly improve the picture quality of your live video stream. Even outdoors, a simple reflector to fill-in the light in the shadows is a cheap and very effective way to improve the look of your live video stream.
Not all situations need a lot of extra lighting, but relying on the existing fluorescent lights in a room just won’t give you the look you want (unless you’re going for the green Martian look!). Purchasing some good quality lights is essential, but there are cheaper alternatives if you’re budget is tight. For example, you can use lamps with bright, daylight temperature bulbs or rig something up with parts from your local hardware store. Consider purchasing a good key light and then using reflectors to add the fill. There are plenty of great ideas (and cheap ones) to help brighten up your location. A simple search on the Internet for lighting techniques should yield plenty of ideas.
Finally, here is an infographic to help you remember these tips!

Wrap it up!
A little upfront planning, along with the right camera and equipment, will definitely help you achieve the live video streaming results you want. Adding an Epiphan Video AV.io video capture card to your setup is an economical way to do live video streaming with Microsoft Lync, Skype, PS4, and other applications. If you’re video streaming larger events and looking for great value in an all-in-one hardware solution, Pearl and Pearl-2 offers features like encoding, video switching, multi-streaming, and recording.
I see above you mention the OMD EM5 mark II as able to output clean hdmi for streaming (ie without recording) but just today I realized at a live event that some onscreen displays still appear including face detection and battery meter… no good