
If you’re familiar with the basics of configuring live streams, you may have heard the terms multi-bitrate (MBR) and adaptive bitrate (ABR).
Distinct terms that are often used interchangeably, MBR and ABR are concepts that relate to how CDNs make your content available for viewers. Some CDNs use ABR and some use MBR—understanding the difference between these terms allows you to configure your encoder accordingly and ensure your chosen CDN can distribute your streamed content to viewers of all levels of bandwidth.
Adaptive bitrate
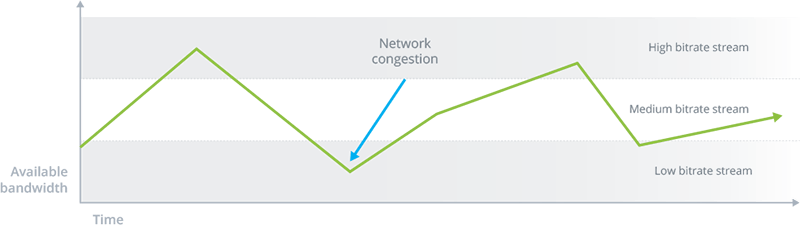
ABR is the more common of the two methods, used by many popular CDNs such as YouTube. With ABR, you send a single configured stream to the CDN. The CDN detects the bandwidth availability of each connected viewer and automatically transcodes the broadcast into a new stream with bitrate that is appropriate for each user’s respective network. In this way, ABR automatically “course corrects” your broadcast to ensure the viewer is able to continuously view your content without hitting a buffering wall.
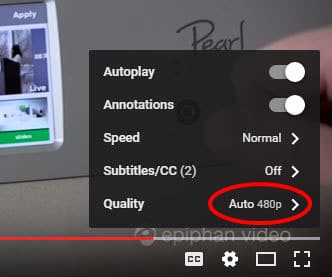
A CDN like YouTube would display an “Auto” option for viewers within a video’s viewing options. Selecting this option enables ABR, ensuring any restrictions or unexpected congestion on the viewer’s network does not hinder the stream from playing.
What does this mean for the encoder administrator? When broadcasting to a CDN that uses ABR, you’ll want to configure the highest-quality (i.e. high-bitrate and high-resolution) stream you’re able to upload based on your uplink bandwidth. Making such a high-quality stream available allows those viewers with the most bandwidth freedom to view your stream at its best possible quality while also simultaneously catering to lower-bandwidth viewers by automatically transcoding the stream to a level that matches the limits of their network.
Multi-bitrate
While adaptive bitrate automatically transcodes a single stream received from your encoder, multi-bitrate works a bit differently. With MBR, you need to configure and encode multiple streams of your program at different bitrates and broadcast to your chosen CDN.
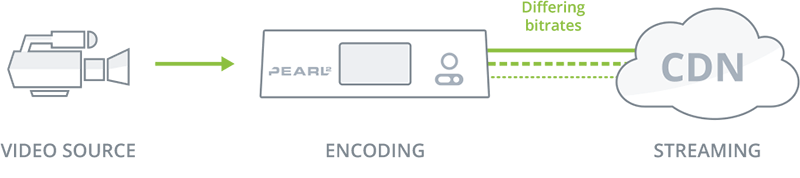
Encoding multi stream at different bitrates
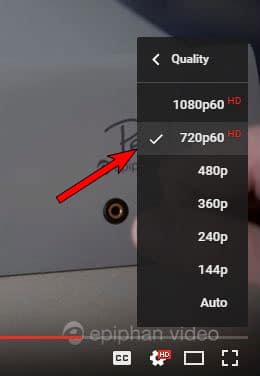
With multiple streams at hand, viewers can select whichever stream best suits their network’s bandwidth. To make things easier for the viewer to make a selection, streams are usually named according to their bitrate depth—High, Medium, Low, etc—or their resolution (Figure 4 to the left). These streams are displayed as choices within the CDN’s media player, typically under the Quality settings field.
Configuring your encoder for MBR: a brief How-to
If your chosen CDN uses multi-bitrate over adaptive bitrate, you’re probably wondering how to configure your encoder to send multiple streams of the same program. With Pearl and Pearl-2, this process is quite simple.
First, you’ll need to configure your channel’s layout to your liking by adding sources, backgrounds, images etc. The stream from this program will be your “High bitrate” broadcast, so you’ll need to set a relatively high bitrate—somewhere around 6 Mb/s or 4 Mb/s at 1080px.
Next, you’ll need to use your program’s RTSP address to add your program as a new RTSP source. Why? Because to send two broadcasts at different bitrates, you need a second channel that duplicates the original channel, but with different encoding settings. The easiest way to do this is to ingest your high bitrate channel as a new RTSP source and use this in your new low bitrate channel.
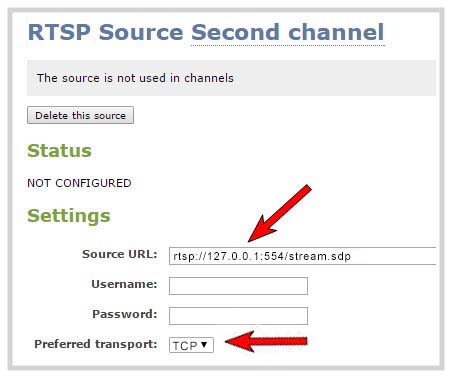
Important: When adding the channel as a new RTSP source, change the IP address of your Pearl-2 to ‘localhost’ or ‘127.0.0.1’. In the example above, the original address rtsp://192.168.0.129:554/stream.sdp was changed to the localhost variant rtsp://127.0.0.1:554/stream.sdp. Also ensure the preferred transport is set to TCP.
From here, create a new program and set the bitrate to a lower bitrate and resolution. Configure your new program’s custom layout(s) to match your first program and then add your newly-created RTSP source. The contents of your first channel are now effectively “linked” to this new channel, which effectively mimics the appearance of the first channel but serves as your “Low bitrate” broadcast.
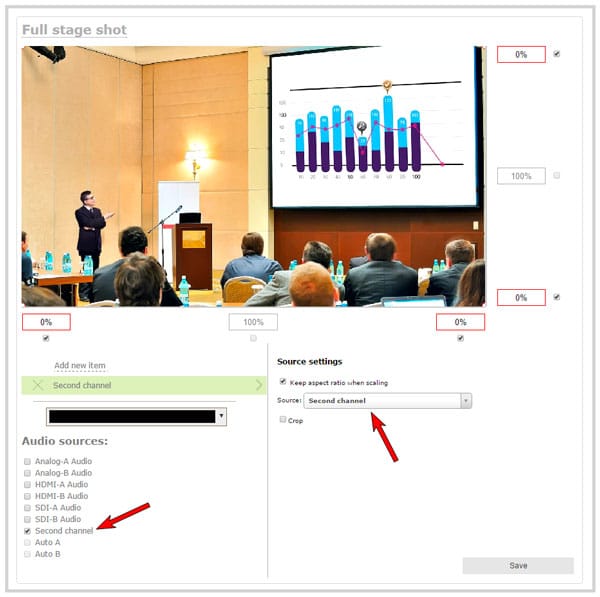
To make sure audio from the first channel comes through the RTSP source when added to this second channel, ensure the RTSP source is selected under ‘Audio Sources’, as in the image below.
Note: If you’re performing any live switching between layouts, this needs to be done from your original (first) channel. Repeat this process of adding your first program as an RTSP source for any additional programs you wish to create. Some CDNs that use MBR are happy with only “High” and “Low” bitrate broadcasts, but other CDNs may give you the option to send more than two programs to cater to as many viewers as possible.
When you stream both programs to your CDN, viewers will have the option of manually selecting whichever broadcast best matches their bandwidth limitations—achieving a smooth, buffer-free stream. It’s that easy.
Whichever method your selected CDN uses—adaptive bitrate or multi-bitrate—you’ll have the knowledge necessary to configure your encoder accordingly and deliver the best possible viewing experience for your audience.