10 pieces of essential audio equipment to record great audio for corporate and educational videos and live streams.
Whether you’re recording a screen cast at a computer, live streaming a video presentation, or setting up a video training studio, knowing what gear you need for good audio can be confusing. This article lists essential audio equipment and suggests gear that’s good value for price, as well as some premium options for:
- Recording screencasts or streaming at your computer
- On-site presentations
- Educational training videos
1. Microphones
As a piece of essential audio equipment, start with one mic but definitely plan to add more. Using different mics for different situations is practical, and having a spare mic as a backup is smart. Plus, if you’re recording multiple hosts or sit-down interviews, a matched pair of microphones (i.e. two mics of the same brand and model) provides a consistent sound.
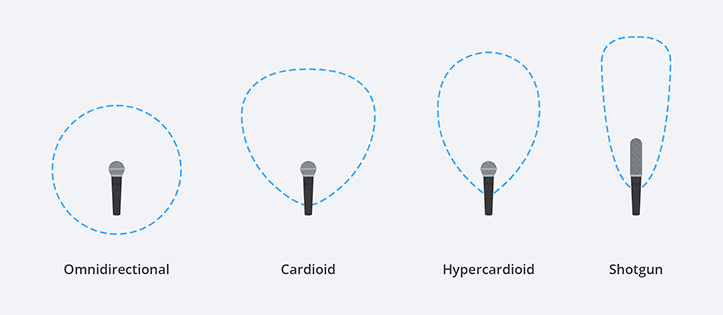
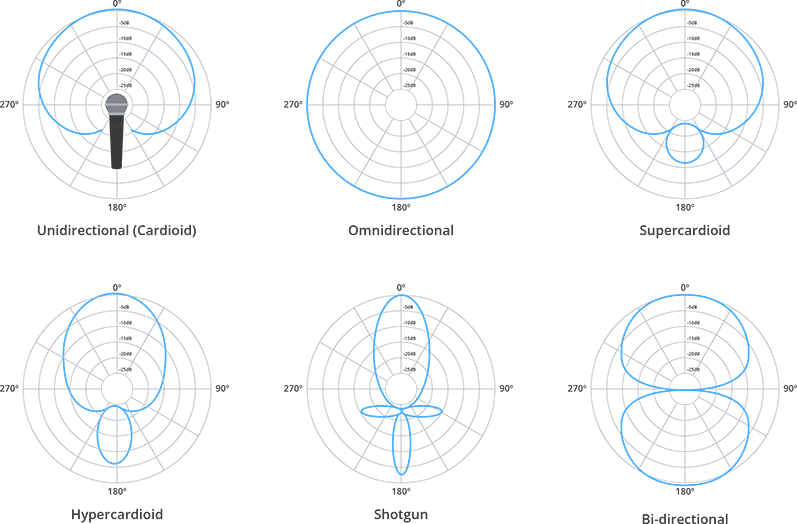
Whatever mic you choose, select a pickup pattern that’s best for your situation. In noisy environments or when you have several mics close together, a directional (cardioid) mic offers better isolation than omnidirectional (360⁰). For applications where loud speakers or noise isn’t an issue, an omnidirectional mic can be beneficial. Their tonal qualities are generally more natural sounding. A shotgun pattern, on the other hand, is great for capturing voice with some room ambiance for that “live on-location” sound with controlled directionality.
X-USB microphones and handhelds
Although reaching for a USB microphone like a Blue Yeti that plugs directly into your computer is convenient, I won’t suggest adding that to your essential audio equipment kit. USB microphones can be electronically noisy and look clumsy on video. Plus you won’t have much opportunity to use these mics for more than their intended use.
You may disagree with me about handheld mics, but since there are great options that let you mic discretely for video and live streaming, I don’t consider a handheld mic essential in these scenarios (ok – that’s out of the way).
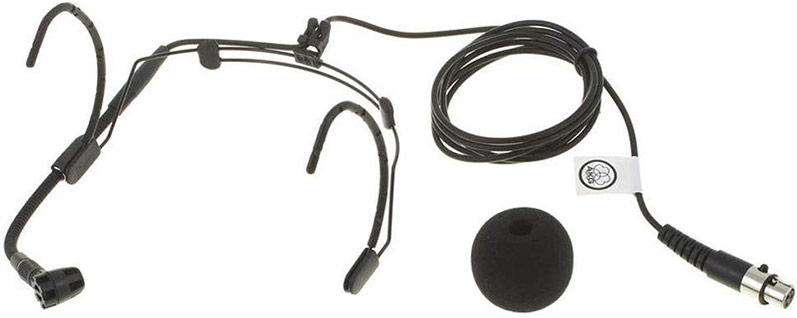
Headsets
A headset is essential audio equipment if you do lots of presentations and need ample mobility. If you don’t mind seeing a small microphone on your face, these can work better than lavalier mics in some situations. They also work well for screencasts. Wired and wireless options are available.
The AKG C520 wired headset rates well for voice quality and costs around $US200.00 (or less on sale). The C520 has a full size XLR connector on 10’ of cable that connects directly to your sound board or field recorder. It’s a bit bulky, but is good value for the money and more rugged than most. The condenser mic needs +48 Vdc phantom power. Since most consumer cameras and computers don’t have XLR connectors or phantom power, an inexpensive audio preamp like the Behringer U-Phoria UM2 (or a mixer) is essential.
Another option is the Rode HS2 omnidirectional headset. It has a 3.5 mm connector on 4’ Kevlar reinforced cable that you can use with wireless systems or wired (with some adaptation). It needs Plug In power (3 to 5Vdc), which can be down converted from an XLR source with phantom power using a Rode VXLR+ adaptor (not to be confused with a straight TRS to XLR adaptor that won’t pass power). The VXLR+ has a belt clip, so you could run an XLR cable over longer distances. Alternatively, an audio preamp that provides Plug In power will work too.
Going wireless requires the whole system: microphone, transmitter, and receiver. The cost can be sky high for a premium headset like the DPA d:fine series, Countryman E6, or Sennheiser HSP series. Some models include a built-in ear bud (or two) for monitoring. If complete freedom of movement and quality sound is a requirement, then consider wireless an expensive essential.
Lavalier mic
Discrete and easy to hide, lavalier microphones can be clipped onto a label, poked through a button hole, or taped to skin and fabric. They’re a piece of essential audio equipment to add to your kit for interviews and news casts where you don’t want to see a headset mic on your subject’s face. Wired lavalier mics are also great options for presentations and screencasts where you want some mobility and aren’t too far from capture and recording equipment.
A nice sounding wired option is the Rode SmartLav+. It’s an omnidirectional smartphone mic so it has a 3.5 mm TRRS (tip-ring-ring-sleeve) connector and requires 2.7 Vdc to operate. An inexpensive 3.5mm TRRS to TRS cable adaptor lets you connect it to mic inputs on cameras or field recorders that supply Plug In voltage (3 to 5Vdc), or you can down convert from phantom power using a Rode VXLR+.
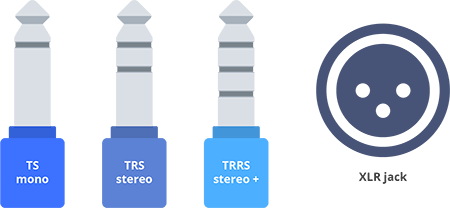
Since many computers and cameras don’t supply Plug In voltage at the 3.5 mm mic input, a preamp like the Behringer U-Phoria UM2 or the Focusrite SCARLETTE is essential (or a mixer as listed later in this article). To plug into the 3.5 mm mono mic input on a computer, you might need an XLR to TS adapter. If you’re connecting to a stereo 3.5 mm line input, you’re going to need an XLR to TRS adapter.
Another wired lavalier mic that rates well is the Audio-Technica Pro 70. This cardioid, condenser mic has 6’ of cable attached to a power pack that has an XLR jack. It takes power from AA batteries or +48 Vdc phantom, so an extra preamp isn’t needed.
A quality wireless option from Sennheiser is the ACX-ME2 set. A more economical option that sounds great is the Sennheiser XSW-D digital wireless portable lavalier set. The XSW’s 75 m range is more limiting and its RF frequency is locked in, which means you can’t adjust it if you run into RF interference on location. However, this is the same for other digital wireless systems, like the RodeLink Filmmaker kit.
Shot gun and on-camera microphones
For small video training studios or run and gun interviews, a shotgun microphone is a piece of essential audio equipment to have on hand. That said, videographers are moving away from overhead shotgun mics and opting for on-body mic options like lavaliers. We did that ourselves. But a quality shotgun mic like the Sennheiser ME66/K6 or the Rode NTG-2 can cost less than a high quality wireless lavalier system, so the choice is yours. There are self-powered, on-camera shotgun mics that plug directly into the 3.5 mm mic input on cameras (or computers), but you still need to be fairly close to your subject for best pick up.
Broadcasting mics
Voice over professionals prefer large diaphragm, broadcast-style microphones for their tonal quality, but they can be expensive. Cheaper alternatives exist that produce sound quality that’s perfectly adequate for training videos and screencasts. A Marshall MXL 2001 or Audio-Technica AT2035 are great sounding large diaphragm condenser microphones at a reasonable price. Keep in mind a condenser microphone needs phantom power or batteries to operate and an audio adapter/preamp to get it into a computer. Another alternative is the very tried and tested Shure SM7B – a dynamic microphone that’s still used for broadcasting and no batteries required. An XLR mic cable (male to female) is needed to plug these mics into an audio inserter, field recorder, or mixer.
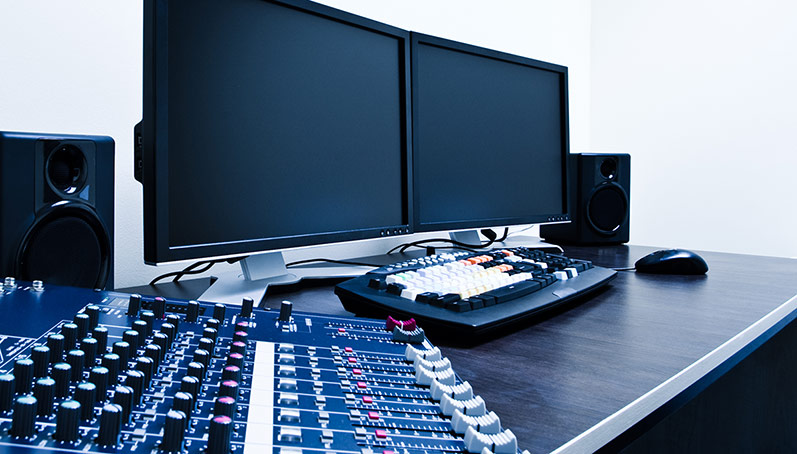
2. Audio mixer with EQ
Even for simple screencasts, an audio mixer with EQ is a piece of essential audio equipment. Sure you could use an audio inserter to match the signal levels of your mic with the inputs on a computer and provide a little gain, but a small mixer can do that and more. Mixers have gain control, tone adjustments, noise reducing filters, offer a variety of different inputs and outputs, and more.
The cost for a mixer depends on brand, quality (i.e. how much noise is introduced to the audio signal), and features. A small compact mixer that’s good quality for the price is the Soundcraft Notepad-8FX 8 channel mixer with USB. It has phantom power, high-pass (low cut) filter for noisy environments, and more. The Yamaha MG-10XU is highly rated with 10 channels, phantom power, plus a built-in compressor to smooth out the peaks and valleys for a more even signal. Brands like the Behringer Xenyx 1204USB also provide good value (at a lower quality).
For top brand names, consider the Mackie ProFX8v2 8-Channel Professional FX Mixer with USB or the 802VLZ4 if you don’t need USB. And if you absolutely want Soundcraft, the Signature 10 compact mixer is priced right with all the essential features like USB interface, phantom power, compressors, and more.
3. Compressor / limiter
If you don’t purchase a mixer that includes a compressor and you’re recording people who don’t have mic training, a compressor is definitely a piece of essential audio equipment. A compressor evens out the audio signal by reducing the dynamic range to eliminate the big peaks and low valleys. It gives you a more even “polished” sound. A compressor can save your recording from being ruined by a few loud, distorted clips. A limiter is basically a compressor that’s set more aggressively. In a nutshell, a limiter helps protect equipment from dangerously loud volume spikes. It blocks signals that are above a set threshold – chopping off the tops of those peaks. If you’re worried about blowing speakers, a limiter is essential.
4. Headphones / monitors
Without a good pair of headphones, you’re mixing blind! Even when recording directly to your computer using an audio inserter or mixer, a pair of good headphones is essential to monitor your recording without fear of feedback. Comfortable earbuds can also work if you’re just monitoring voice and don’t want to see bulky headphones on camera. And unless you’re close to the headphone output jack, picking up a handy 3.5 m stereo male to 3.5 mm stereo female extension cable is useful.
Choosing monitor headphones is subjective and can be pricey. I suggest selecting a pair that feels comfortable and has a neutral sound over headphones that boost the bass or high end. AKG is known for their high-end studio headphones, but they do have budget pleasing models like the K240 and the K550. Other quality headphones that won’t blow your budget include the Audio-Technica ATH-M50x and Pioneer HRM-7m. For a bit more money, try the impressive Focal Listen Professional. There are, of course, the studio benchmarks like the AKG K18 Pro and Sennheiser HD800.
Studio monitor speakers are great if you have a control room that’s isolated from your video studio space. It’s good to hear what your audio sounds like on speakers rather than just on headphones. Are studio speaker’s essential for a video training studio and screencasts? That depends on your application. But you could spend the money elsewhere, like a higher quality set of headphones. Some excellent studio monitors in the more affordable range include the IK Multimedia iLoud Micro Monitor, Yamaha HS5, and the RKR Rokit RP7 G4.
5. Field recorders
You could record directly to software on your computer when doing screencasts, but consider using a hand-held field recorder for better quality. Field recorders are easy to use and very portable. Most connect directly to computers and cameras, making them a convenient audio recording solution.
A field recorder like a Zoom H4n Pro can even take the place of an audio inserter to get your mic audio into your computer while at the same time record a backup to an SD card. Add a headphone splitter to the audio output jack and feed audio to a set of headphones and into your camera’s 3.5mm external mic input for a completely portable audio recording solution. The Zoom H4n Pro has two XLR inputs with +48 V phantom, a 3.5 mm Plug In voltage input, USB, line/headphone output, plus two built in cardioid stereo microphones at the top of the unit for a total of four recording tracks. Only need a single track? There’s a Zoom H1n for that.
Many different models and less expensive brands exist. Another option is the Tascam DR-40X with many of the same features of the H4n Pro except the built-in stereo mics are omnidirectional. However, the preamps of the Tascam are noisier than Zoom. You may prefer the Tascam DR-100MKII. To directly record a lavaliere mic, the Zoom F1-LP is an option. This Zoom field recorder can also connect to a computer like an audio interface and to the mic inputs on a camera. If you need more powerful gain at the XLR mic input, look at the higher Zoom models such as the H5, H6, or the Tascam DR-60DMKII.
6. Cables, adapters, and stands
You can never have enough cables, adapters, and different mic stands. For each mic you own, have at least two cables: a long XLR (25’) and a shorter XLR (8’). For camera mounted mics, consider having a 3.5 mm (stereo) female to male extension cable on hand. They’re useful if you ever need to tape your mic to a boom pole and get it closer to your subject.
A good sturdy mic stand like the Hercules MS533B EZ that can double as an overhead boom mic stand is useful if you have limited space for your gear. But you get what you pay for in terms of quality, so opt for a good stand. A cheap stand won’t hold up and are often unstable. Plus having at least one tabletop mic stand is an essential – like this foldable model from Ammoon. Add a gooseneck for better flexibility and reach.
Adaptors can get you out of a sticky audio situation. The Rode VXLR+ 3.5 mm mini jack to XLR with power converter is one we’ve talked about. Other adaptors to have around include a short XLR to 3.5 mm TRS cable to plug powered condenser mics into your camera (or computer), XLR to 1/4” adaptors, and 3.5mm (stereo) to RCA adaptors for line level connections.
7. Wind sock or pop filter
This often overlooked item is an essential to improve audio captured outdoors and in the studio. A wind sock or pop filter isn’t a magic bullet, but they go a long way towards eliminating unwanted room noise and loud vocal plosives. Use a wind sock if your subject is seen on video and when there’s wind. If what you see isn’t an issue, use the pop filter. Having both gives you choice. Other options if you’re looking to isolate your microphone from room noise is a product like the Kaotica Eyeball or the cheaper Alctron PF8 knock off. They’re very portable and help dampen room noise.
8. Audio treatment
To eliminate echo and other unwanted room noise from ruining your audio, apply audio treatment to walls and hard surfaces. Sure a large walk-in closet can produce a nice “dead zone” free of reverb and background noise, but maybe you don’t want to record in a closet. To dampen your room acoustics:
- Cover hard surfaces with cheap quilted moving blankets (don’t forget the floor if it’s not carpeted). For a few dollars more, get some quality acoustic blankets.
- Hang acoustic blankets or heavy drapes behind the microphone, over doors and windows, as well as behind you to eliminate slap back.
- Attach convoluted foam or even egg crates to walls. A DIY tip is to tack cheap, convoluted foam mattress toppers to walls. But be careful to avoid heat sources like studio lights. Polyurethane foam isn’t fire retardant.
Though not essential, a portable vocal isolation shield for recording sceencasts like the Stage Right Microphone Isolation Shield from Monoprice is handy – or make one using some foam around the mic. They help shield the mic from room noise entering the sides and rear of the mic, but you’ll still need some acoustic treatment to prevent echo from bouncing off the wall behind you and entering the front of the mic.
9. Amplifiers and preamps
Unless you’re driving external PA systems or studio monitors, a preamp is really the only essential audio equipment you need. Use a preamp to connect microphones with devices like computers and cameras that may not provide the required power to drive the mic (i.e. +48 V phantom or Plug In power), or when the device doesn’t have enough gain at the input. Some options include BeachTek DXA-HDV or the BeachTek DXA-Micro Pro+ XLR adapter for on-camera external audio with phantom-power and 3.5 mm Plug In voltage inputs and outputs to connect directly to your camera. Economical audio interfaces include the Behringer U-Phoria UM2 or for a bit more, the Focusrite SCARLETTE.
The Radial J+4 2-channel Signal Level Driver is really nice, but you’ll pay more for this signal level driver. It’s essential when you’re interfacing with pro equipment and your input device is 12 db too low. The signal level driver increases -10 (commercial line level) to +4 (pro line level). Or consider the ART CLEANBox Pro, which does two jobs, it converts consumer line level to professional line level and converts unbalanced signals to balanced. This blog talks more about audio input levels.
10. Bits and bobs
A pad (attenuator) is handy when you need to decrease the signal level of a device you’re plugging into your equipment. The Shure A15AS is switchable for either 15db, 20db, or 25db of attenuation and allows phantom power to pass through from your mixer to your condenser microphone.
A headphone splitter is also great to have on hand if you need to take audio from the output jack and feed it to a set of headphones and into the 3.5mm external mic input of a device like a camera.
Wrap it up!
To simplify streaming, switching, and recording video, consider the Epiphan Pearl all-in-one video production systems. They provide audio inputs for consumer, line, and mic level inputs with in-app gain and delay settings. For professional video production, the Epiphan Pearl Mini and the higher capacity Pearl-2 guarantee quality results without the hassle of a lot of complicated gear so you can focus on what’s really important – the content.
How do you use the Zoom F1 with OBS? I have it hooked up but unlike an H6 it doesn’t appear to have the setting to make it show up vs record