From voice over booths and pop-up studios in multi-use spaces, to a dedicated video studio setup – improve the production quality of your training videos with three easy how-to video studio setups.
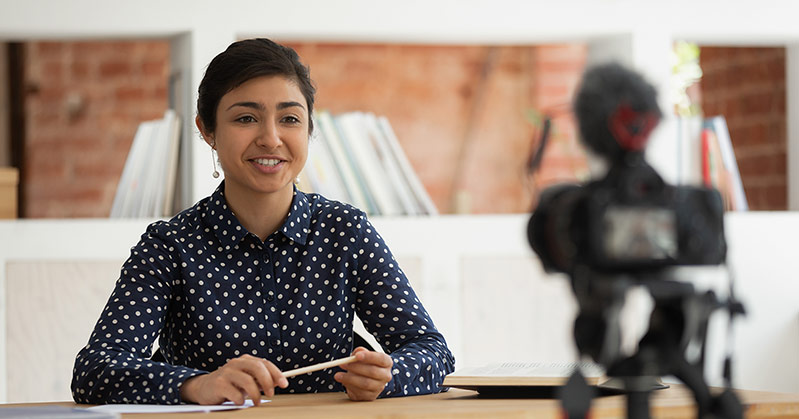
Still using the built-in webcam on your laptop and a mobile phone or cheap headset to capture tinny sounding audio? There are easy ways to get more professional looking (and sounding) corporate training and how-to videos.
Outstanding training videos share some common traits:
- A quiet, well-lit location that’s clear of clutter and other distractions.
- The subject is in focus and nicely framed (usually in the center).
- The presenter speaks to the camera and appears as though they’re looking at you, the audience, straight in the eye.
- Audio is loud and clear with no noticeable echo.
- There’s visual variety like text overlays, close ups, and switching between camera angles, images, or output from a computer.
If you’re ready to take steps to improve the production quality of your training videos, even a small investment in your how-to video studio setup can make a big difference. Here are some suggestions.
Voice over booth
If you’re doing voice overs for how-to screencasts, the average room generates a lot of background noise and is full of hard surfaces that cause echo. You don’t need to invest hundreds (or thousands) of dollars on an isolation (ISO) booth for great sounding voice overs. Choosing the right location and setup is key.
Room acoustics
Clap your hands and listen. Does the room sound hollow and echo? That’s how you’re voice over will sound without some acoustic treatment.
How the space sounds is more important than what it looks like for voice overs. A large walk-in closet can produce a nice “dead zone” free of reverb and background noises. But if setting up in a closet isn’t possible, here are some tips to dampen the room acoustics:
- Cover hard surfaces with cheap quilted moving blankets (don’t forget the floor if it’s not carpeted). For a few dollars more, get some quality acoustic blankets.
- Hang acoustic blankets or heavy drapes behind the microphone, over doors and windows, as well as behind you to eliminate slap back.
- Attach convoluted foam or even egg crates to walls. A DIY tip is to tack cheap, convoluted foam mattress toppers to walls. But be careful to avoid heat sources like studio lights. Polyurethane foam isn’t fire retardant.
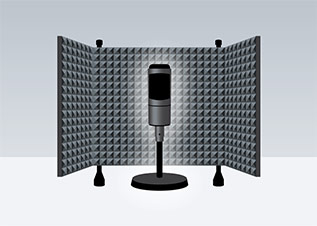
If you want a less permanent and more compact solution for screencast voice overs, consider a portable vocal isolation shield like the Stage Right Microphone Isolation Shield from Monoprice – or make one using some foam around the mic. They help shield the mic from room noise entering the sides and rear of the mic, but you’ll still need some acoustic treatment to prevent echo from bouncing off the wall behind you and entering the front of the mic.
Another option to help isolate your microphone from room noise is a product like the Kaotica Eyeball or the cheaper Alctron PF8 knock off. They’re very portable and help dampen room noise. However, you’ll still want to hang an acoustic blanket behind you to stop sound from bounding off the wall and over your shoulder into the microphone.
Audio capture
Getting up close to a good unidirectional microphone with a wind sock or pop filter improves the quality of your voice over. The unidirectional pattern picks up voice in front of the mic and not a lot of noise from the sides and rear.
A USB microphone that plugs directly into your computer is probably the easiest to use for voice overs. A popular one is the Blue Yeti. But USB microphones don’t produce super high quality sound. They can even introduce electronic noise. Plus having a laptop in the same room as you can generate unwanted noise during your recording.
A better choice is a good quality lavalier microphone. Close micing using a lavaliere won’t pick up a lot of room noise and a foam wind screen blocks pops. The wired Rode SmartLav+ is a great lavaliere mic for the money. Even if it’s sold as a smartphone mic, all you need is an inexpensive 3.5mm TRRS to TRS cable adaptor to connect the Rode SmartLav+ to cameras and field recorders.
However, a lavalier’s signal strength is usually too low to plug directly into a computer’s microphone input. In that case, you need to boost the signal using a pre-amp. You have a few options:
- Option 1 Purchase an audio inserter with mic-level inputs like a Focusrite SCARLETTE to boost the audio and connect that to your laptop’s audio input. Depending on your microphone, you might need an XLR to 3.5mm adapter like the Rode VXLR to connect to the XLR inputs commonly found on audio inserters (or the VXLR+ if you need to convert from +48 Vdc phantom power to Plug In voltage).
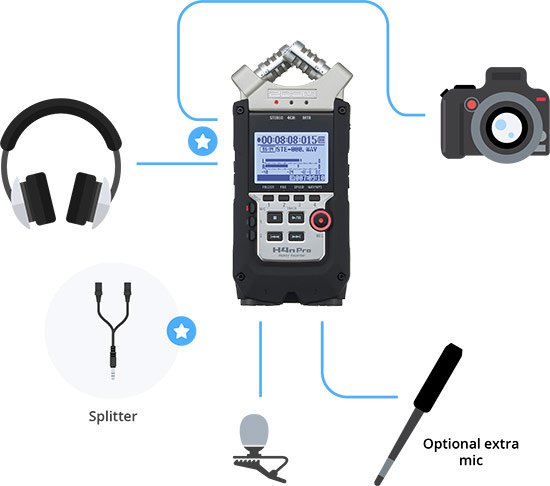
- Option 2 Purchase a field recorder like the Zoom H4n Pro. Field recorders range in price and are ultra-portable so you can record anywhere without needing your laptop. The Zoom H4n has built-in mics you can use if you’re in a pinch. The XLR/¼” combo jacks accept mic-level and line-level inputs, plus there’s a 3.5mm mic input jack on the back. A field recorder like the Zoom H4n records to a removable SD card and can even connect directly to a laptop like an audio inserter. Add a headphone splitter to the audio output jack and feed audio to a set of headphones and into your camera’s 3.5mm external mic input for a backup recording.
Voice over professionals prefer large diaphragm, broadcast-style microphones for their tonal quality, but they can be expensive. Cheaper alternatives exist that produce sound quality that’s perfectly adequate for training videos and screencasts. A Marshall MXL 2001 or Audio-Technica AT2035 are great sounding large diaphragm condenser microphones at a reasonable price. Keep in mind a condenser microphone needs phantom power or batteries to operate. Another alternative is the very tried and tested Shure SM7B – a dynamic microphone that’s still used for broadcasting and no batteries required. You also need to purchase an XLR cable (male to female) to plug these mics into a field recorder or audio inserter.
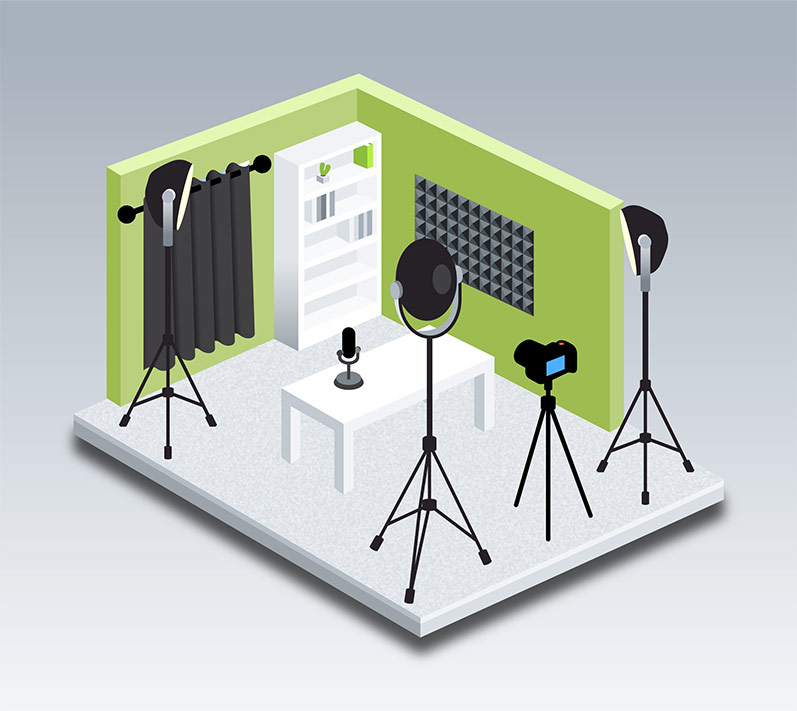
Pop-up video studio setup for multi-use spaces
Are you a teacher and need to occasionally film a short lesson? If creating training videos isn’t your main job, then a pop-up video studio is all you really need. Follow these steps to turn a multi-use space into an effective temporary training video studio.
Step 1: Stage the space
A little staging makes your video look polished. Find a quiet room – preferably one with a desk and AC power nearby. Close the door and follow these tips to stage the space:
- Move the desk so you’re sitting at least 4 feet away from the back wall. Some depth in the background looks better and avoids unwanted shadows in the background.
- Is it a small space? Place your desk diagonally in front of the corner of the room. A corner provides more depth behind the desk and adds visual interest.
- Remove unnecessary clutter from the desk, bookshelves, or whatever’s visible on camera behind you. With the magic of video, you don’t have to move things far to hide them. Simply placing items on the floor gets them off camera.
- Cameras with automatic settings compensate for brightness. If there’s a bright window behind you, close the drapes to avoid looking like a dark silhouette in front of a very bright background.
- Turn off the AC/furnace to avoid the unit making noise while you’re filming.
- If you must hide the background, invest in an affordable photography background support kit and hang some material, drapery, or a commercially available backdrop. There are many inexpensive options.
- If the background’s bare, you can:
- Option 1: Add props. A plant, screen, poster, or small table adds visual interest.
- Option 2: Add a backdrop. Hang some lightweight material or tack a lightweight, commercially available backdrop to the wall using push pins or gaffer tape (careful you don’t damage the paint). Avoid pin-stripe patterns and you won’t get that dizzying moiré effect.
- Option 3: Add a backlight. Even a small lamp can do the trick. Put the lamp on the floor and angle the shade up towards the back wall to create an effect. Use an LED bulb that has a daylight color temperature. They don’t get hot so you can safely throw a cloth over the back of the shade to stop the light from spilling out and use tissues to soften the light.
Step 2: Control the sound
Clap your hands and listen for echo. In a temporary video training studio setup, that’s hard to avoid unwanted noise like echo. Hard surfaces and walls reflect sound. When using a multi-purpose space to film training videos, try these simple techniques to improve the sound quality.
- Cover hard surfaces that don’t appear in your camera view with cheap moving blankets.
- Cover the surface of your desk with a material like felt.
- Close the drapes to cover windows.
- Turn off fans, air conditioners, and all other noisy equipment.
- Introduce upholstered furniture into the space to help absorb sound. Placed against walls, furniture breaks up the long hard surface.
Much of the same audio advice for voice over booths apply to pop-up studios. A big difference is you won’t want to see the microphone. A lavalier such as the wired Rode SmartLav+ is a great option. They’re small and easy to hide. When you close mic, you eliminate a lot of issues related to room noise and echo. For the SmartLav+, you need a 3.5mm TRRS to TRS cable adaptor to plug it into your camera. If you’re connecting to the XLR input of a pre-amp, you most likely will need the Rode VXLR adaptor.
If you do a video test and the room noise is unmanageable, look for a different location. Not all are locations are suitable for filming no matter how great they look.
Step 3: Control the light
You can easily improve the lighting in a pop-up studio space without investing in a professional video lighting setup. For example, you can:
- Turn off fluorescent lights to get rid of any greenish tinge in the room.
- Close the drapes if there’s a window in the room.
- Switch out any incandescent light bulbs with bright LED bulbs that are daylight (5,000 K ) color temperature rated. LED bulbs don’t get hot so you can safely remove the shades and use tissue paper to soften the light.
- Watch out for reflective surfaces. Cover the desktop with a piece of material and remove glass items if they reflect the light into the camera lens.
A simple three point lighting system is worth the effort. You don’t have to invest a lot of money to get some good LED video lights, like this inexpensive two pack 480 LED video light panels with stands from Neewer. Or get handy and buy some cheap clamp-on lighting fixtures from your local hardware store and clamp those to some inexpensive lighting stands.
Step 4: Choose a video source and confidence monitor
Don’t use your laptop’s built-in camera for your pop-up video training studio. But if you really don’t want to use an external camera, a Logitech C920 webcam connected to your laptop is a good option. They provide a wide image that looks pretty good in average lighting conditions. Position your webcam at eye level directly in front of you rather than clipping it to the top of your laptop to avoid the up-your-nose visual effect.
A camcorder or DSLR will give you a better quality image, plus you get more control over the image. If you’re not comfortable using the more advanced camera settings, the auto settings do pretty well in most locations. An inexpensive camcorder like the VIXIA HF R800 can do the job. It accepts an external microphone using a 3.5mm connector and records to a removable SD card for easy transfer to your laptop. But it does have a small 1/4.85-inch CMOS image sensor, so use it in a well-lit space. For a bit more, you can get the impressive Z-Cam E2C and future proof your video productions with resolutions up to 4K, interchangeable lenses, and a 4/3” CMOS sensor.
DSLRs and mirrorless cameras are more expensive, but offer more options for better quality images. A mirrorless Panasonic Lumix G7 is a great entry-level 4K camera for the price. You don’t have to worry about how long you record video since there’s no mirror to lift. A DSLR can only record continuous video for so long before the camera overheats and shuts down to protect the motor that’s lifting the mirror. And don’t forget to use the external AC adaptor for your mirrorless camera or DSLR.
A decent tripod like a Magnus VT-3000 or Velbon Videomate-638 are good value for their price. If you’re using a camcorder, you can flip the monitor screen so that it’s facing you. Otherwise, connect the HDMI output of your camera to any monitor you have around that has HDMI inputs. For portability, a 7” on-camera field monitor like the Aputure AV-2 fineHD or the Lilliput A7S 4K are great options for confidence monitoring.
Dedicated video studio setup for training videos
The nice thing about a dedicated video studio setup is you can make permanent changes, like affixing audio treatment to walls and blocking noisy air vents. Permanent studio spaces are great for multiple camera setups with video switching since you only setup the gear once. You can also add components like an audio mixer for better control of audio from microphones and computers. A mixer like the Behringer X1204USB can output directly to USB.
Investing in better equipment is a logical step when you have a permanent video studio space. But you don’t have to buy a lot of complicated gear to get professional results. A good camera (or cameras), some LED lighting, and an all-in-one video switching, recording, and streaming system like the Pearl Mini eliminates the fuss of having to setup a lot of complicated equipment. Pearl Mini isn’t just easy to use, it’s flexible and portable so you can take your all-in-one video studio with you on the road. You can even connect microphones and line-level audio sources directly to Pearl Mini.
Here are 5 easy steps to create a video studio for training or lecture capture. And watch us convert extra office cubicle space into a permanent video studio in this video.
Wrap it up!
Whatever your video studio needs, implementing even a few of the techniques covered here and upgrading to some better gear will improve the quality of your training videos. The results are worth the extra effort.
Consider using gear like the Epiphan Pearl all-in-one video production systems to help simplify video production so you can focus on what’s really important – creating great content. For professional video production, the Epiphan Pearl Mini and the higher capacity Pearl-2 guarantee quality results without the hassle of a lot of complicated gear.