Configure automatic streaming
Webcaster X1 can be set up to automatically broadcast to your Facebook Timeline or any Facebook Page, Event or Group for which you have posting permissions. By automatically, we mean as soon as you connect your Ethernet cable and turn on your Webcaster X1 (you will want to also connect your HDMI source!), it connects automatically to your Facebook account and starts streaming with your pre-configured settings.

These instructions walk you through configuring your system for automatic streaming. Once configured, it will automatically broadcast the next time you use it (and any subsequent times until you change the settings or de-authorize Webcaster X1 from Facebook).
To pre-configure streaming you need:
- A Facebook account
- Your HDMI camera to stream
- Your Webcaster X1 for Facebook Live
- An HDMI display (that supports 1080p video)
- A USB mouse
- Optionally, a USB keyboard
-
An Internet connection with 4 Mb/s uplink
- Connect everything and turn on Webcaster X1.
- Connect your display to the HDMI OUT port.
- Connect your Ethernet cable to the Ethernet port.
- Connect your mouse to one of the USB ports.
- (OPTIONAL) Connect your keyboard to another USB port.
- Turn on Webcaster X1 using the toggle button at the back; Webcaster X1 executes its boot-up sequence.
- If not already logged in, authorize Webcaster X1 to use your Facebook account.
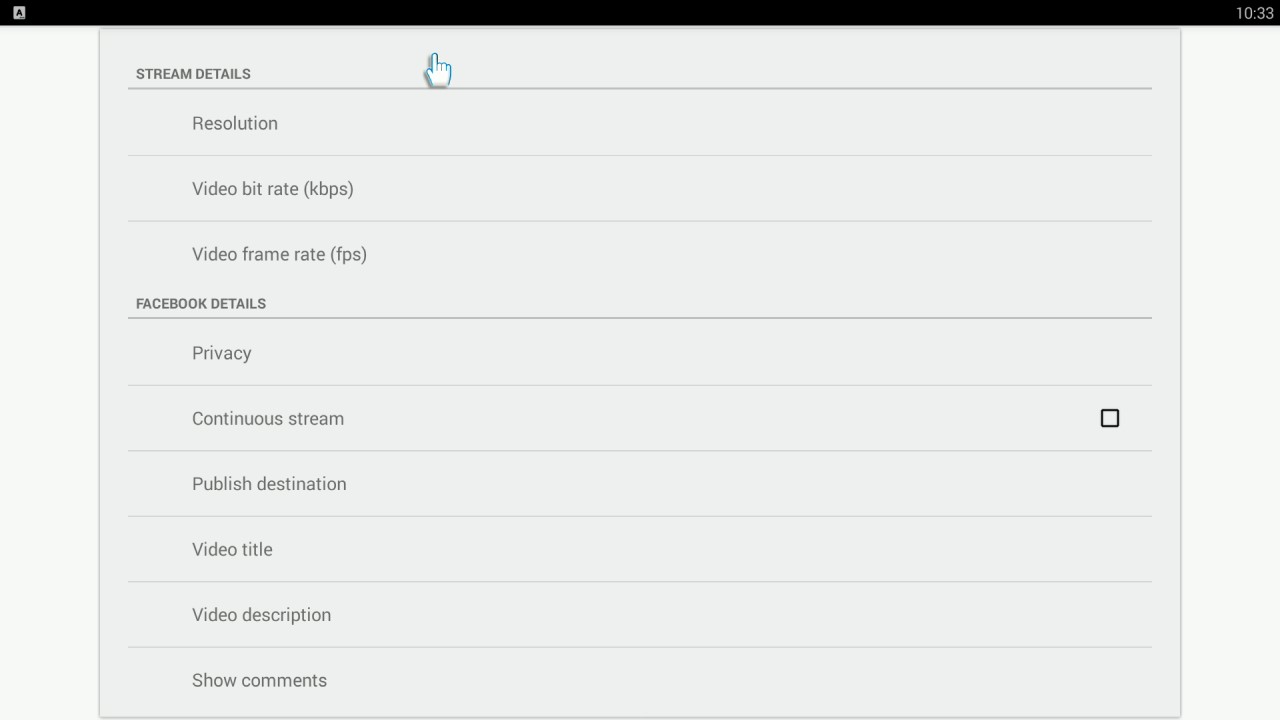
- Click the Preferences icon
 at the lower right corner of the screen; the preferences screen opens.
 - Scroll to the bottom of the list and ensure Automatic start streaming after user login is not checked.
- Click the Right mouse button to return to the main screen.
- If you want to stream to a Facebook Page, Event or Group and haven't already created or joined it, do so now.
- Authorize Webcaster X1 for Facebook Live to your Facebook account in one of two ways:
- Click the Preferences icon
- Ensure your Webcaster X1 is connected to the Internet.
- Open a web browser on your computer, tablet or mobile device.
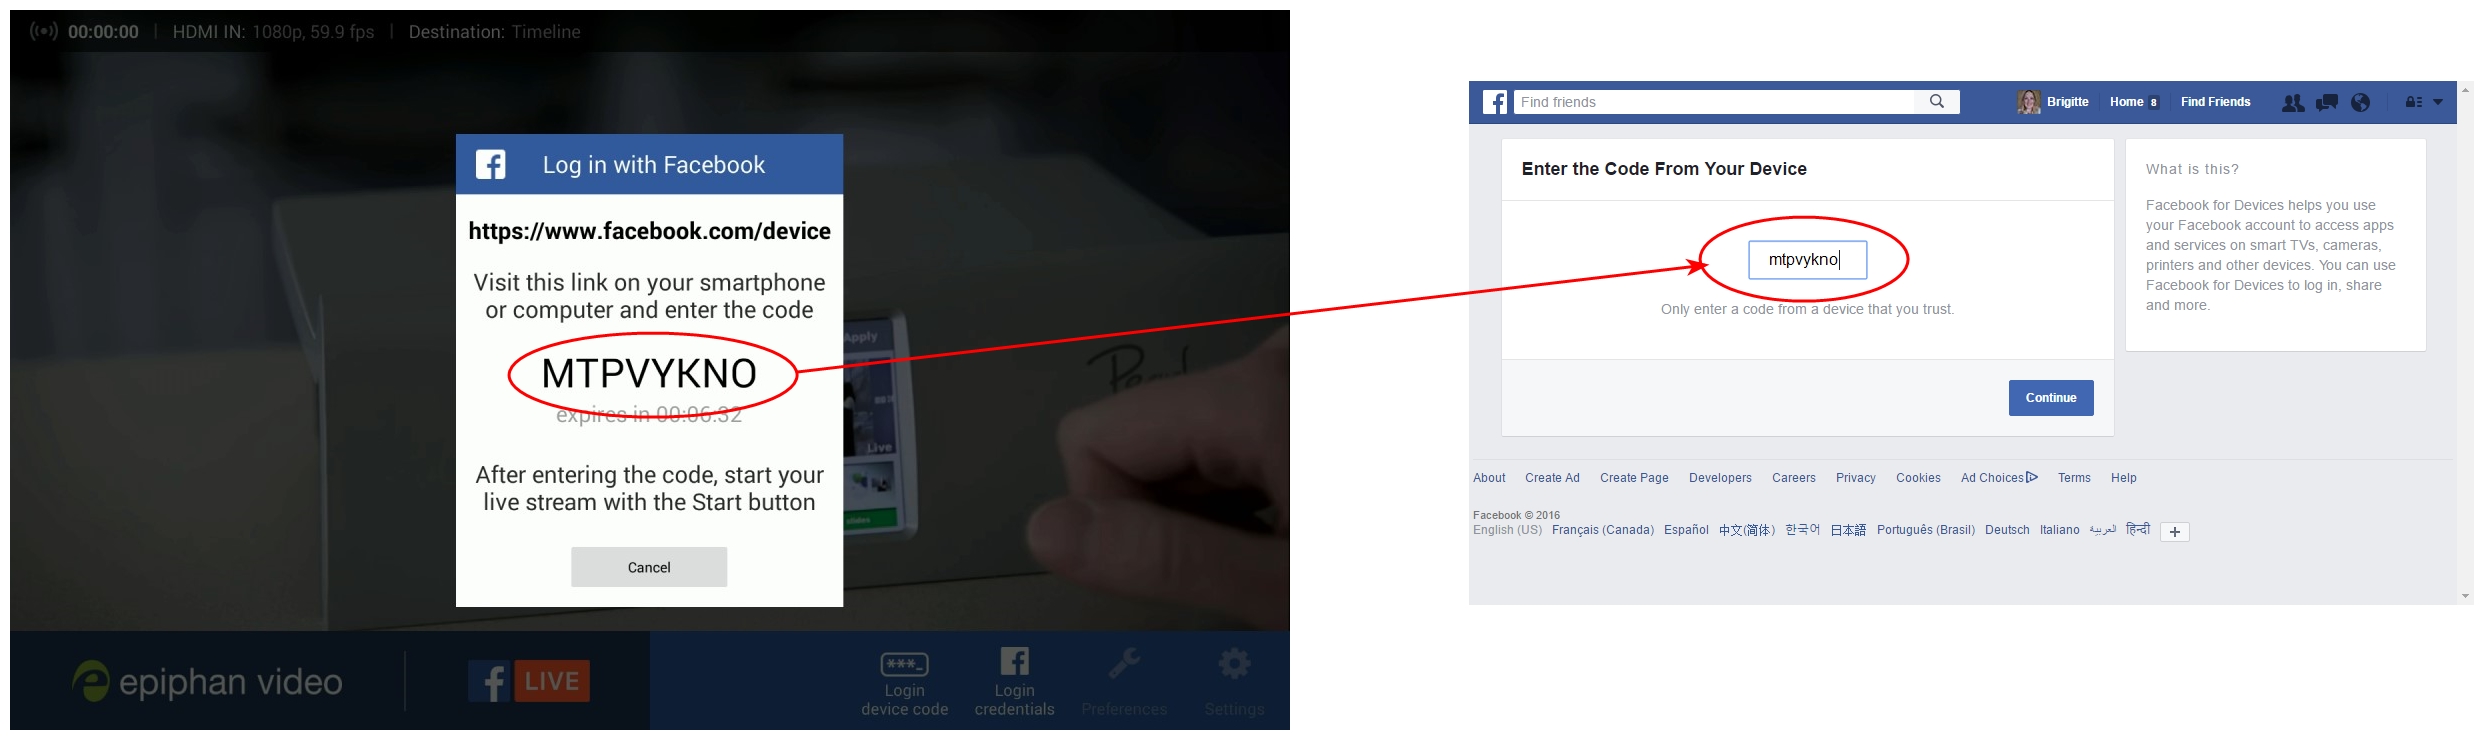
- Go to facebook.com/device.
- If needed, login to your Facebook account.
- On your display attached to Webcaster X1, a message box says Log in with Facebook (if this message does not appear, click the Login device code icon
 ). Type the code in this box into the device code box on your Facebook device pairing page.
 - (OPTIONAL) Alternatively, the same device code is available from Webcaster X1's screen. Enter this code in the device code box on your Facebook pairing page.
- Click Continue, then OK and OK again in Facebook to authorize Webcaster X1 to post to your Facebook account and associated pages.
- Note: If you have previously authorized this Webcaster X1 for Facebook Live with your Facebook account, there are fewer Facebook messages to click through, simply click OK to confirm that you have already authorized your Webcaster X1.
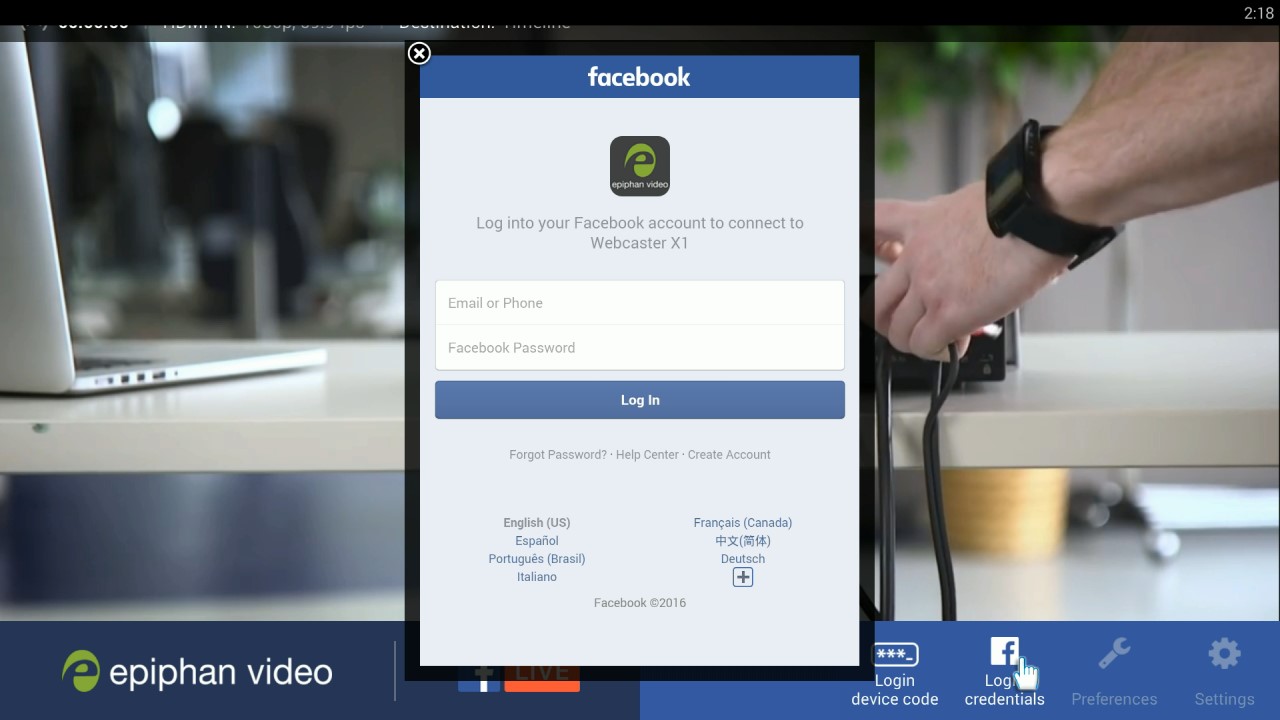
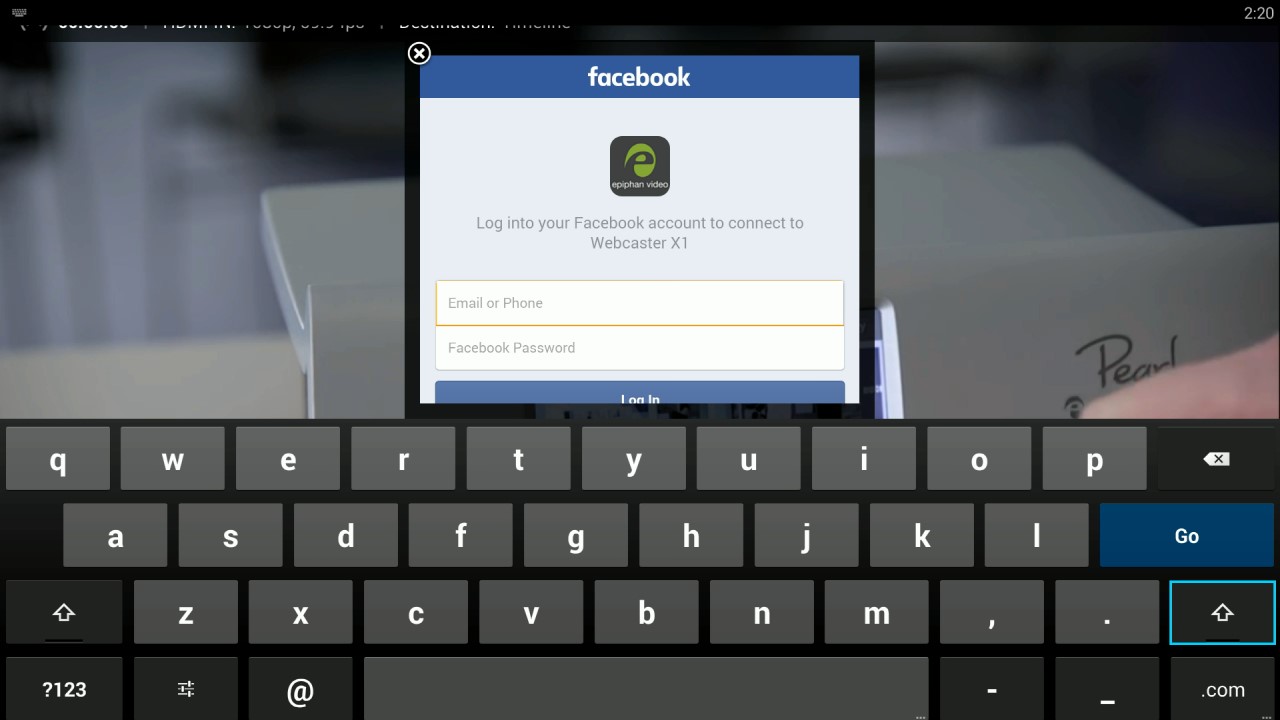
- Ensure your Webcaster X1 is connected to the Internet.
- If a device code is showing on the display attached to your Webcaster X1, click Cancel.
- Click the Facebook Login icon
 ; Facebook's login page appears (information typed here is shared directly to Facebook and is not intercepted or saved by Webcaster X1).

- If you do not have a keyboard connected, click either text box to display the on-screen keyboard for typing.

- Enter your Facebook account credentials and click Log In.
- Click Continue, then OK and OK again in Facebook to authorize Webcaster X1 to post to your Facebook account and associated pages.
-
Note: If you have previously authorized this Webcaster X1 for Facebook Live with your Facebook account, there are fewer Facebook messages to click through, simply click OK to confirm that you have already authorized your Webcaster X1.
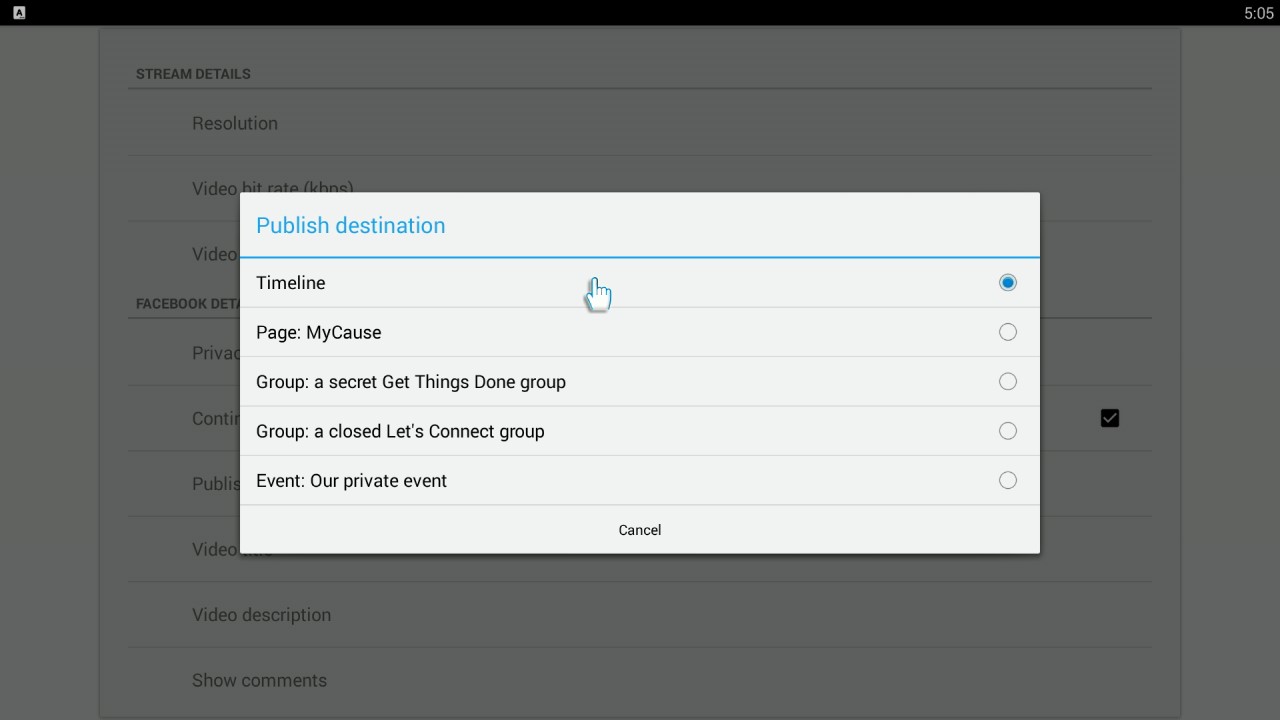
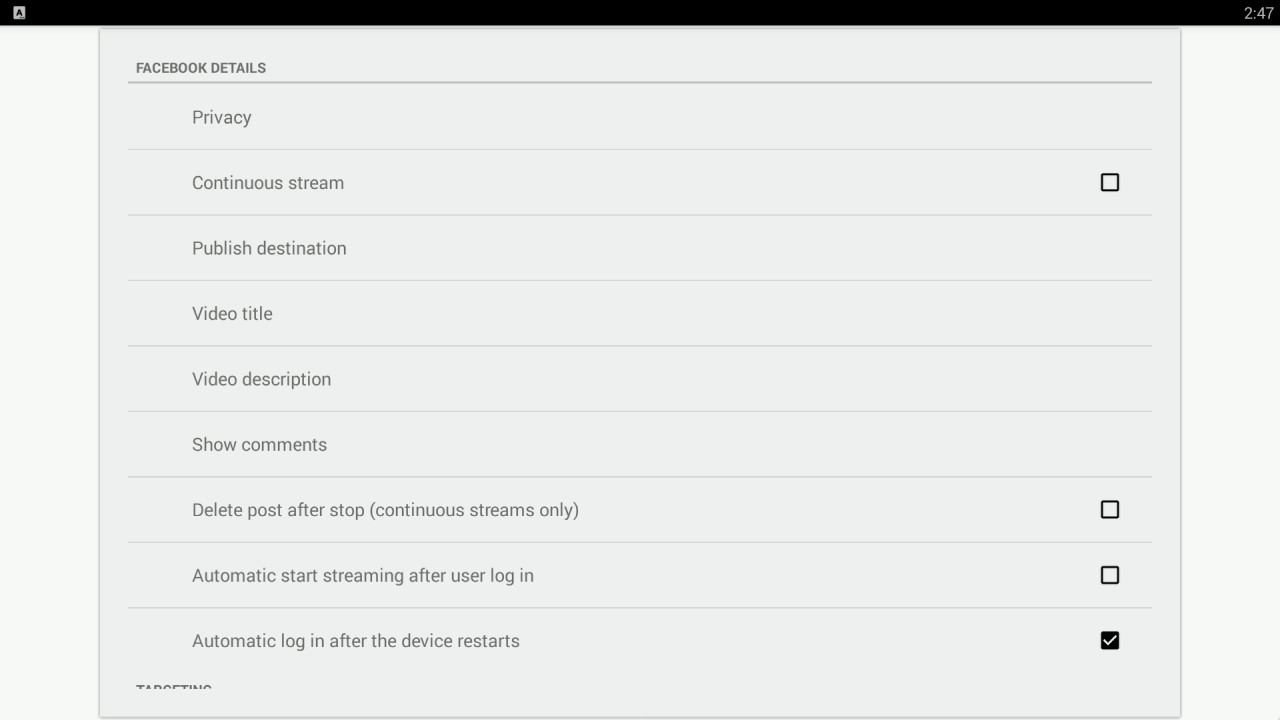
- Configure your live stream settings.
- Click the Preferences icon at the lower right corner of the screen; the preferences screen opens.
- Click Publish destination in the Facebook details section; Webcaster X1 asks Facebook for a list of places to which you can publish and displays these in the Publish destinations settings box.

- Select your Timeline or the Page, Group or Event you want to stream to. (You can easily confirm your selection after you exit the configuration menu by checking the Destination listed at the top of the display.)
- (OPTIONAL) Configure aspects of your Facebook post.
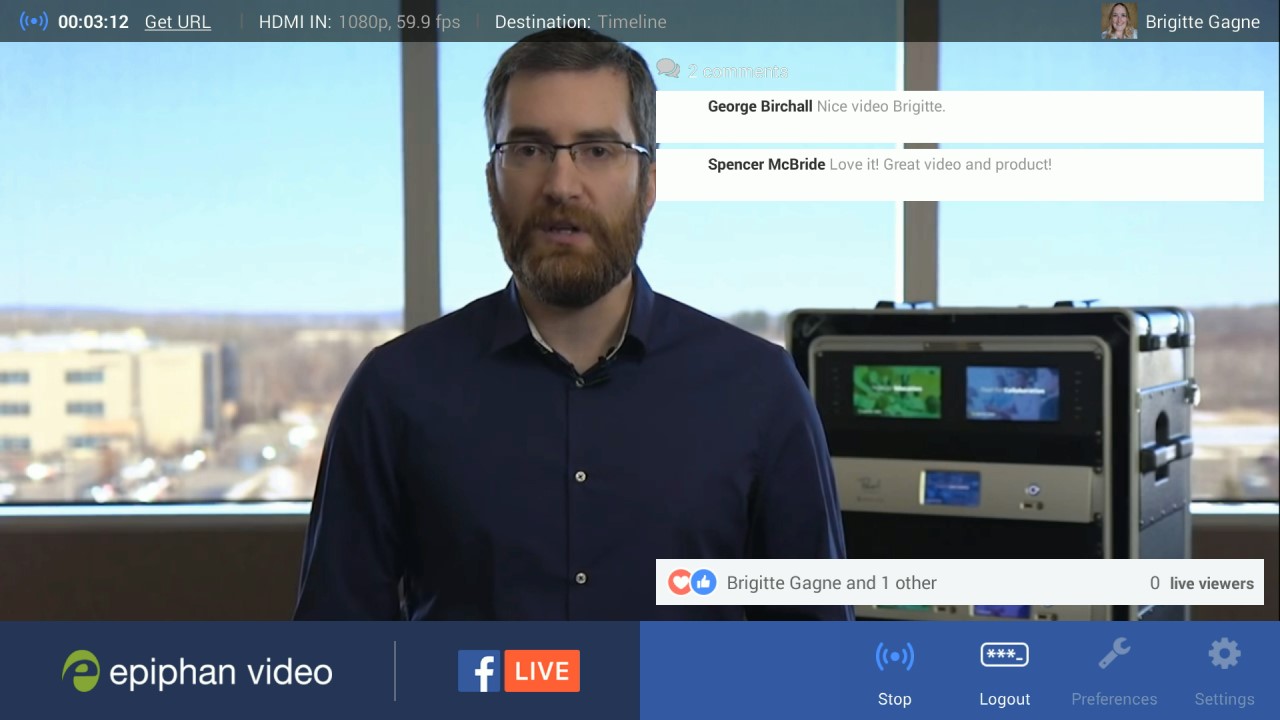
- You can use Webcaster X1 to monitor comments and reactions on Facebook on your attached HDMI display.
- At the top of the screen, viewers comments are displayed.
- At the bottom of the screen, the number of viewers and the top three reactions are listed along with the name of the user who last reacted.
- You can choose whether to have these shown on the left or right side of the screen.
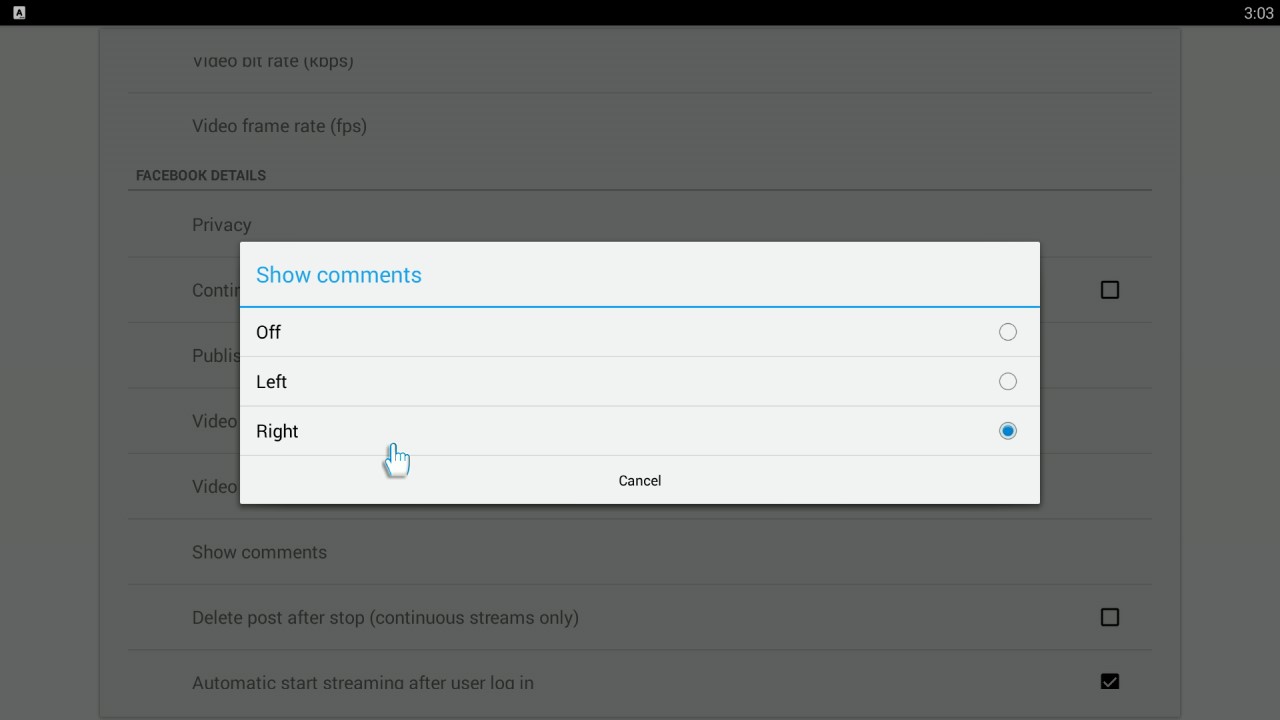
- If not already on the Preferences page, click the Preferences icon at the lower right corner of the screen; the preferences screen opens.
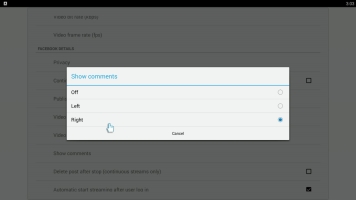
- Click Show comments in the Facebook Details section.
- Select the location for the comments.
- When your broadcast starts, you will see a live viewer count, reactions and comments on the chosen side of the screen.
- If you are done with Facebook settings for your broadcast, right click to exit the Preferences menu.
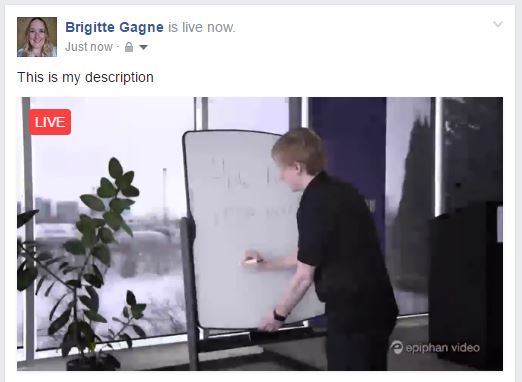
- You can see the video title and description while watching the video:
- The video description is also your post text:
- You can also change your video description by editing the post from Facebook.
- Note: During a broadcast, Webcaster X1 is not updated to reflect the current video description and video title for your live stream (e.g. if you change it using Facebook, Webcaster X1 is not updated with your changes). This option only controls the initial video description and title for your stream.
- When you first get your Webcaster X1 for Facebook Live, the default video title is:
Live Video Stream Title from the Epiphan Webcaster X1 For Facebook Live
and the default video description is:
- Live Video Stream Description from the Epiphan Webcaster X1 For Facebook Live
- If not already on the Preferences page, click the Preferences icon at the lower right corner of the screen; the preferences screen opens.
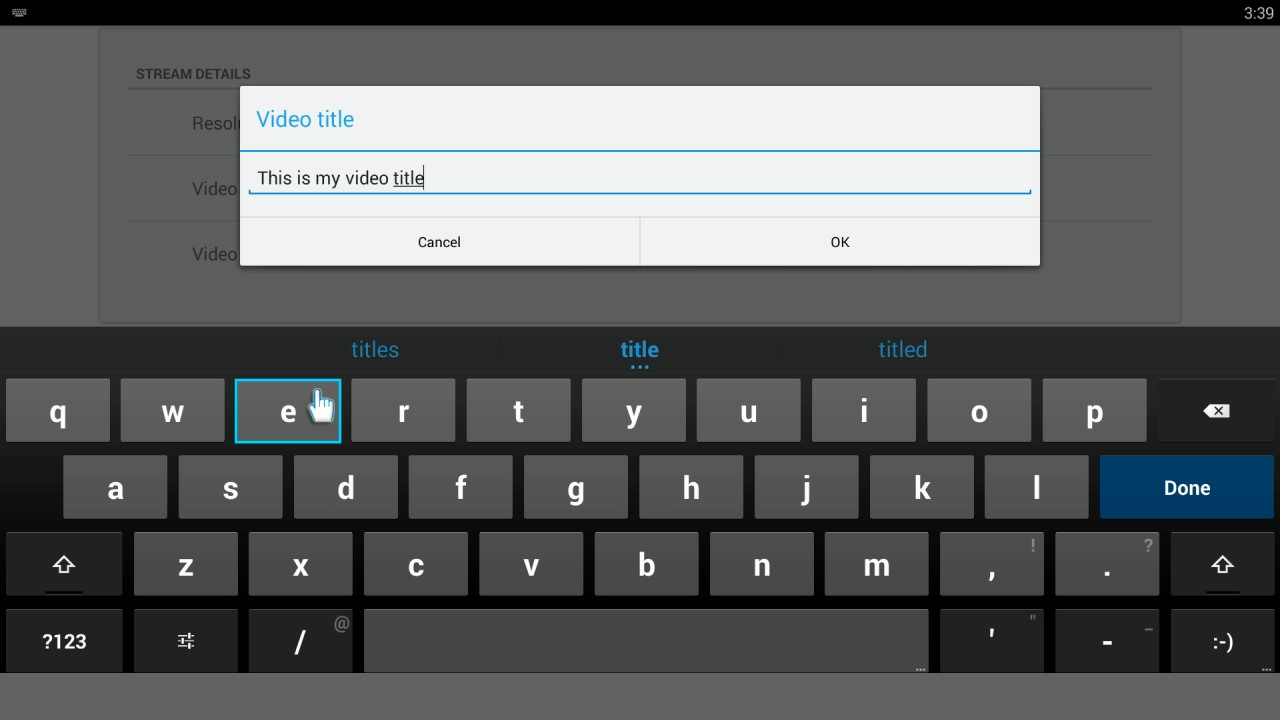
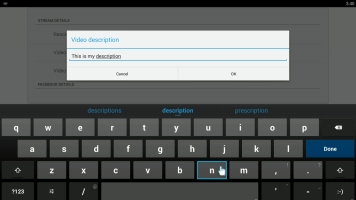
- Click Video Title in the Facebook Details section.
- Use your USB keyboard or the on-screen keyboard to type a title for your video.
- Click OK to save your changes (or Cancel to go back without saving).
- Repeat the same process for the Video description. Remember to save your description by clicking OK.
- Note: When you first get your Webcaster X1 for Facebook Live, the default Video title and Video description are generic. On subsequent uses, Webcaster X1 automatically uses the most recent title and description entered (or if you don't change them, it continues to use the defaults).
- If you are done with Facebook settings for your broadcast, right click to exit the Preferences menu.
- Facebook offers two types of live streams.
- Continuous streams for long-running broadcasts (meant for 24x7 or long running streams)
- Live event broadcast (with a time limit of up to 4 hours)
- Note: Facebook does not save continuous streams for video on demand after your live event is complete.
- If not already on the Preferences page, click the Preferences icon at the lower right corner of the screen; the preferences screen opens.
- To broadcast a continuous stream: click Continuous stream checkbox in the Facebook Details section. When using this option, Facebook will not save a copy of your video for replay after your broadcast.
- To broadcast an event less than 4 hours in length: uncheck the Continuous stream checkbox in the Facebook Details section. Facebook will create a video for replay after your live broadcast is complete.
- Note: When you first get your Webcaster X1 for Facebook Live, the default stream type setting to not use a continuous stream. On all subsequent uses after your first use, the default setting is whatever you used last time.
- If you are done with Facebook settings for your broadcast, right click to exit the Preferences menu.
- By default, after your broadcast is complete, Facebook makes your live broadcast into a post on your Timeline, Event, Group or Page. For continuous streams, this post does not contain a playable video (because Facebook doesn't save a video for continuous streams), it only contains a screen capture of the view and the comments from the video (but video playback is black).
- Sometimes, you may not want to keep the comments and blank post. For continuous streams, Webcaster X1 can be configured to automatically delete the Facebook post after broadcast so you don't have to remember to log in to Facebook to do it.
- If not already on the Preferences page, click the Preferences icon at the lower right corner of the screen; the preferences screen opens.
- Click Delete post after stop (continuous streams only) in the Facebook Details section.
- After your broadcast ends, Webcaster X1 deletes it from your configured publish destination (Timeline, Event, Group or Page).
- If you are done with Facebook settings for your broadcast, right click to exit the Preferences menu.
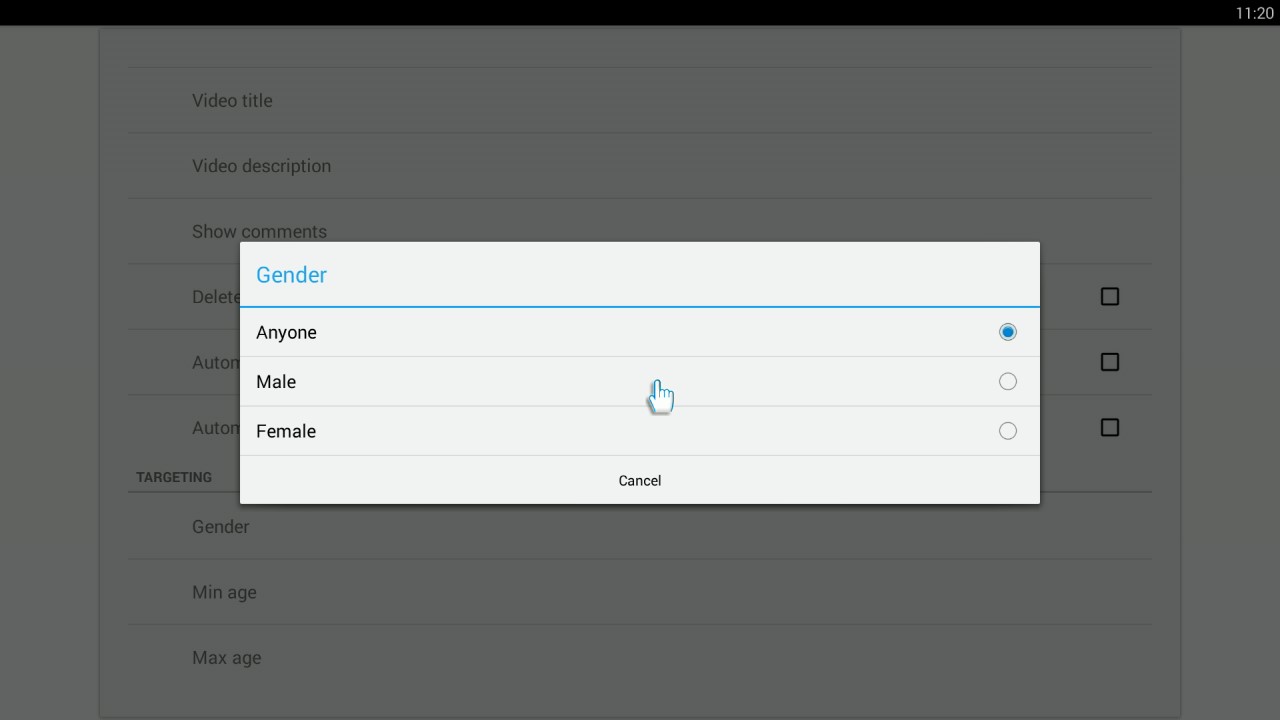
- When you broadcast to Facebook Live, Facebook helps you generate an audience. When your publish destination is a Facebook Page, you can target specific kinds of viewers.
- For example, you can target the gender or age of viewers who will be most interested in your live stream.
- Webcaster X1 lets you configure targeting for your broadcast and sends this targeting request to Facebook.
- Note: Targeting is only supported for Pages.
- If not already on the Preferences page, click the Preferences icon at the lower right corner of the screen; the preferences screen opens.
- Scroll to the bottom of the settings page to the Targeting section.
- Click Gender to select a target gender.
- Click Min age and/or Max age to configure a targeted age range for your live broadcast.
- If you are done with Facebook settings for your broadcast, right click to exit the Preferences menu.
- (OPTIONAL) Configure your stream settings.
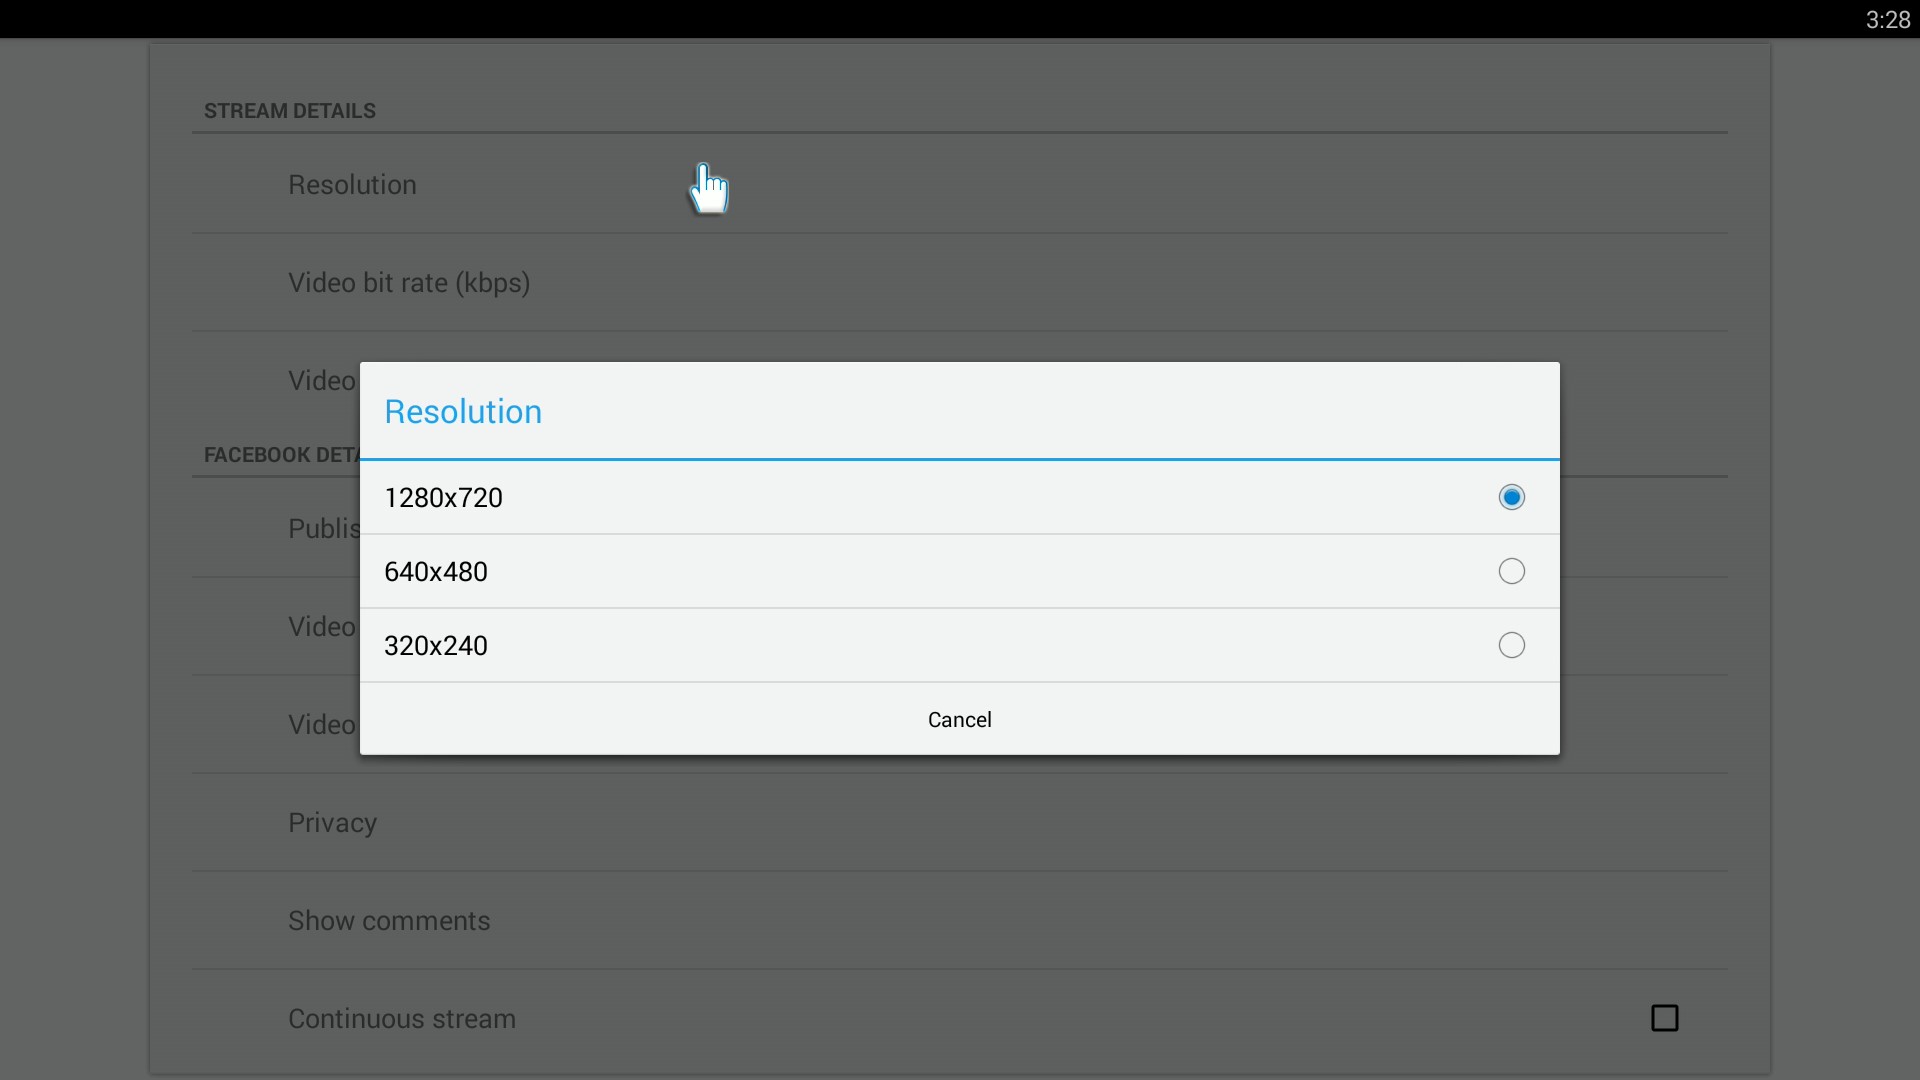
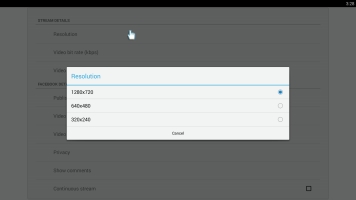
- The resolution is the size of each frame and is sometimes called frame size.
- Usually these values are expressed as a pair of values such as 1280×720. The first value describes how wide your picture is (in pixels) and the second how tall it is.
- Some resolutions also have short forms. For instance 720p or HD means 1280×720.
- The higher (larger) the resolution, the more data needed to accurately describe everything in your video.
- If you have limited uplink bandwidth, you need to find a balance between frame size and frame rate that makes your video look as good as possible at your current bit rate.
- Facebook has specifications for the maximum resolution they accept. Currently this value is 1280×720 (720p).
- You can configure the resolution that Webcaster X1 sends to
- Note: You cannot change the resolution during your live broadcast. If you change it while streaming, the change only takes effect when you stop the current stream and start another.
- If not already on the Preferences page, click the Preferences icon at the lower right corner of the screen; the preferences screen opens.
- Click Resolution in the Stream Details section.
- Use your connected USB mouse to select the bit rate for your live stream.
- Note: When you first get your Webcaster X1 for Facebook Live, the default resolution is 1280×720. On all subsequent uses after your first use, the default frame size is whatever you set last time.
- If you are done with settings for your live stream, right click to exit the Preferences menu.
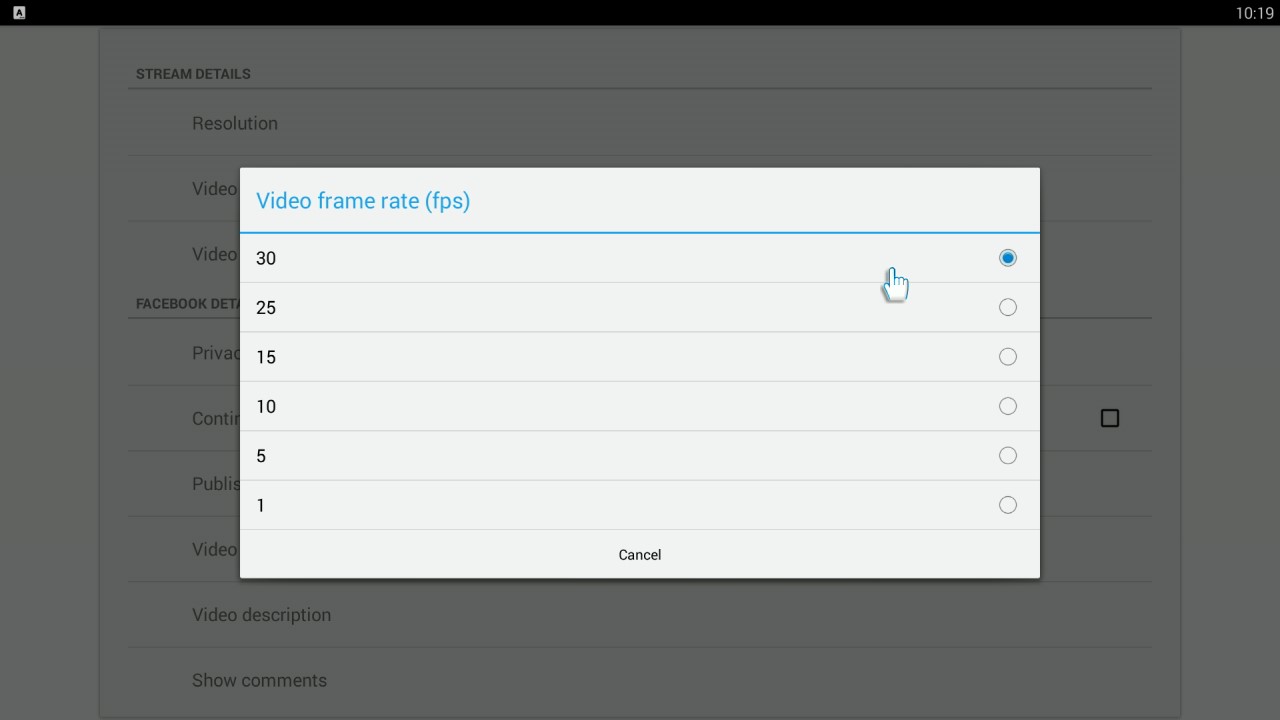
- The frame rate is a measure of how many frames are sent each second and is often referred to as frames per second and abbreviated fps.
- The higher the frame rate, the smoother the action in your video. This is particularly true for video that has a lot of movement.
- The higher the frame rate, the more data you're sending over your uplink.
- If you have limited uplink bandwidth, you need to find a balance between frame size and frame rate that makes your video look as good as possible at your current bit rate.
- Facebook has specifications for the maximum frame rate they accept. Currently this value is 30 fps.
- You can configure the frame rate that Webcaster X1 sends to
- Note: You cannot change the frame rate during your broadcast. If you change it while streaming, the change only takes effect when you stop the current stream and start another.
- If not already on the Preferences page, click the Preferences icon at the lower right corner of the screen; the preferences screen opens.
- Click Video frame rate (fps) in the Stream Details section.
- Use your connected USB mouse to select the frame rate for your live stream.
- Note: When you first get your Webcaster X1 the default frame rate is 30. On all subsequent uses after your first use, the default frame rate is whatever you set last time.
- If you are done with
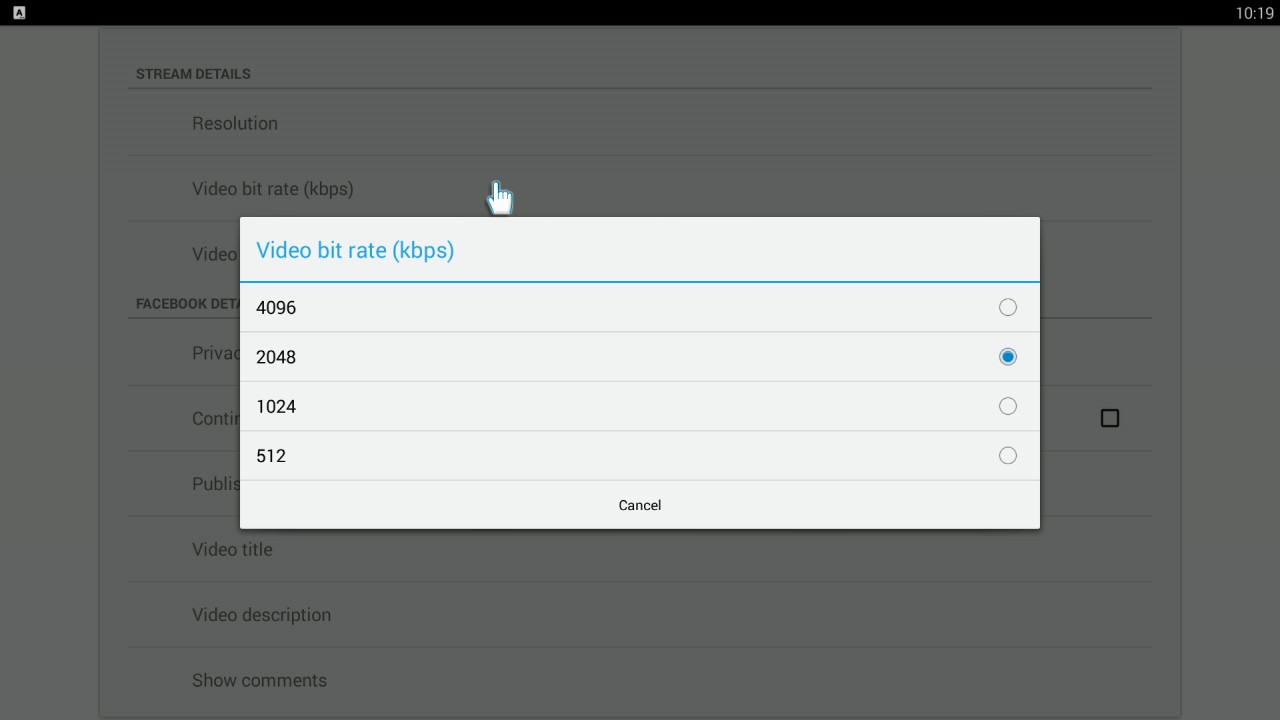
- The bit rate is a measure of how many bits of data are sent each second and is often referred to as kilobits per second and abbreviated kbps.
- The higher the bit rate, the more data per frame, and therefore the more detail you'll see in your video.
- Higher bit rates send more data over your uplink, so sometimes having a bit rate is necessary to avoid overloading your Internet connection.
- Facebook has specifications for the maximum frame rate they accept. Currently this value is 4000 kbps (which we've tested with our 4096 kbps setting).
- You can configure the bit rate that Webcaster X1 sends to
- Note: You cannot change the bit rate during your broadcast. If you change it while streaming, the change only takes effect when you stop the current stream and start another.
- If not already on the Preferences page, click the Preferences icon at the lower right corner of the screen; the preferences screen opens.
- Click Video bit rate (kbps) in the Stream Details section.
- Use your connected USB mouse to select the bit rate for your live stream.
- Note: When you first get your Webcaster X1, the default bit rate is 4096. On all subsequent uses after your first use, the default frame rate is whatever you set last time.
- If you are done with
- If not checked, check the checkbox for Automatic login after the device restarts (this will log you back in next time your start your Webcaster X1).
- Scroll to the bottom of the list and check the checkbox for Automatic start streaming after user login (this will make the stream start automatically after the auto-login when the device restarts).
- Click the Right mouse button to return to the main screen.
See Facebook reactions and commentsWhat does show comments do?
 During your broadcast, click the left mouse button to show or hide the Webcaster X1 overlay (including comments, if you have your device configured to show them).Your USB mouse or keyboard must be connected to Webcaster X1 for Facebook Live before boot-up.Set a video title and descriptionShow me where the video title and description used on Facebook
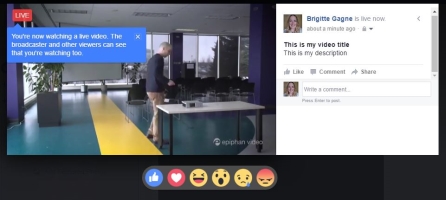


 Your USB mouse or keyboard must be connected to Webcaster X1 for Facebook Live before boot-up.Decide if you want a long running (continuous) streamWhat is a "continuous" stream to Facebook?Your USB mouse or keyboard must be connected to Webcaster X1 for Facebook Live before boot-up.Automatically delete your post after the broadcast (continuous streams only)What is meant by delete post after stop?This option is only has an effect if you have configured Webcaster X1 for continuous streaming.Your USB mouse or keyboard must be connected to Webcaster X1 for Facebook Live before boot-up.Configure your target audience (stream to Page only)What is targeting?
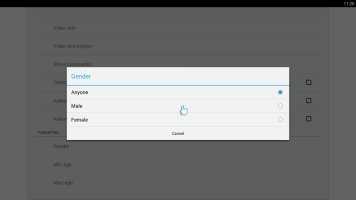 Your USB mouse or keyboard must be connected to Webcaster X1 for Facebook Live before boot-up.Configure stream resolutionWhat is stream resolution?
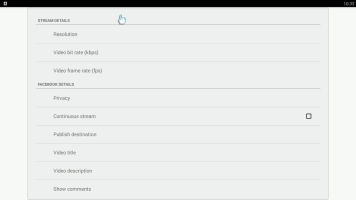
 Your USB mouse or keyboard must be connected to Webcaster X1 before boot-up.Configure stream frame rateWhat is stream frame rate?
 Your USB mouse or keyboard must be connected to Webcaster X1 before boot-up.Configure stream bit rateWhat is stream bit rate?
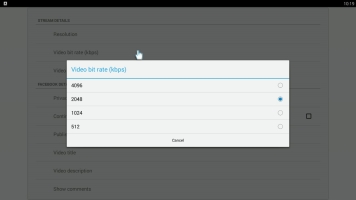 Your USB mouse or keyboard must be connected to Webcaster X1 before boot-up.
 - Click the Preferences icon
- Turn off Webcaster X1
- Use the toggle button to turn off the device.
- (OPTIONAL) Disconnect the cables and move Webcaster X1 to your broadcast location.
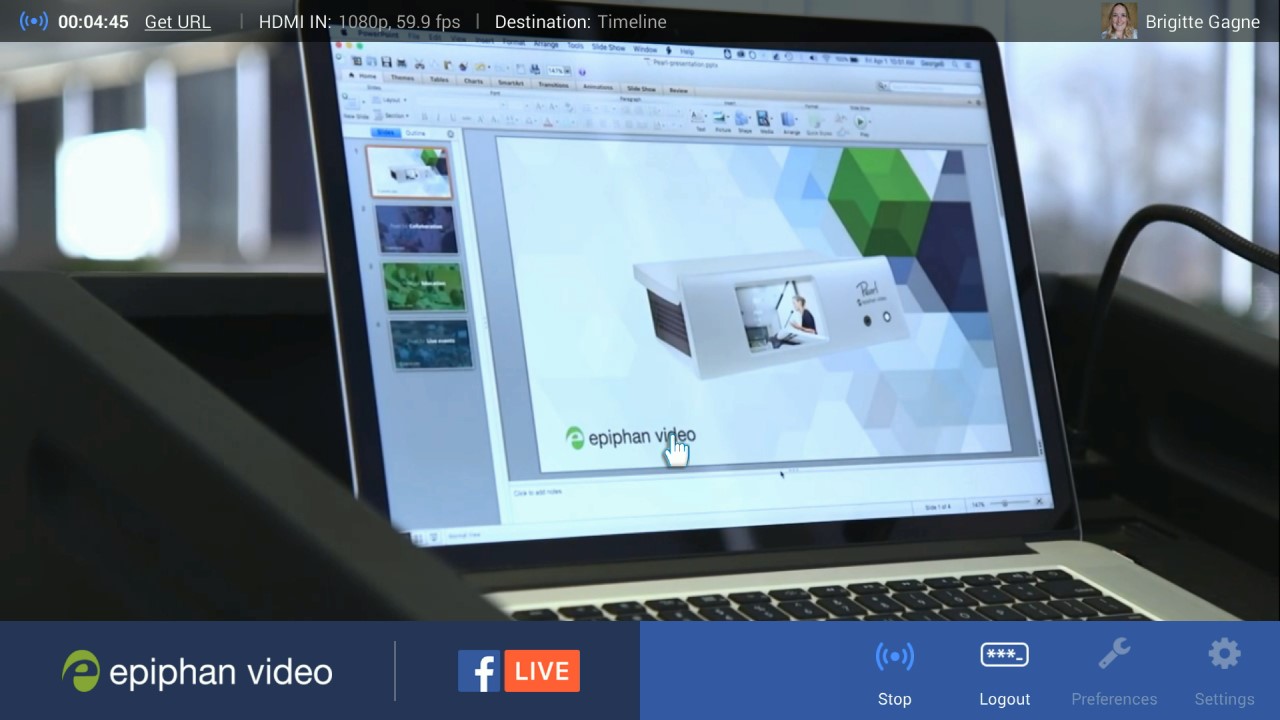
- When you are ready, begin your broadcast!
- (OPTIONAL) Connect an HDMI display and USB mouse to Webcaster X1.
- When you are ready to start streaming, turn on Webcaster X1 using the toggle button at the back; Webcaster X1 executes its boot-up sequence.
- After boot-up, Webcaster X1 starts streaming with your saved settings and the front display shows the elapsed streaming time.
- If an HDMI display is attached, it updates to let you know how long you have been streaming.
 During your broadcast, click the left mouse button to show or hide the Webcaster X1 overlay (including comments, if you have your device configured to show them).
- End your broadcast . When your live broadcast is complete, you can stop streaming by doing any one of these three things:
- Click the Stop icon
 .
. - Click the Logout icon to log out of your Facebook account (you will need to re-authenticate before using Webcaster X1 again.)
- Turn off Webcaster X1.
By default, if you turn off the device without logging out, you will be automatically logged in next time you turn on Webcaster X1. You can change this behavior by following the steps here: Stay logged in. - Click the Stop icon