Configure automatic streaming
Webcaster X2 can be set up to automatically broadcast to your YouTube channel or to a YouTube Live Event. By automatically, we mean as soon as you connect your Ethernet cable and turn on your Webcaster X2 (you will want to also connect your HDMI source!), it connects automatically to your YouTube (Google) account and starts streaming with your pre-configured settings.
These instructions walk you through configuring your system for automatic streaming. Once configured, it will automatically broadcast the next time you use it (and for Stream Now, any subsequent times until you change the settings or de-authorize Webcaster X2 from your YouTube account).
To pre-configure streaming you need:
- A YouTube channel that is verified and has no live stream restrictions
- Your HDMI camera to stream
- Your Webcaster X2
- An HDMI display (that supports 1080p video)
- A USB mouse
- Optionally, a USB keyboard
-
An Internet connection with a minimum of 6 Mb/s uplink for 1080p, or 3 Mb/s for 720p
- Connect everything and turn on Webcaster X2.
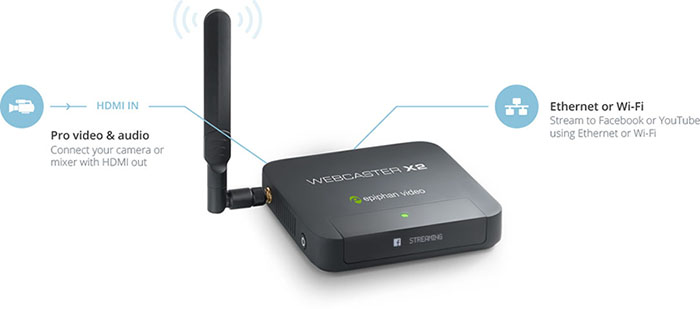
- Connect your HDMI camera to the HDMI IN port.
- Connect your display to the HDMI OUT port.
- Connect your Ethernet cable to the Ethernet port. (Or configure Wi-Fi after boot up.)
- Connect your mouse to one of the USB ports.
- (Optional) Connect your keyboard to another USB port.
- Turn on Webcaster X2 by plugging in the power cord; Webcaster X2 executes its boot-up sequence.
Webcaster X2 supports HDMI input signals of 720p (1280×720) and 1080p (1920×1080), progressive signals only. Interlaced signals (e.g. 720i and 1080i) are not supported. If your camera isn’t supported (or is experiencing another signal issue), the front screen and attached display show a message that says HDMI IN No Signal. Audio is supported over HDMI at 44.1 kHz and 48 kHz. Or using the (beta) USB camera feature, you can use the audio from a connected USB webcam or a plug-and-play USB microphone that is a UAC device. - Choose streaming to YouTube.
- If the YouTube logo isn't visible on Webcaster X2's front display, double-press the multi-function power button. See Choose the platform app you want.
- (Optional) If you want to stream to a Live Event and have not already created it, create your Live Event on YouTube.
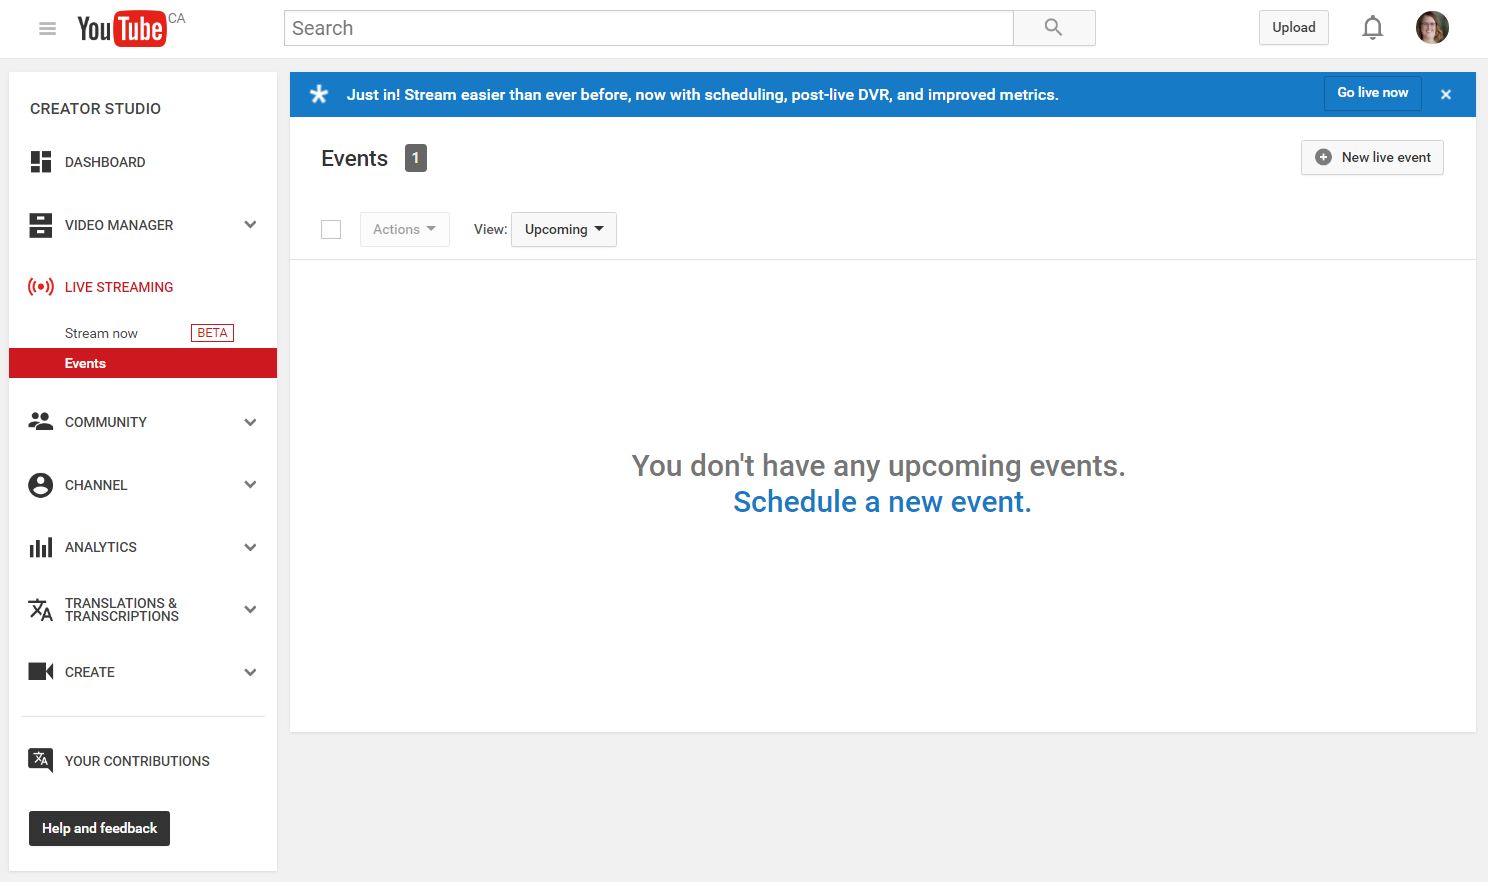
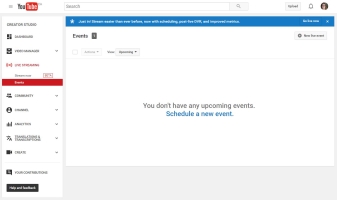
- Open a browser window on your computer, tablet or mobile device.
- Go to the YouTube live events page www.youtube.com/my_live_events.
- Click Schedule a new event.
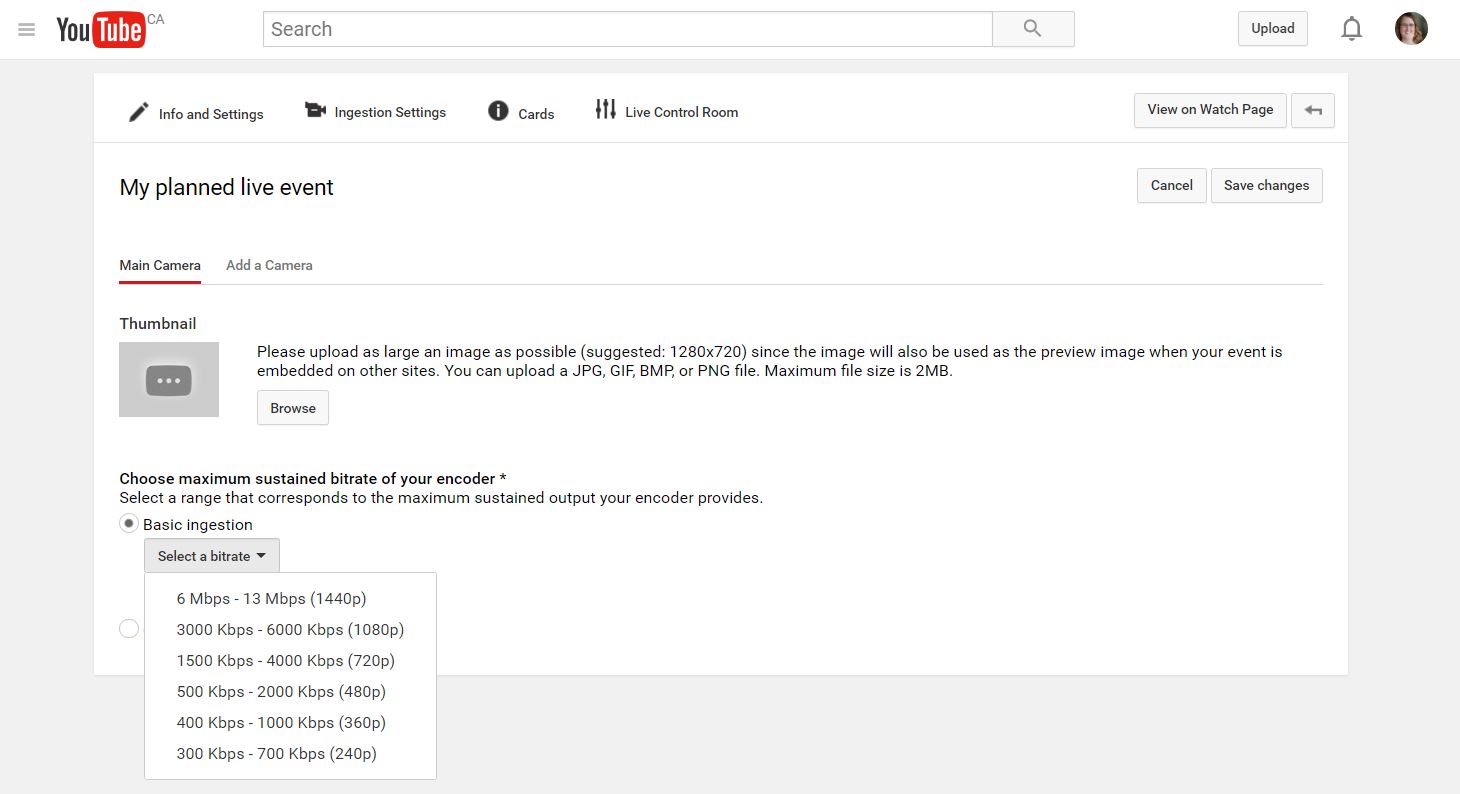
- Enter a date, time, name and description for your event.
- Select your event privacy and Click Create event.
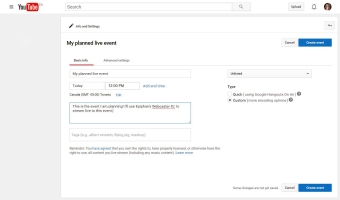
- On the next page, select a bitrate (and resolution) that match the upload bandwidth you'll have when streaming your event. (Follow steps in this help topic to configure Webcaster X2 with the same settings.)
- No need to configure anything else! Your Live Event is ready.
Show me how to create a Live Event on YouTube
- Ensure automatic streaming is not configured (otherwise you won't be able to configure other settings).
- Click the Preferences icon
 at the lower right corner of the screen; the preferences screen opens.
 - Scroll to the bottom of the list and ensure Start stream automatically after pairing is not checked.
- Click the Right mouse button to return to the main screen.
- Click the Preferences icon
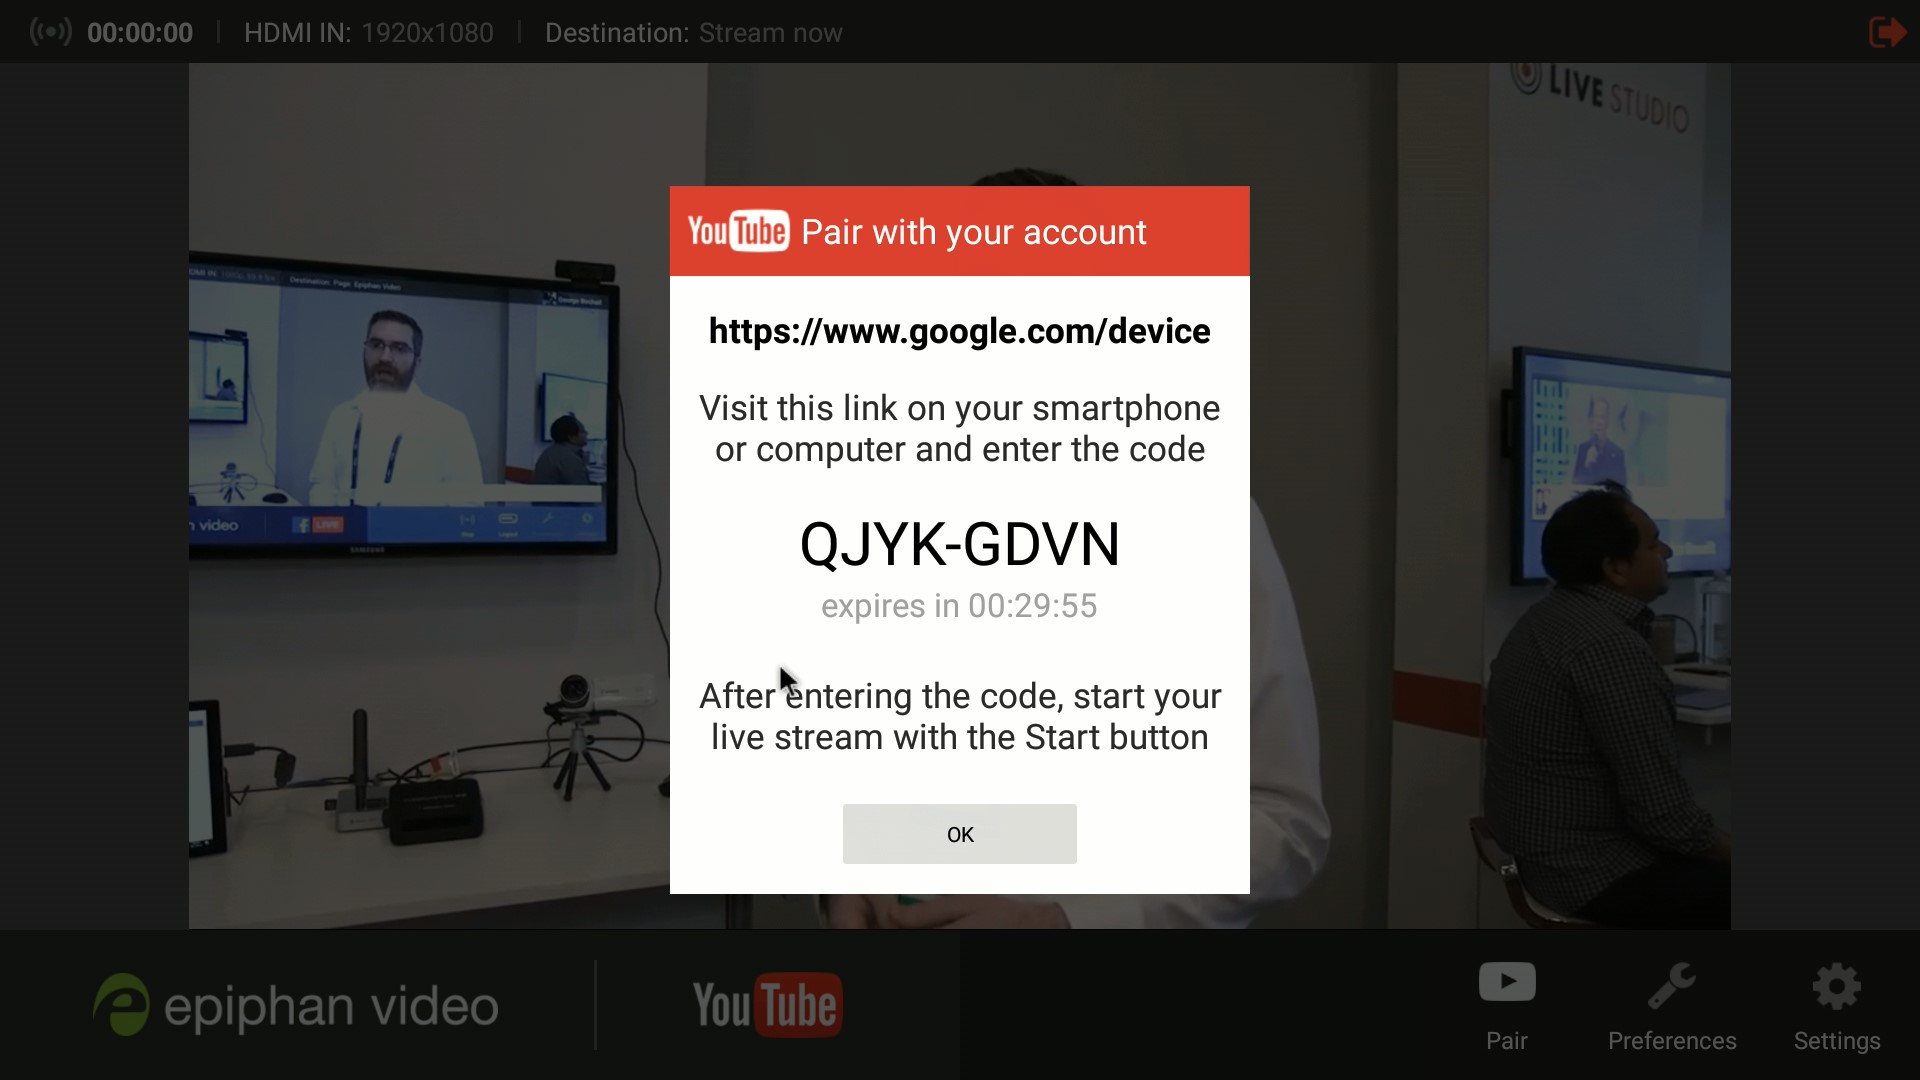
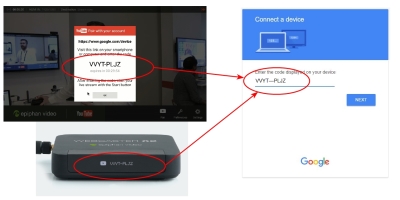
- If Webcaster X2 is not already paired with your YouTube (Google) account, pair it.
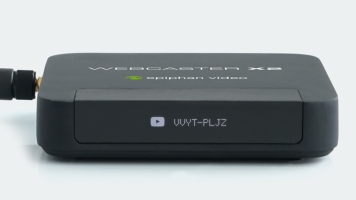
- Look at the front screen display for your YouTube device pairing code or click the Pair icon
 if you're using an attached HDMI display.
 - Using a web browser on your computer or mobile device, go to google.com/device and login to your Google account.
- If you manage more than one YouTube channel, pick the channel you want to stream to. It's important that you pick a channel that's verified and able to stream to YouTube. Check your channel's access to live streaming using this YouTube link.
- On the Google device pairing page, enter the pairing code from your Webcaster X2 in the device code field, then click Next and Allow to authorize Webcaster X2 to live stream to your YouTube channe.
- The front screen on Webcaster X2 updates to indicate that it's paired with your YouTube account.
- To unpair the encoder, click the YouTube Unpair icon from the bottom of the screen.
If your Webcaster X2 is paired with your Google account from a previous session, your account name displays instead of a new pairing code. If no code appears, check that you still have an Internet connection or whether you are still logged in to a captive WiFi network, see Use a captive WiFi network that's password protected .Front screen HDMI Display 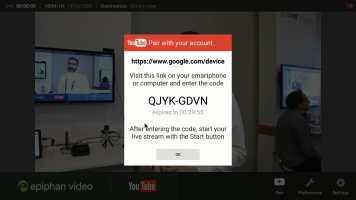
- Look at the front screen display for your YouTube device pairing code or click the Pair icon
- Configure your live stream settings.
- Click the Preferences icon at the lower right corner of the screen; the preferences screen opens.
- Click Publish destination in the YouTube details section; Webcaster X2 asks YouTube for a list of your events and displays these (along with Stream Now) in the Publish destinations settings box.
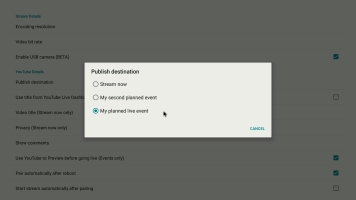
- Select Stream Now or the Event you want to stream to.
- Note: The information in brackets after event names shows the event's state and privacy setting.
- (OPTIONAL) If you selected an event you can choose to enable the Preview feature of your YouTube Live event. Check the Use YouTube to Preview before going live checkbox. When you use this feature, Webcaster X2 will start streaming to YouTube when you next turn it on, but YouTube will be in a preview-only mode. You'll start the actual broadcast by clicking Start from the YouTube Live Control Room.
- (Optional) Configure aspects of your YouTube stream. (Note that when streaming to a YouTube Live Event, Privacy and Video title are only configurable through your YouTube Live Event dashboard.)
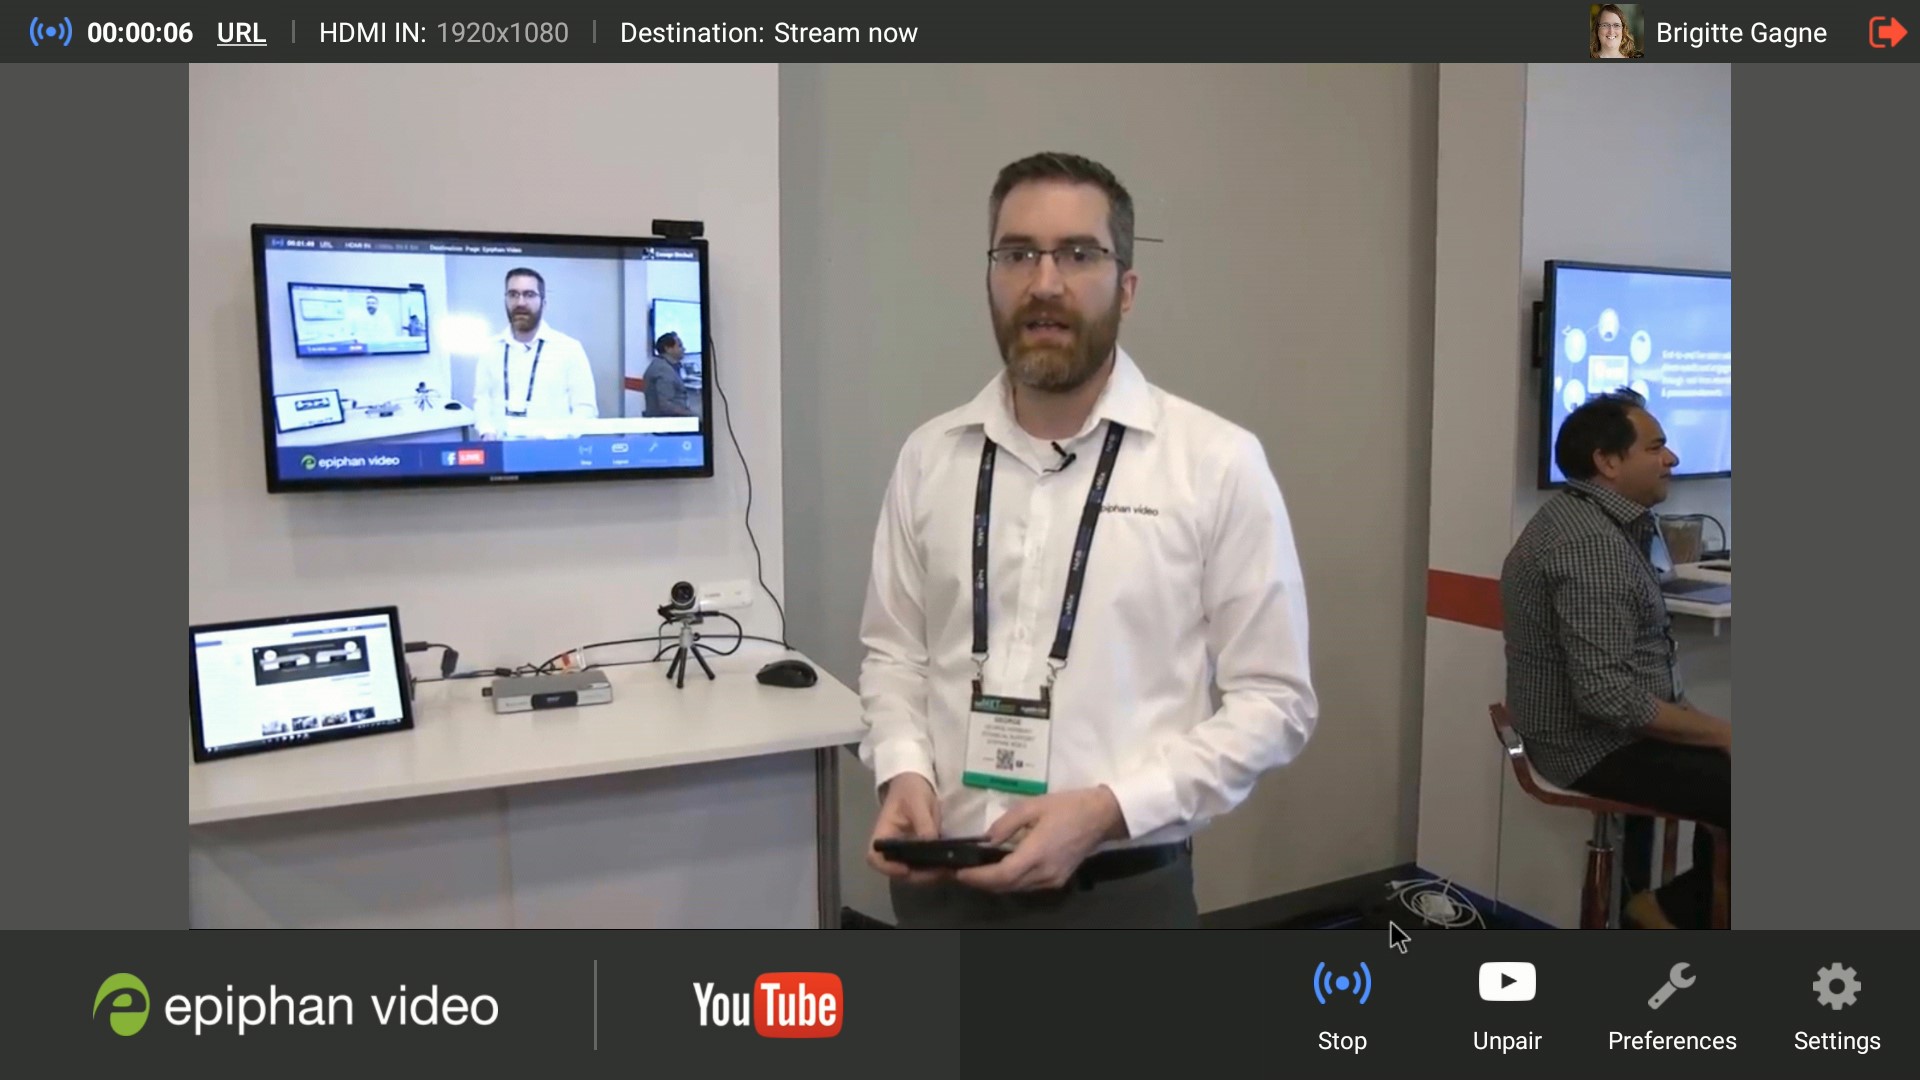
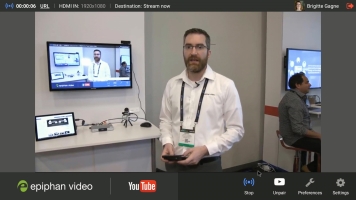
- You can use Webcaster X2 to monitor YouTube video comments on your attached HDMI display.
- At the top of the screen, viewers comments are displayed with most recent at the bottom.
- Below the comments you can see thumbs up and thumbs down count, as well as a count of total views and live viewers.
- If not already on the Preferences page, click the Preferences icon at the lower right corner of the screen. The Preferences screen opens.
- Check or uncheck the Show comments checkbox in the YouTube Details section.
- When your stream starts, you will see a live viewer count and comments on the chosen side of the screen.
- Right click to exit the Preferences.
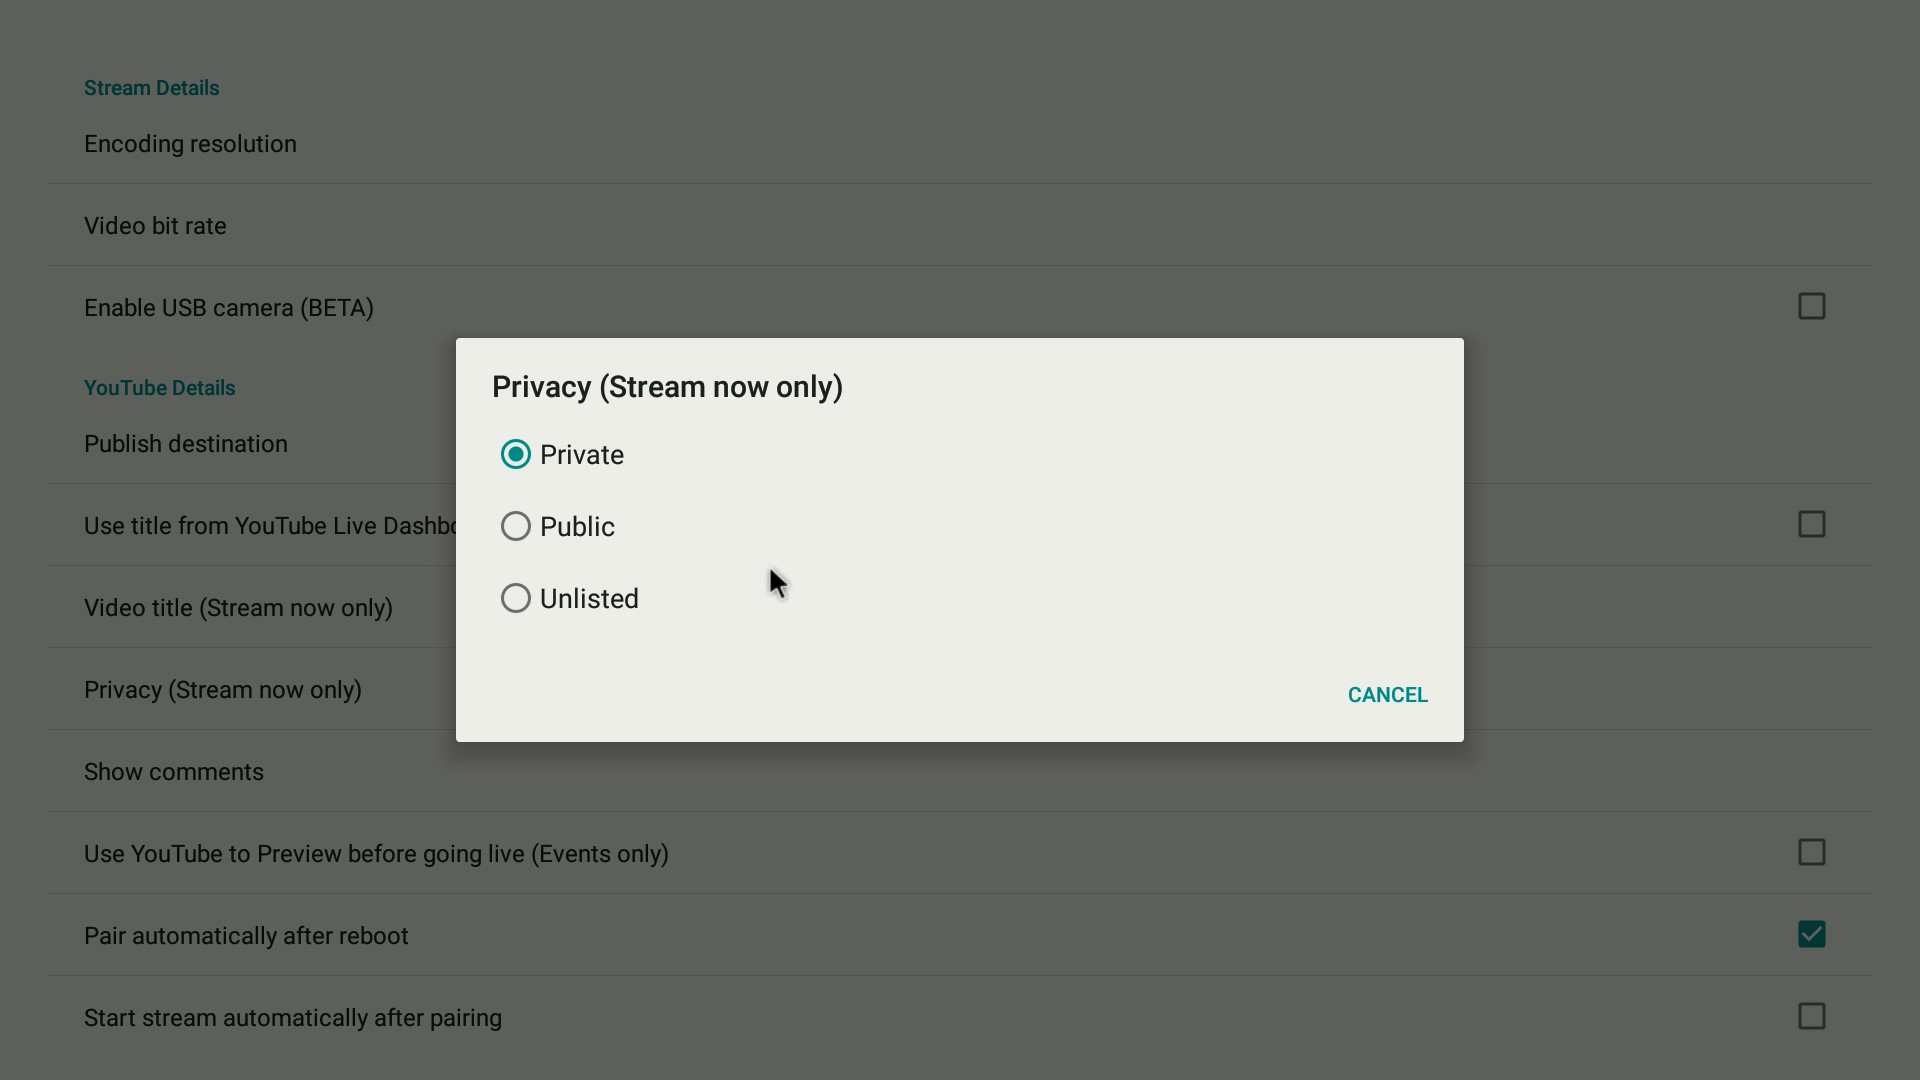
- You can use Webcaster X2 to configure the privacy of the video streamed to your YouTube channel.
- The stream's privacy setting affects who is notified of your live stream as well as who can see it.
- You can also change the stream's privacy setting from the YouTube Live Dashboard once your stream is live.
- Note: During a broadcast, Webcaster X2 is not updated to reflect the current privacy level of your live stream (e.g. if you change it using YouTube, Webcaster X2 is not updated with your changes). This option only controls the initial privacy setting of your stream.
- If not already on the Preferences page, click the Preferences icon at the lower right corner of the screen. The Preferences screen opens.
- Click Privacy in the YouTube Details section.
- Select an initial privacy setting for your live stream.
- Note: When you first get your Webcaster X2, the default privacy setting is Private to avoid accidentally streaming something you didn't mean to stream. If you change the settings, Webcaster X2 remembers those changes the next time you use the encoder.
- Right click to exit the Preferences.
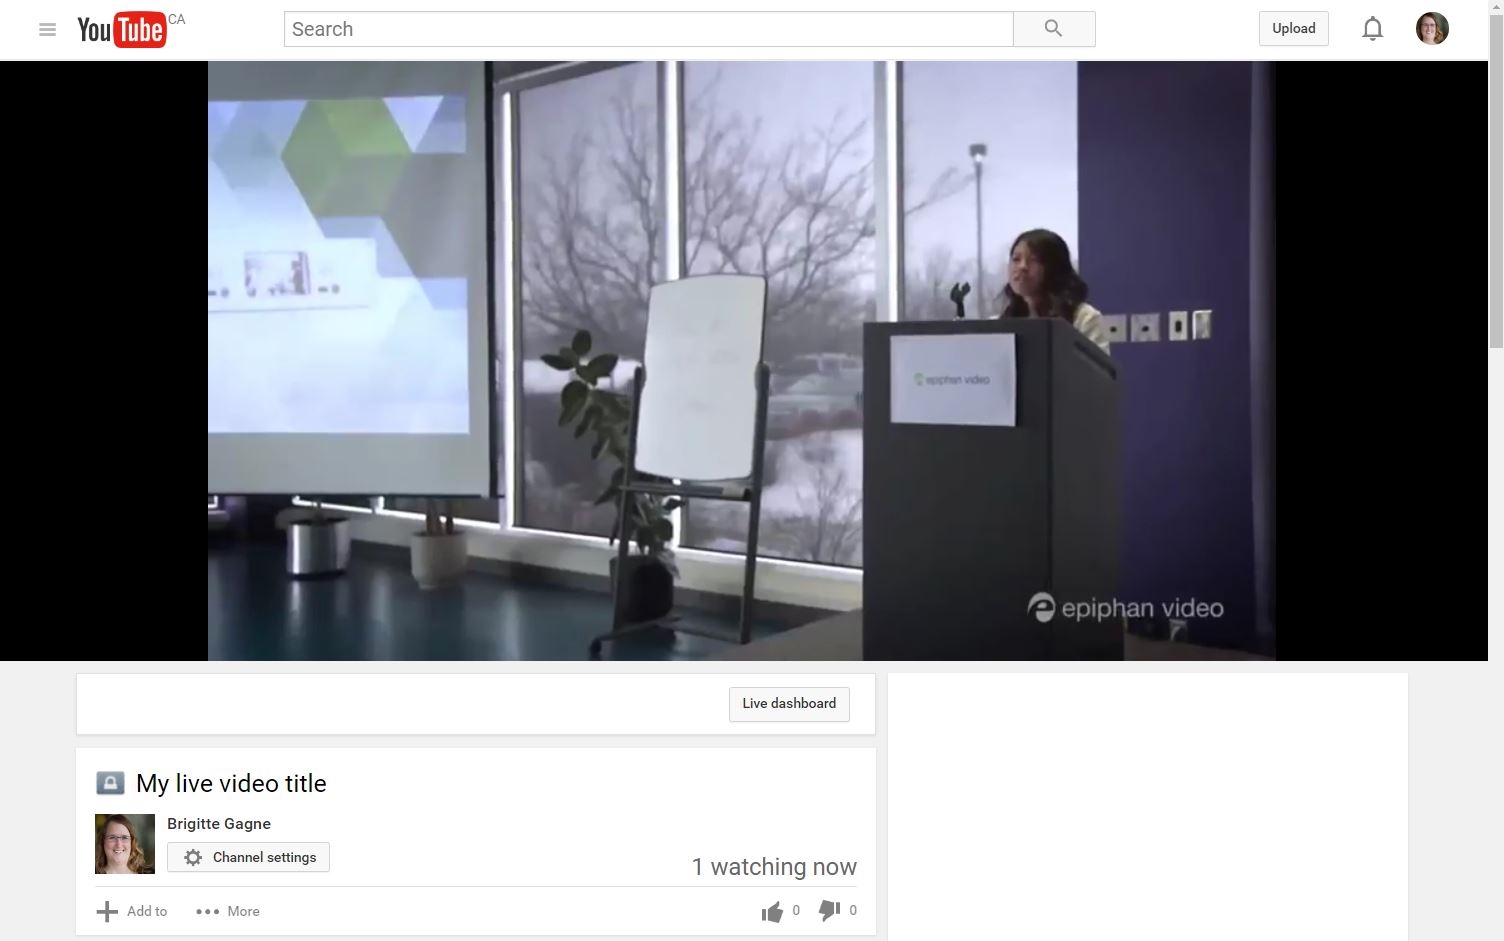
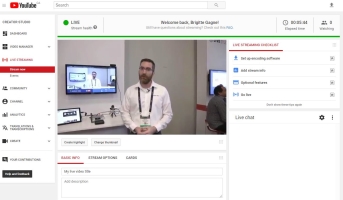
- You can see the video title while watching the video (see below the video):
- The video title is also visible (and editable) from your live dashboard (see the Basic Info section) :
- And the video title is also used in other YouTube locations like on your list of videos, in search results, etc.
- You can also change your video title and add a description by editing the text from the YouTube live dashboard.
- Note: During a broadcast, Webcaster X2 is not updated to reflect the current video video title for your live stream (e.g. if you change it using YouTube, Webcaster X2 is not updated with your changes). This option only controls the initial video title for your stream.
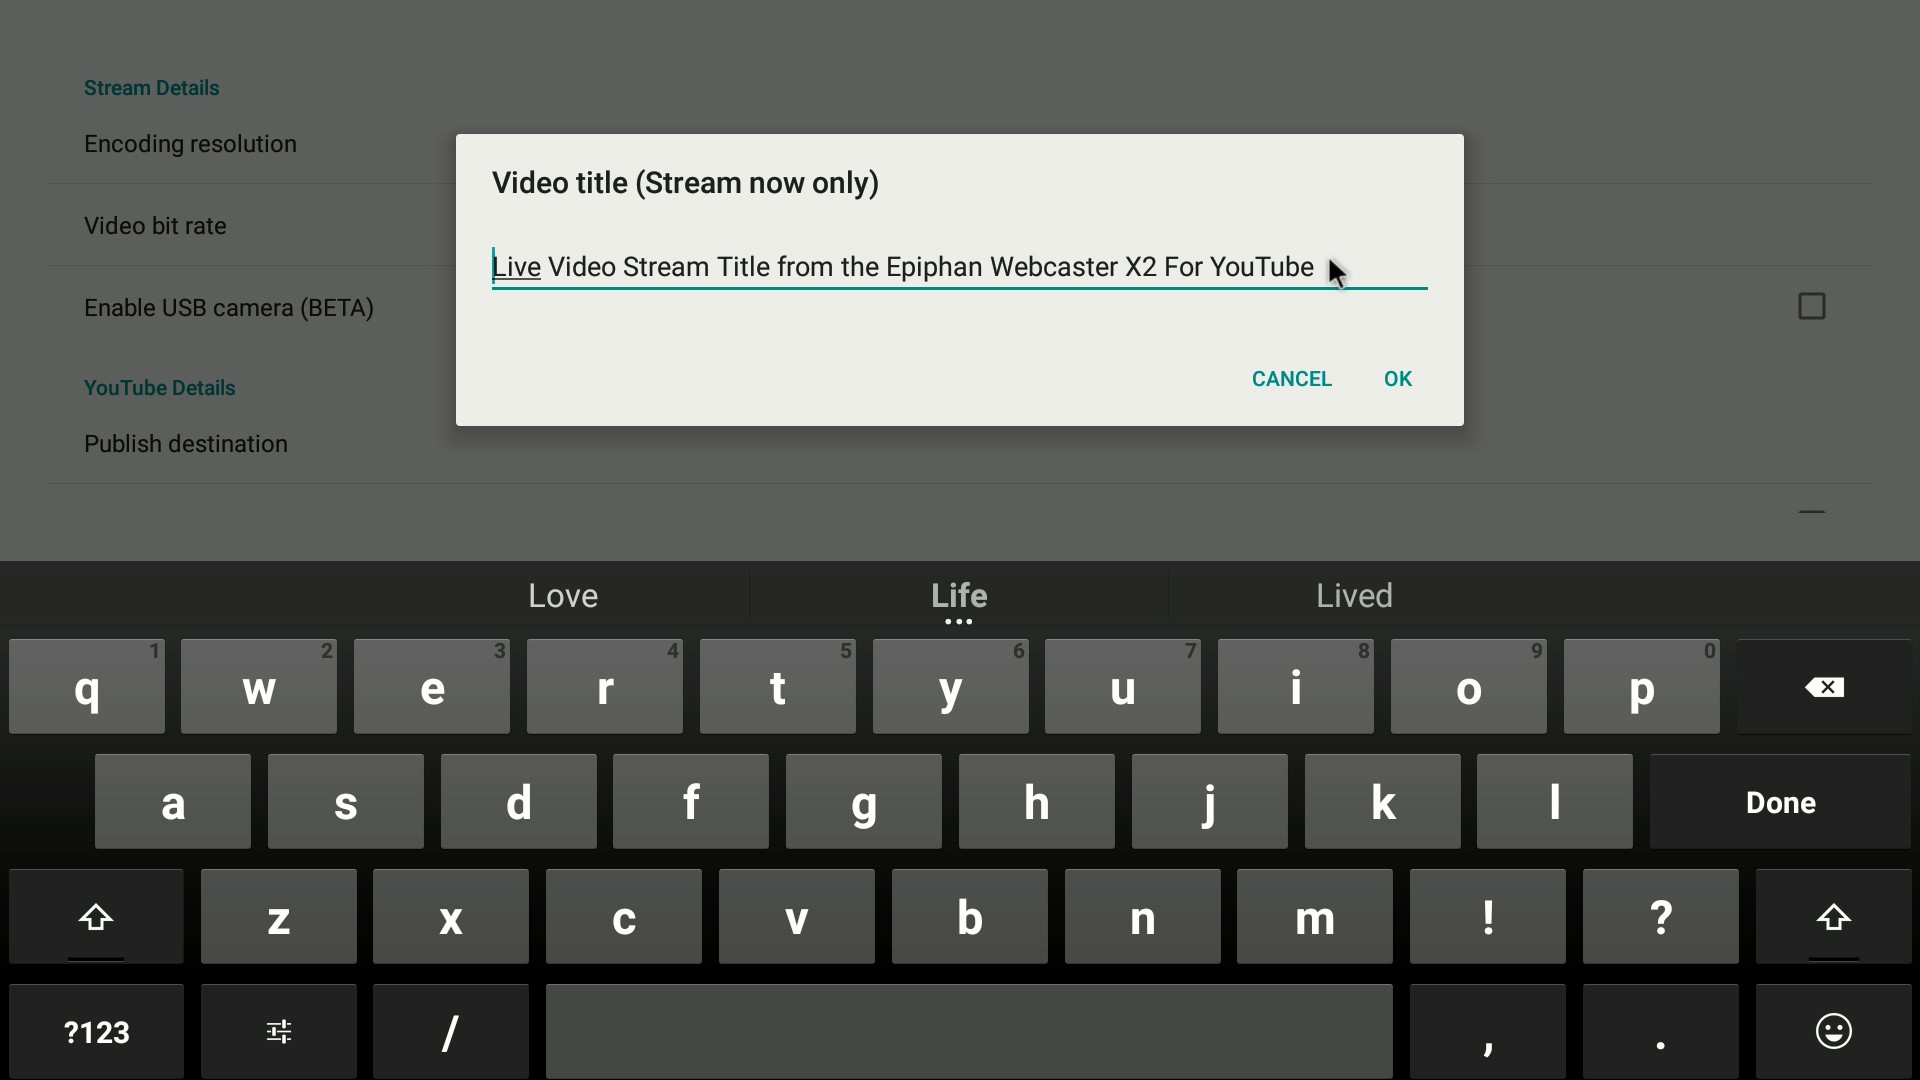
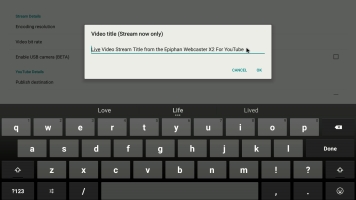
Live Video Stream Title from the Epiphan Webcaster X2 For YouTube
- If not already on the Preferences page, click the Preferences icon at the lower right corner of the screen. The Preferences screen opens.
- Click Video Title in the YouTube Details section.
- Use your USB keyboard or the on-screen keyboard to type a title for your video.
- Click OK to save your changes (or Cancel to go back without saving).
- Note: When you first get your Webcaster X2, the default Video title is generic. On subsequent uses, Webcaster X2 automatically uses your the most recent title you entered (or if you don't change it, it continues to use the default).
- Right click to exit the Preferences.
- (Optional) Configure your stream settings, being sure to match the bit rate and resolution you configured for your YouTube Live Event.
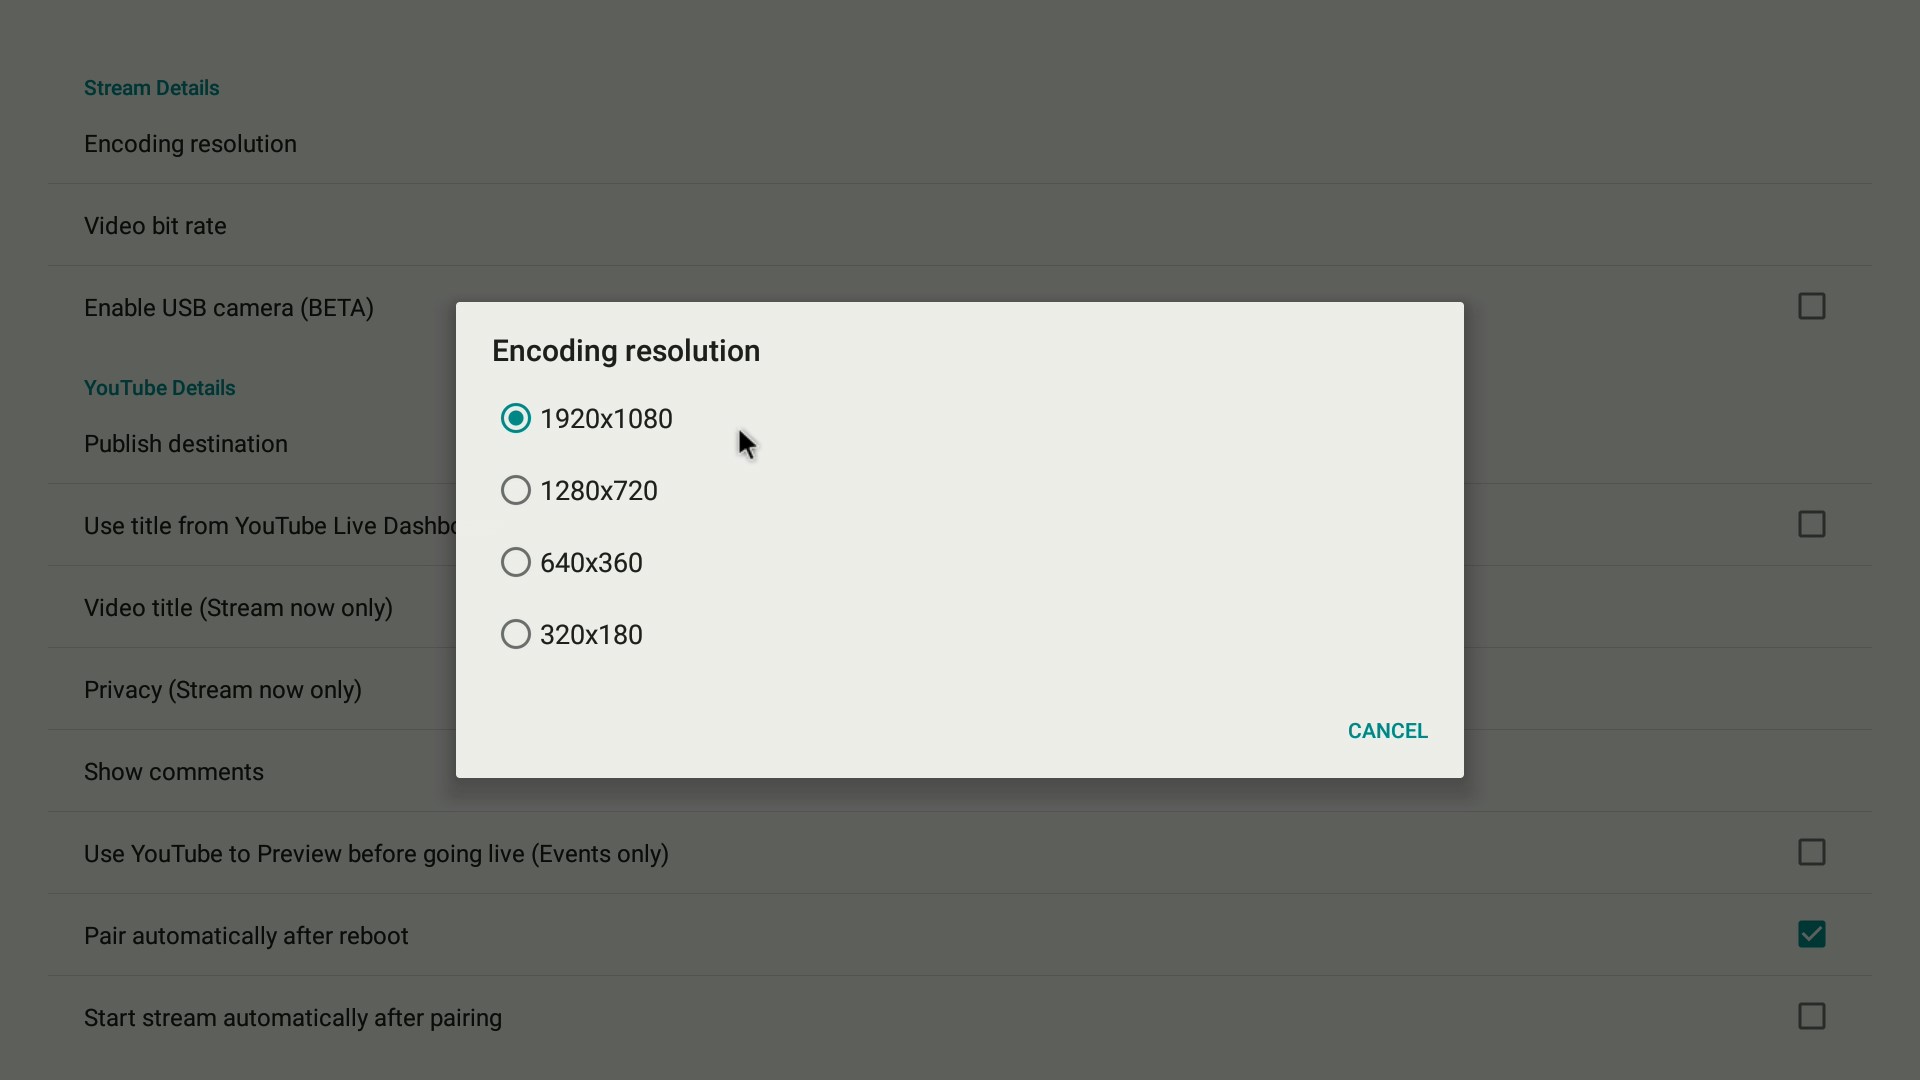
- The resolution is the size of each frame and is sometimes called frame size.
- Usually these values are expressed as a pair of values such as 1280×720. The first value describes how wide your picture is (in pixels) and the second how tall it is.
- Some resolutions also have short forms. For instance 720p or HD means 1280×720.
- The higher (larger) the resolution, the more data needed to accurately describe everything in your video.
- If you have limited uplink bandwidth, you may need to stream at a lower frame size.
- Facebook has specifications for the maximum resolution they accept. Currently this value is 1280×720 (720p).
- You can configure the resolution that Webcaster X2 sends to YouTube, Facebook, or Twitch.
- If not already on the Preferences page, click the Preferences icon at the lower right corner of the screen. The preferences screen opens.
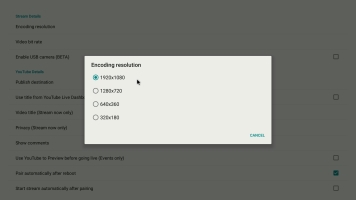
- Click Encoding resolution in the Stream Details section.
- Use your connected USB mouse to select the resolution for your live stream. For example:
- Right click to exit the Preferences menu.
- The bit rate is a measure of how many bits of data are sent each second and is often referred to in Mega bits per second (Mbps) or kilobits per second (kbps).
- The higher the bitrate, the more data per frame, and therefore the more detail you'll see in your video.
- Higher bitrates send more data over your uplink, so sometimes having a low bit rate is necessary to avoid overloading your Internet connection.
- Facebook has specifications for the maximum frame rate they accept. Currently this value is 4 Mbps.
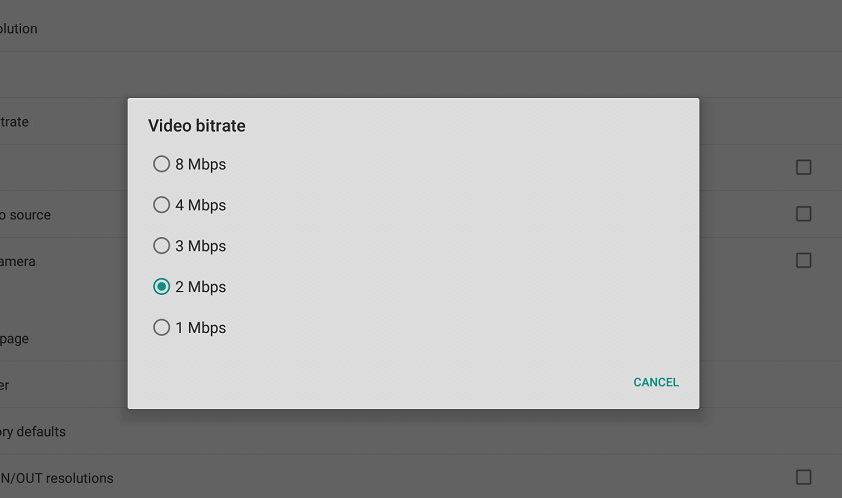
- You can configure the bit rate that Webcaster X2 sends to your streaming platform. By default, Webcaster X2 streams using 2Mbps.
- Click the Preferences icon at the lower right corner of the screen. The preferences screen opens.
- Click the Video bitrate option and then select a bitrate for your live stream.
- Right click to exit the Preferences.
- Scroll to the bottom of the list and check the checkbox for Start stream automatically after pairing.
- If not checked, check the checkbox for Pair automatically after reboot.
- Click the Right mouse button to return to the main screen.
See viewer commentsWhat does show comments do?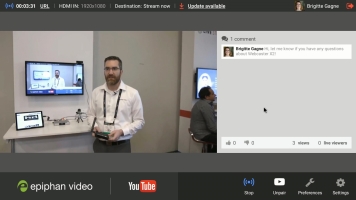 During your live stream, click the left mouse button of your mouse connected to Webcaster X2 to show or hide the Webcaster X2 overlay (including comments, if you have your device configured to show them).Configure your stream's privacyWhat does setting the stream privacy do on YouTube?
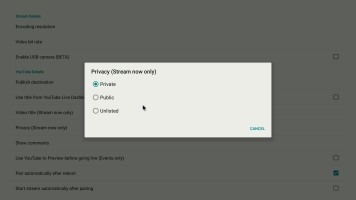 Set a video titleWhen you first get your Webcaster X2, the default video title is:Where is the video title used on YouTube?
 Configure stream resolutionWhat is stream resolution?Note: If you change the video resolution while streaming, the change only takes effect after the stream ends.
Facebook YouTube 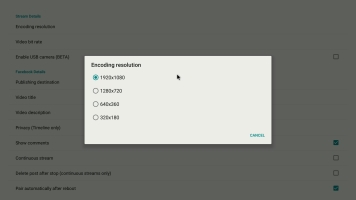
 Note: When you first get your Webcaster X2, the default resolution is 1280×720. If you change the settings, Webcaster X2 remembers those changes the next time you use the encoder.Configure video bit rateWhat is video bit rate?Note: If you change the video bit rate while streaming, the change only takes effect after the current stream ends.
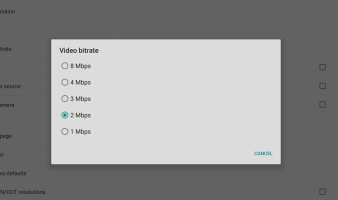
- Click the Preferences icon
- Turn off Webcaster X2
- Press and hold the multi-function power button to turn off the device.
- (Optional) Disconnect the cables and move Webcaster X2 to your broadcast location.
- When you are ready, begin your broadcast!
- (Optional) Connect an HDMI display and USB mouse to Webcaster X2.
- When you are ready to start streaming, turn on Webcaster X2 by connecting the power cable or pressing the multi-function power button; Webcaster X2 executes its boot-up sequence.
- After boot-up, Webcaster X2 starts streaming with your saved settings and the front display shows the elapsed streaming time.
- (Optional) If streaming to a Live Event with previewing enabled, use the YouTube Live Control Room for your event (can be found from the YouTube My Live Events page) to view the preview of your stream and to start the stream when you are ready.
- If an HDMI display is attached, it updates to let you know how long you have been streaming.
 During your broadcast, click the left mouse button to show or hide the Webcaster X2 overlay (including comments, if you have your device configured to show them).
- End your broadcast .
- If you are streaming to Stream Now, do any one of these things:
- Click the Stop icon
 , then confirm that you wish to stop streaming.
 - Press the multi-function power button once.
- Click Unpair to log out of your YouTube (Google) account (you will need to re-pair before using Webcaster X2 again.)
- Click the Webcaster X2 Exit icon
 to leave the YouTube streaming application.
 - Turn off Webcaster X2 by pressing and holding the multi-function power button for 7 seconds.
- If you are streaming to a Live Event:
- When your live broadcast is over, click the Stop Streaming button in your YouTube Live Control Room to complete the event.
- Webcaster X2 stops transmitting to YouTube.
- Now that your YouTube Live Event is complete, you can no longer stream to it. Webcaster X2 updates its publish destination to Stream Now.
By default, if you turn off the device without unpairing, your Webcaster X2 is still paired with your YouTube (Google) account next time you turn it on. You can change this behavior by following the steps here: Stay paired with Facebook.