
Webcaster X1 for YouTube user guide
Stream now to YouTube
You can live stream any HDMI camera or other HDMI source to your YouTube channel with Webcaster X1 for YouTube. For simple instructions to stream to your Timeline the first time you use Webcaster X1, see our Quick start guide.
These instructions include optional configuration steps like choosing your stream's privacy level and setting a video title.
To configure and stream live to YouTube you need:
- A YouTube channel that is verified and has no live stream restrictions
- Your HDMI camera to stream
- Your Webcaster X1 for YouTube
-
An Internet connection with 4 Mb/s uplink
This examples shows you how to stream an HDMI camera, but you can use any other HDMI source you like (camera, computer, video mixer, etc.), as long as your source (or media) does not have High-bandwidth Digital Content Protection (HDCP).
- Connect everything and turn on Webcaster X1
- Connect the supplied power cable to Webcaster X1.
- Connect your display to the HDMI OUT port.
- Connect your Ethernet cable to the Ethernet port.
- Connect your mouse to one of the USB ports.
- (OPTIONAL) Connect your keyboard to another USB port.
- Turn on Webcaster X1 using the toggle button at the back; Webcaster X1 executes its boot-up sequence.
- If not already logged in, authorize Webcaster X1 to stream to your YouTube channel.
- (OPTIONAL) Configure Webcaster X1 to start streaming automatically after login. (Skip this step if you want to control streaming with the Start option in Webcaster X1.)
- Click the Preferences icon
 at the lower right corner of the screen; the preferences screen opens.
 - Scroll to the bottom of the list and ensure Automatic start streaming after user login is checked.
- Click the Right mouse button to return to the main screen.
- Note: With Automatic start streaming after user login checked, your broadcast will begin as soon as you complete YouTube (Google) authorization in the next step. (See Autostart after login for more information about this feature.)
- Click the Preferences icon
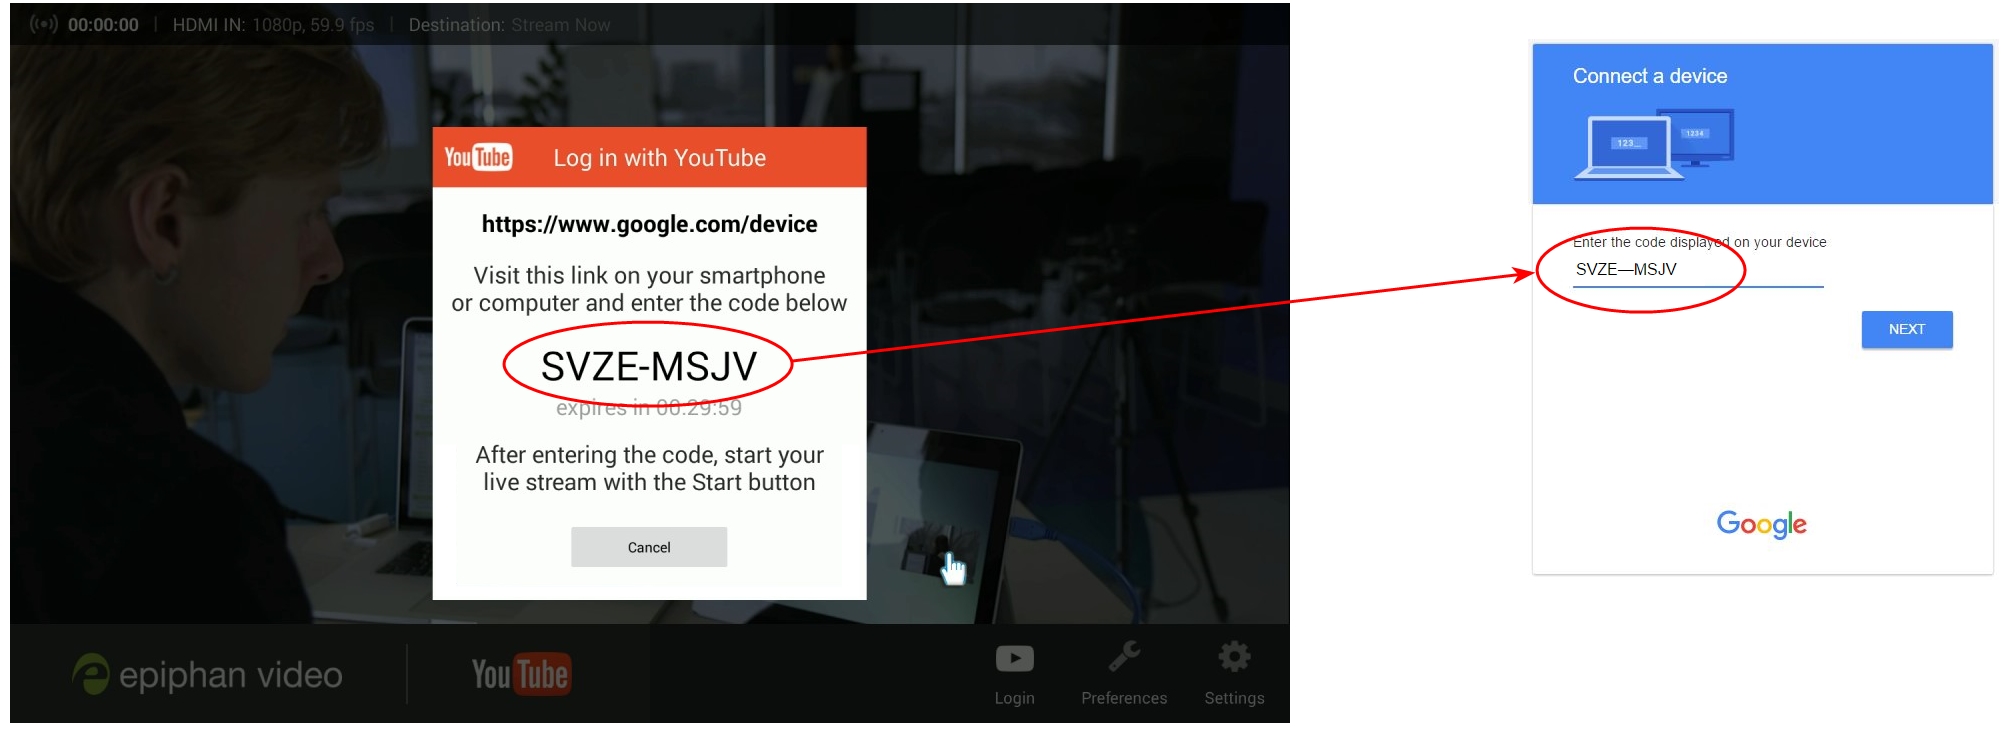
- Authorize Webcaster X1 for YouTube to your YouTube channel.
- Ensure your Webcaster X1 is connected to the Internet.
- Open a web browser on your computer, tablet or mobile device.
- Go to google.com/device.
- If needed, login to your Google account.
- If you manage more than one YouTube channel, pick the channel you want to stream to.
- On your display attached to Webcaster X1, a message box says Log in with YouTube (if this message does not appear, click the Login icon
 ). Type the code in this box into the device code box on your Google device pairing page.
 - (OPTIONAL) Alternatively, the same device code is available from Webcaster X1's screen. Enter this code in the device code box on your Google pairing page.
- Click Next, then Allow in your Google pairing window to authorize Webcaster X1 to live stream to your YouTube channel.
Use the device code
- (OPTIONAL) Configure Webcaster X1 to start streaming automatically after login. (Skip this step if you want to control streaming with the Start option in Webcaster X1.)
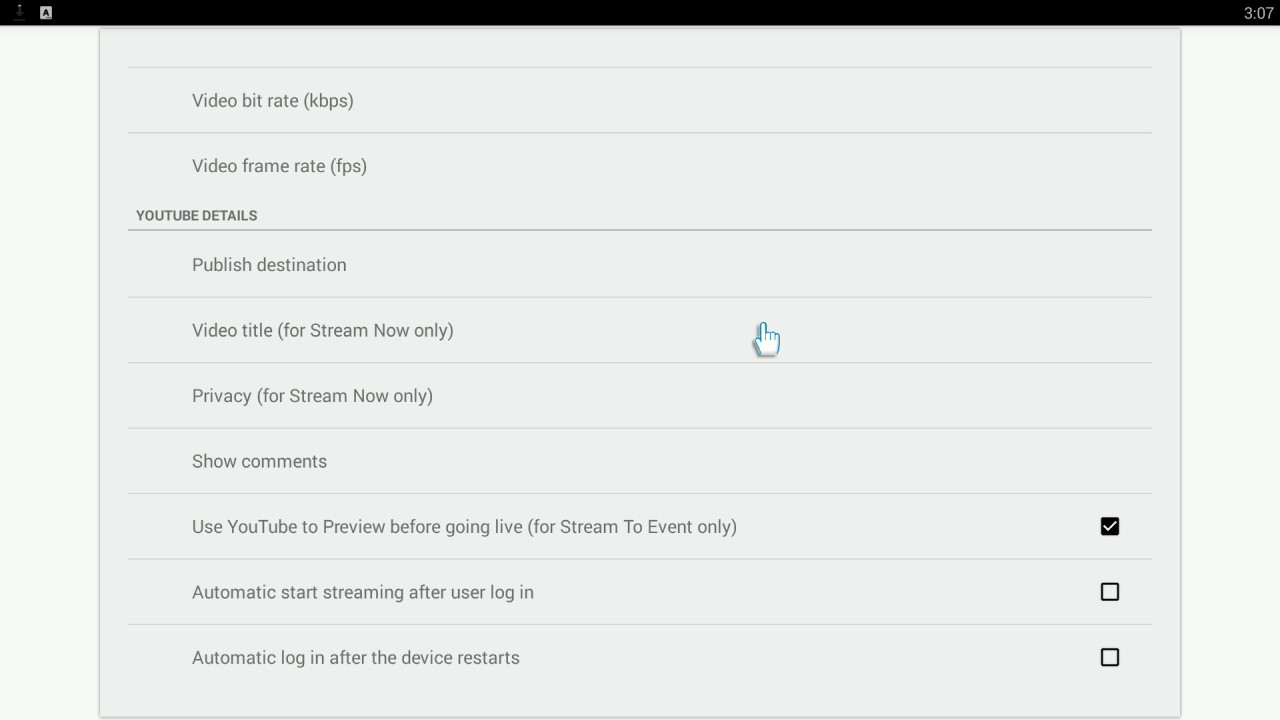
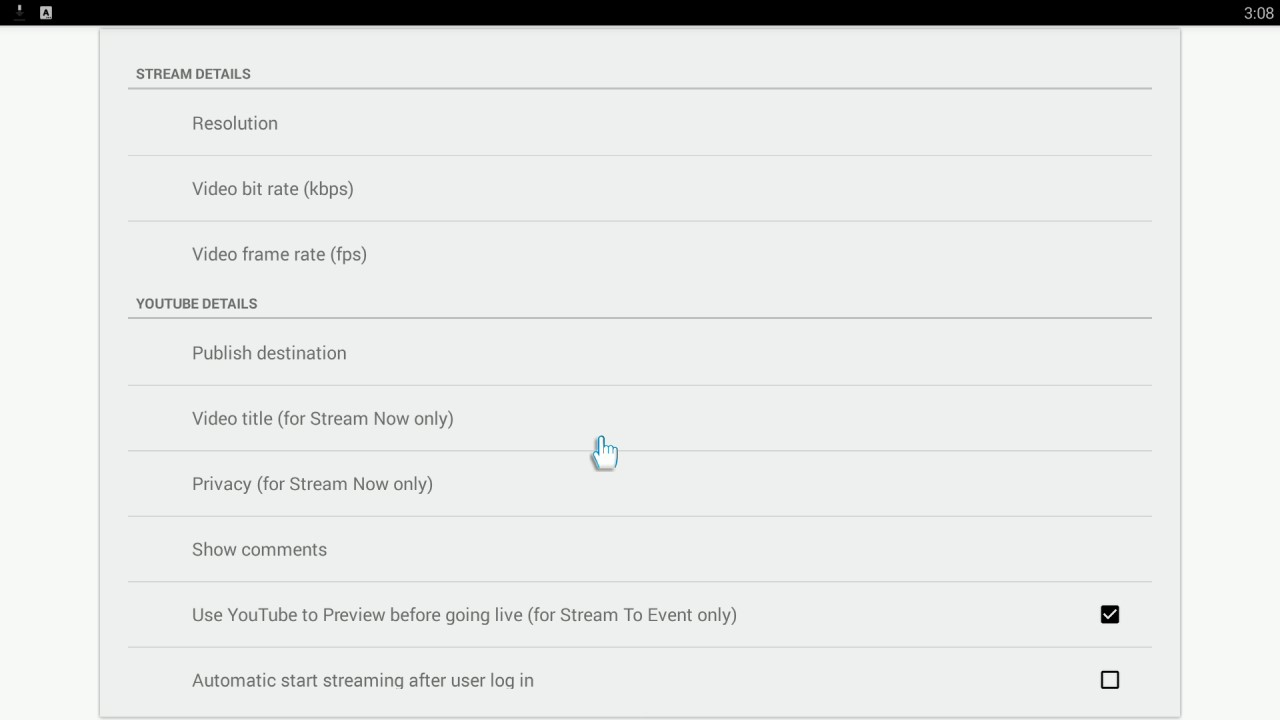
- (OPTIONAL) Configure optional aspects of your YouTube live stream.
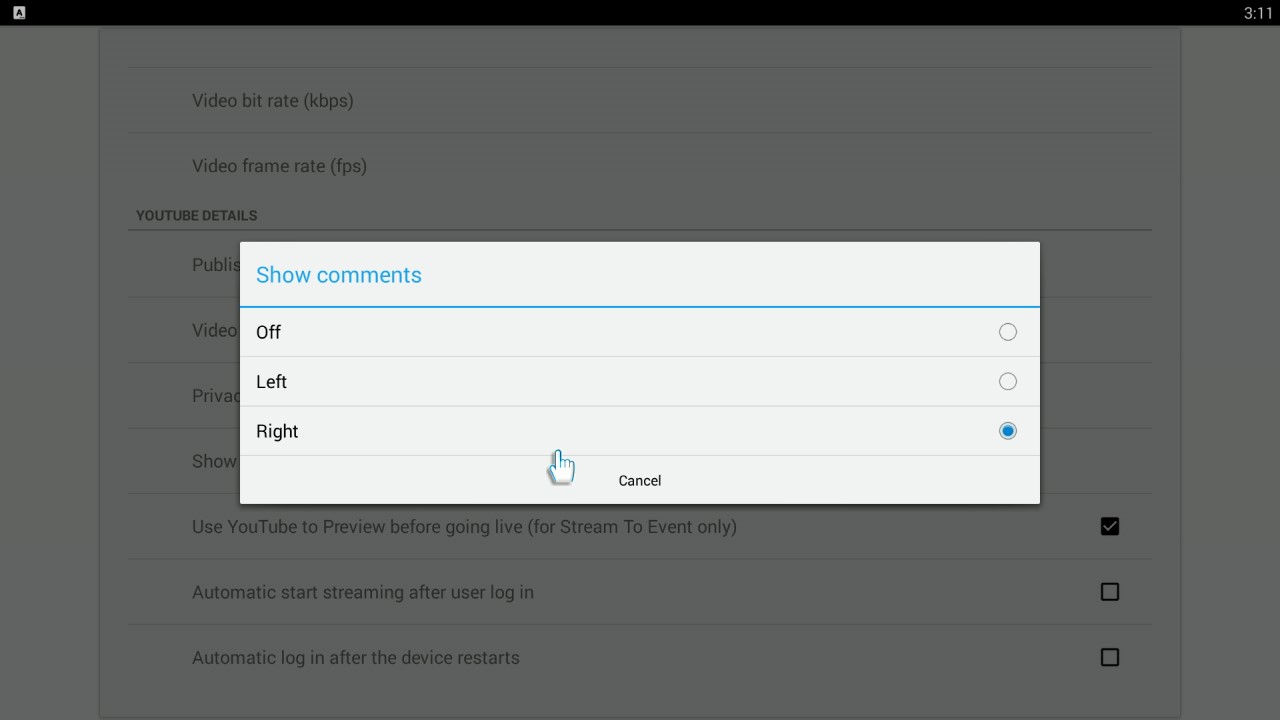
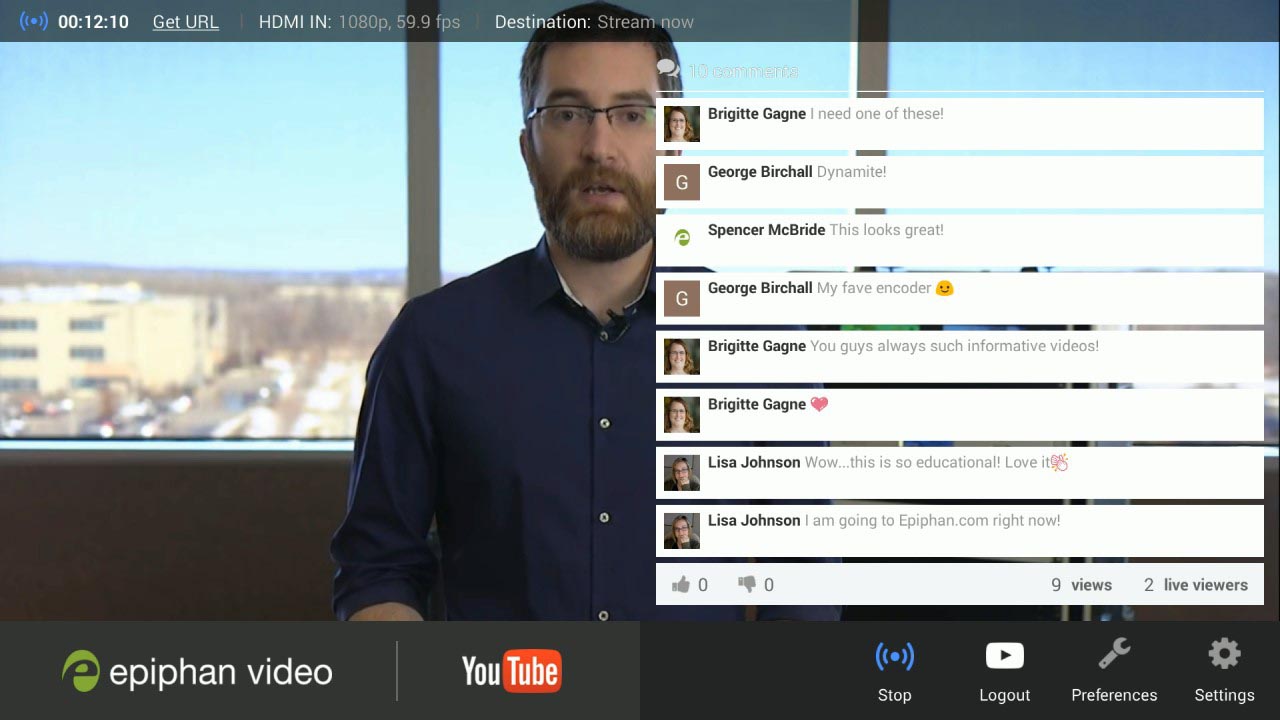
- You can use Webcaster X1 to monitor YouTube video comments on your attached HDMI display.
- At the top of the screen, viewers comments are displayed with most recent at the bottom.
- Below the comments you can see thumbs up and thumbs down count, as well as a count of total views and live viewers.
- You can choose to have these shown either on the left or right side of the screen.
- If not already on the Preferences page, click the Preferences icon at the lower right corner of the screen; the preferences screen opens.
- Click Show comments in the YouTube Details section.
- Select the location for the comments.
- When your stream starts, you will see a live viewer count and comments on the chosen side of the screen.
- If you are done with YouTube settings for your stream, right click to exit the Preferences menu.
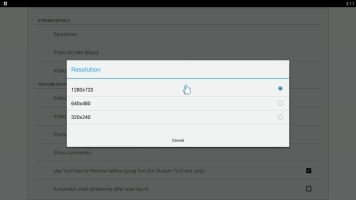
- (OPTIONAL) Configure your stream settings.
- The resolution is the size of each frame and is sometimes called frame size.
- Usually these values are expressed as a pair of values such as 1280×720. The first value describes how wide your picture is (in pixels) and the second how tall it is.
- Some resolutions also have short forms. For instance 720p or HD means 1280×720.
- The higher (larger) the resolution, the more data needed to accurately describe everything in your video.
- If you have limited uplink bandwidth, you need to find a balance between frame size and frame rate that makes your video look as good as possible at your current bit rate.
- You can configure the resolution that Webcaster X1 sends to
- Note: You cannot change the resolution during your live broadcast. If you change it while streaming, the change only takes effect when you stop the current stream and start another.
- If not already on the Preferences page, click the Preferences icon at the lower right corner of the screen; the preferences screen opens.
- Click Resolution in the Stream Details section.
- Use your connected USB mouse to select the bit rate for your live stream.
- Note: When you first get your Webcaster X1 for YouTube, the default resolution is 1280×720. On all subsequent uses after your first use, the default frame size is whatever you set last time.
- If you are done with settings for your live stream, right click to exit the Preferences menu.
- The frame rate is a measure of how many frames are sent each second and is often referred to as frames per second and abbreviated fps.
- The higher the frame rate, the smoother the action in your video. This is particularly true for video that has a lot of movement.
- The higher the frame rate, the more data you're sending over your uplink.
- If you have limited uplink bandwidth, you need to find a balance between frame size and frame rate that makes your video look as good as possible at your current bit rate.
- YouTube has specifications for the maximum frame rate they accept. Currently this value is 30 fps.
- You can configure the frame rate that Webcaster X1 sends to
- Note: You cannot change the frame rate during your broadcast. If you change it while streaming, the change only takes effect when you stop the current stream and start another.
- If not already on the Preferences page, click the Preferences icon at the lower right corner of the screen; the preferences screen opens.
- Click Video frame rate (fps) in the Stream Details section.
- Use your connected USB mouse to select the frame rate for your live stream.
- Note: When you first get your Webcaster X1 the default frame rate is 30. On all subsequent uses after your first use, the default frame rate is whatever you set last time.
- If you are done with
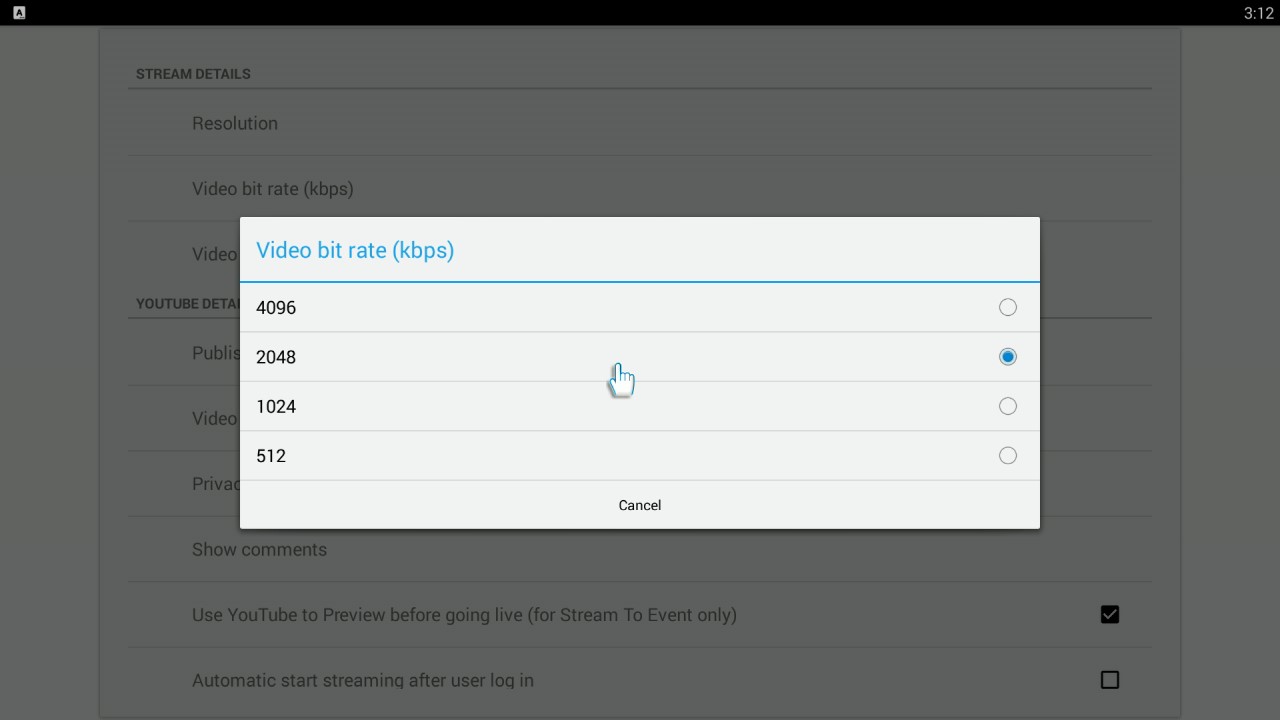
- The bit rate is a measure of how many bits of data are sent each second and is often referred to as kilobits per second and abbreviated kbps.
- The higher the bit rate, the more data per frame, and therefore the more detail you'll see in your video.
- Higher bit rates send more data over your uplink, so sometimes having a bit rate is necessary to avoid overloading your Internet connection.
- You can configure the bit rate that Webcaster X1 sends to
- Note: You cannot change the bit rate during your broadcast. If you change it while streaming, the change only takes effect when you stop the current stream and start another.
- If not already on the Preferences page, click the Preferences icon at the lower right corner of the screen; the preferences screen opens.
- Click Video bit rate (kbps) in the Stream Details section.
- Use your connected USB mouse to select the bit rate for your live stream.
- Note: When you first get your Webcaster X1, the default bit rate is 4096. On all subsequent uses after your first use, the default frame rate is whatever you set last time.
- If you are done with
- Click the Right mouse button to return to the main screen.
See viewer commentsWhat does show comments do?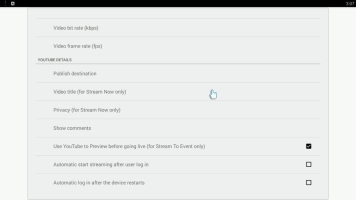

 During your livestream, click the left mouse button of your mouse connected to Webcaster X1 to show or hide the Webcaster X1 overlay (including comments, if you have your device configured to show them).Your USB mouse or keyboard must be connected to Webcaster X1 for YouTube before boot-up.Configure stream resolutionWhat is stream resolution?
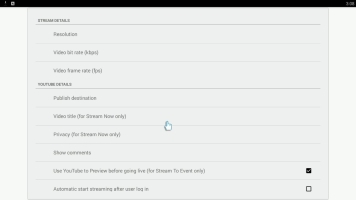
 Your USB mouse or keyboard must be connected to Webcaster X1 before boot-up.Configure stream frame rateWhat is stream frame rate?
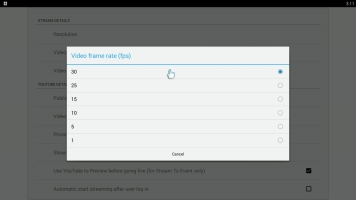 Your USB mouse or keyboard must be connected to Webcaster X1 before boot-up.Configure stream bit rateWhat is stream bit rate?
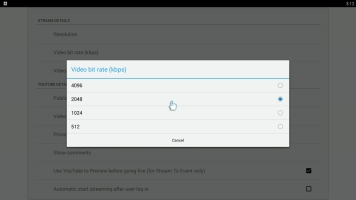 Your USB mouse or keyboard must be connected to Webcaster X1 before boot-up.
 - (OPTIONAL) Configure further aspects of your Live stream through YouTube.
- Open a browser window on your computer, tablet or mobile device.
- Go to the YouTube live dashboard www.youtube.com/live_dashboard.
- Add a description for your video, choose a thumbnail and/or choose a category for your live stream.
- If you are not using auto-start after login, choose when to begin your broadcast!
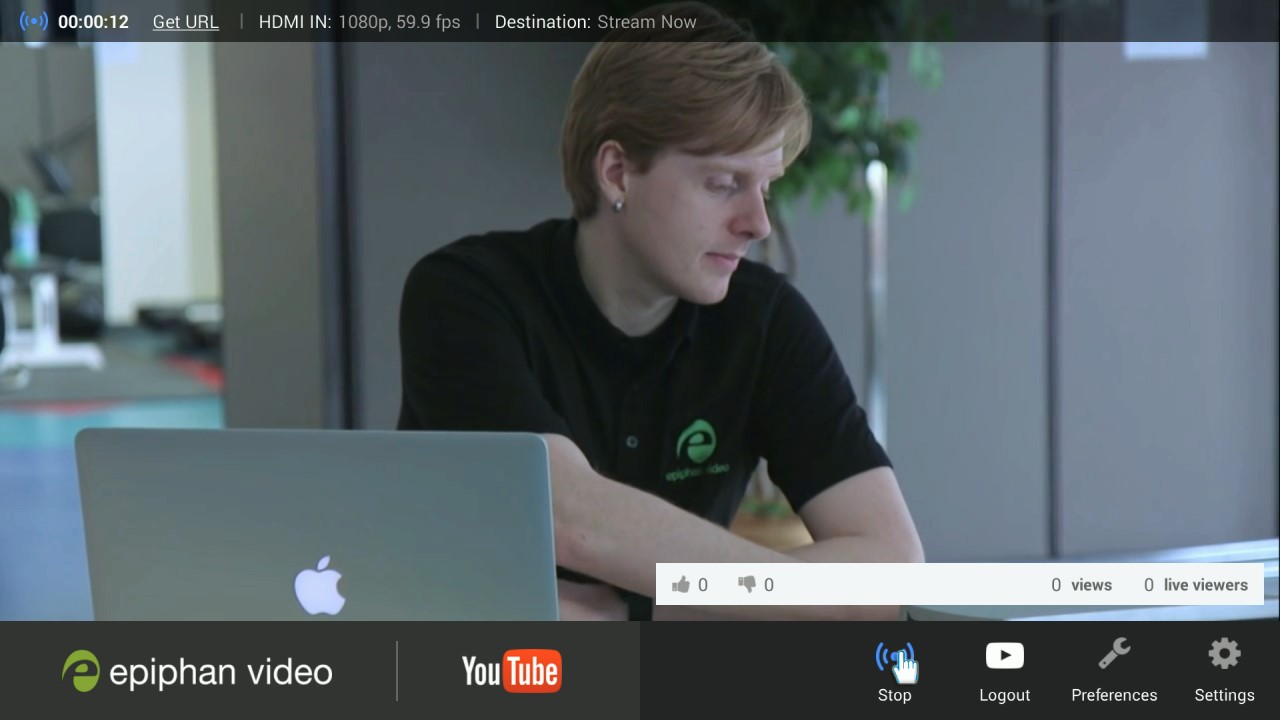
- When you are ready to start streaming, click the Start icon
 ; the screen updates to let you know how long you have been streaming.
(Note the info bar at the top confirms you are streaming to the Stream Now destination.)
; the screen updates to let you know how long you have been streaming.
(Note the info bar at the top confirms you are streaming to the Stream Now destination.)  During your broadcast, click the left mouse button to show or hide the Webcaster X1 overlay (including comments, if you have your device configured to show them).
- When you are ready to start streaming, click the Start icon
- End your broadcast. When your live broadcast is complete, you can stop streaming by doing any one of these three things:
- Click the Stop icon .
- Click the Logout icon to log out of your YouTube account (you will need to re-authenticate before using Webcaster X1 again.)
- Turn off Webcaster X1.
By default, if you turn off the device without logging out, you will be automatically logged in next time you turn on Webcaster X1. You can change this behavior by following the steps here: Stay logged in. - Click the Stop icon


You can also use Webcaster X1 for YouTube in pre-configured mode with manual or automatic start.