Record a video
The Epiphan Capture Tool can record the images captured from your DVI2USB 3.0 as a video.
You can choose to capture audio (see Configure audio) and can also alternatively choose to save individual image files instead of a video, see Record as a series of images.
To record a video of your captured video source:
Step 1: Set the codec
Take this opportunity to select your encoding codec. Codecs are the software that take the uncompressed video frames from the DVI2USB 3.0 and combine/compress these into a digital video file that you can view with a player, share with a colleague or upload to a video sharing site, like YouTube.
By default, your operating system comes with some default codecs installed, no additional codecs come with the Epiphan Capture Tool. You can choose to install third party codecs such as x264. Picking the best codec for your use case is beyond the scope of this document, but you can find many resources (and debates) about this topic on the Internet.
To configure the codec:
- Connect your video source to the video grabber.
- Connect the video grabber to a USB port on your capture workstation (use USB 3.0 for best performance or if you plan to capture embedded audio).
- Launch the Epiphan Capture Tool using the installed desktop shortcut. See or Epiphan Capture Tool.
- Select the Tools » Options menu item; a dialog box opens.
- Select the Recording tab.
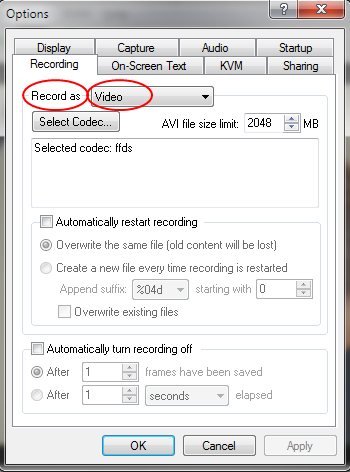
- Ensure the Record as drop down has Video selected.
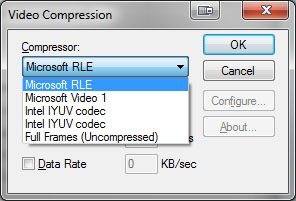
- Use the Select Codec... button to open the Video Compression dialog. Choose from codecs installed on your system and click OK to close the Video Compression dialog.
- If desired, modify the AVI file size limit. Recording will automatically be stopped when this limit is reached.
- From this page you can also Configure optional recording settings such as file names and recording period.
- Click OK to save your Recording settings.
Step 2: Record
With the Epiphan Capture Tool properly configured, all there is to do is record your video!
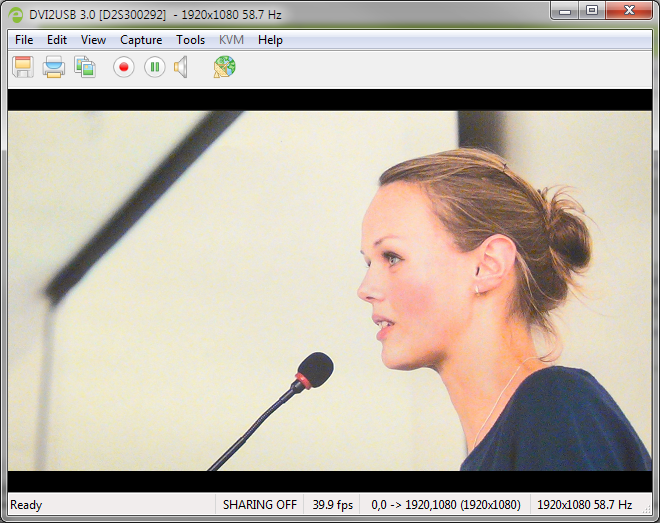
As images/frames are captured by the video grabber they are recorded to the video file. The status bar displays the name and location of the video file, the elapsed recording time and the number of frames (or images) recorded.
To record your video:
- The Epiphan Capture Tool should already be capturing and previewing your video source (if you see a No Signal message, disconnect and reconnect the cables to make sure they are all seated correctly).
- Optionally, configure audio capture and enable audio capture. See Configure audio.
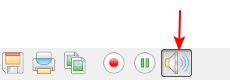
- Select Capture » Start Recording, use the red record button or keyboard shortcut Ctrl-R to start recording; a Save dialog opens.

- Specify the filename and folder to save your file. (See Configure optional recording settings for pre-configuring recording file names.)
- When you are done capturing, use the pause or stop buttons to pause or stop recording. (You can also use the keyboard shortcut Ctrl-U for pause and can use the menu items Capture » Pause or Capture » Stop Recording to control recording.)

- Use your operating system's file browser (Windows Explorer or Finder) to find your saved capture file. If the status bar is visible, the filename and path of the last saved file is found in the status bar at the bottom of the Epiphan Capture Tool.
If you're having trouble capturing embedded audio, make sure you have the video grabber connected to a USB 3.0 port. Due to the extra volume of data that needs to be captured, embedded audio capture is only supported when connected via USB 3.0.
HDMI audio capture may fail if your device has an old or incorrect EDID loaded. See Update device EDID.
When the video file reaches the AVI file size limit, one of the following occurs based on recording configuration settings:
- recording stops;
- recording continues and a new video file is created; or
- recording continues and the original video file is overwritten.
To set recording options refer to Configure optional recording settings.
