Quick start
After you've unpacked your Pearl Nano, you're ready to get started. This quick start uses the default settings where possible so you can quickly start using your Pearl Nano.
Before you begin, make sure you have:
- A video source such as a camera or computer and cables to connect them to Pearl Nano. For HDMI, the video source must not be HDCP protected.
- An audio source coming from either your SDI
- Local area network that uses Dynamic Host Configuration Protocol (DHCP) is preferable.
- Computer with a web browser connected to the same network. We'll call it the “admin” computer.
- Ethernet cables to connect Pearl Nano and the admin computer to the network.
- An SD card so you can record video using Pearl Nano right away. We recommend an SD card that is at least a class 10 with up to 512 GB of capacity, see SD card and SATA M.2 2280 SSD storage.
Pearl Nano comes shipped with an AC/DC power adapter and a registration card that contains brief instructions to connect Pearl Nano to the network, login to the Admin panel, and format an SD card. The instructions in this quick start provide more details.
Starting up
Pearl Nano is pre-configured with a no fuss Auto channel, which makes it possible to connect a video source and start recording right away to the EXT4 formatted SD card that you install.
When you first start Pearl Nano, the pre-configured Auto channel behaves as follows:
-
If you connect an HDMI video source to the HDMI IN port, the Auto channel automatically uses the HDMI video and embedded HDMI audio.
-
If you connect an SDI video source to the SDI port, the Auto channel automatically uses the SDI video and embedded SDI audio.
-
If both HDMI and SDI video sources are connected, the HDMI video source and embedded audio takes priority and is used in the Auto channel by default.
-
If no video sources are connected, a standard No Signal screen displays.
The Auto channel's frame size is set to match the video source by default and the best bit rate for the default frame rate of 30 fps is applied automatically.
Start up Pearl Nano for the first time
- Turn on your camera or video source and connect the output to the HDMI IN port on the back panel of Pearl Nano.
- (Optional) Connect a video source to the SDI port.
- Connect the Ethernet cable to Pearl Nano and to your network. If your network supplies PoE+ power, then you can skip the next step to connect the power adapter. Pearl Nano will power up using the power from the Ethernet cable.
- Connect the power adapter cable and finger tighten the screw ring securely. Then plug the other end into a power source.
- Wait for the power-up cycle to complete and the Auto channel to appear on the front screen.
- (Optional) Plug headphones into the 3.5 mm headphone jack at the front of Pearl Nano to monitor the video signal's embedded audio. For more about monitoring audio, see Monitoring audio.


If your network supplies PoE+ power, then you can skip this step.
If your video source has a signal, the video displays on the front screen. If you don't see the Auto channel displayed on the front screen, press the left arrow key on the control key interface to cycle through the different views.

Install and format an SD card
To record video, you must install and format a storage medium, such as an SD card. The easiest way to do that is using the front screen menu and the control key interface on the front panel of Pearl Nano. If you want to format the SD card using the Admin panel, you need the IP address of your Pearl Nano and an admin computer connected to the same network. See My network IP address and access to the Admin panel.

After the SD card is installed and formatted for the EXT4 format, simply press the Record key on the front panel to start and stop recording the channel. Recordings are saved to the SD card by default.
Ejecting the SD card while recording is in progress may corrupt the SD card and cause loss of data.
If you install a SATA M.2 2280 SSD, Pearl Nano no longer detects the SD card, see Install and format a SATA M.2 2280 SSD.
Format an SD card using the front screen menu and control keys
- Power on the Pearl Nano device.
- Insert the SD card into the SD card slot.
- Press the left arrow key repeatedly on the control key interface until the Menu screen displays.
- Use the arrow and check mark keys to select Storage. Then from the Storage screen, select Format SD card to open the Format SD card screen.
- (Optional) Highlight Quick format and press the check mark key to toggle the switch on or off.
- Highlight Format card and press the check mark to start the process. The formatting in progress screen appears and the LED beside the SD slot starts flashing.
- When the screen indicates formatting is complete and the LED is solid off, press the check mark to return to the previous screen.


Your first recording
When you power up Pearl Nano, you can start recording as soon as you connect a video source to one of the video input ports and have a formatted SD card installed.
Record the default Auto channel using the Record control key
To record the default Auto channel using the control key on the front panel of Pearl Nano, simply press the Record key. When you're done, press the Record key again to stop. The Record key is lit red while recording is in progress.

Record the default Auto channel and download the file using the Admin panel
The SD card uses the EXT4 format and you cannot manually transfer recordings off the SD card directly to iOS or Windows systems. Instead, download your recording using the Admin panel .
- Open a web browser on the admin computer and go to the IP address of your Pearl Nano and log in, see My network IP address and access to the Admin panel.
- From the Channel menu in the Admin panel, select your channel (i.e. Auto) and select Recording. The Recording page for the channel opens.
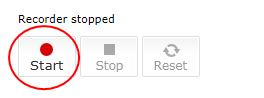
- Select Start to start recording the channel and click Stop when you're done.
- Refresh the page to see the newly recorded file appear in the Recorded Files list.
- Select the file in the list and download that recording to your admin computer.

My network IP address and access to the Admin panel
You can get the network IP address of your Pearl Nano from the front screen menu. With the device IP address, you can access the Admin panel to do things like configure Pearl Nano, format the SD card, start/stop recording and more. Just make sure that your admin computer is connected to the same network as Pearl Nano and that the network uses DHCP.
If your network requires you to assign Pearl Nano a static IP address instead of using DHCP to obtain one, contact your network administrator and see Connect using persistent static IP address.
Obtain the IP address of Pearl Nano and access the Admin panel
- Press the left arrow key repeatedly on the control key interface until the System status screen appears.
- Using a browser on the admin computer, enter the URL for your Pearl system and include /admin to access the Admin panel.
- When prompted, log in using the default user name admin and the administrator account password. If you don't know the password, contact your Pearl system administrator.
- (Optional) Open a new tab in your browser and enter the URL to preview a channel.

http://<IP Address for Pearl Nano>/admin
For example:http://192.1.10.100/admin
For a first-time set up, you're prompted to assign passwords to the admin, operator, and viewer accounts. Record the passwords for future reference.
http://<IP Address for Pearl Nano>/preview.cgi?channel=1
For example:http://192.1.10.100/preview.cgi?channel=1
For more details about accessing the Admin panel, see Connect to Admin panel. For more information about user accounts and passwords, see User types and privileges.
What’s Next?
Now that you have a video source connected and an SD card installed and formatted, you can fine-tune Pearl Nano to your exact requirements. Take a look at topics such as:
- What is a channel?
- Custom layout configuration
- What is streaming?
- Selecting an audio source
- Video output ports
- Automatic file transfers
When you're done setting up your Pearl Nano, make sure to back up the system configuration using the procedure described in Create a configuration preset.
Register Pearl-2 to get firmware updates
Keep Pearl-2 up-to-date and get all the latest features and firmware updates. Registering your Pearl-2 is free and only needs to be done once. You can register anytime from the Firmware update page using the Admin panel, see Register your device
