CMS event controls using the touch screen
Pearl-2 starts recording scheduled events automatically; however, you can use the touch screen to start and stop scheduled events sooner. The touch screen can also be used to authenticate with your Content Management System (CMS) to create unscheduled ad hoc recordings and webcasts. For detailed instructions, see:
- Stop/start scheduled CMS events using the touch screen
- Extend or pause CMS recordings and webcasts
- Create ad hoc events using the touch screen
- Set up a CMS start screen
For important considerations before recording or webcasting to a CMS, see Integration.
Events screens for scheduled Kaltura, Panopto, and YuJa events
| Events screens |
|---|
|
The Calendar icon appears on the touch screen when CMS is setup using the Admin panel. 
Tap the calendar icon to display the Events screen. For example: From the Channel view, the calendar icon appears along the bottom of the screen. |
|
This Events screen displays when no scheduled events are configured. To create an ad hoc recording or webcast, tap Create event and authenticate using your CMS credentials. Note:The Pearl-2 must be registered with the CMS to create ad hoc events. |

This Events screen displays when a scheduled event is configured and it's 30 minutes or more before the event start time. Notice that this is a recurring event with the date appended to the event name. To create an ad hoc recording or webcast, tap Create event and authenticate using your CMS credentials. Tap the channel thumbnail to go to the Channel view and see a live preview of that channel with an audio VU meter for confidence monitoring. |

This Events screen displays when a scheduled event is set to start within 30 minutes. To start the scheduled event early, tap Start event. To create an ad hoc recording or webcast, tap Create event and authenticate using your CMS credentials. Note: Scheduled events override ad hoc events. The Pearl-2 stops the ad hoc event and starts the scheduled event when it's time for the scheduled event to start. |

This Events screen displays when a scheduled event is set to start in five minutes or less. To start the scheduled event early, tap Start event. Note: For Panopto, the video quality you select for the session overrides the channel encoding settings in the Pearl-2. Notice the lower resolution of HDMI-B for the slides with the inserted black bars. Video quality encoding settings applied to the channel by Panopto persist for that channel after the scheduled event ends. |
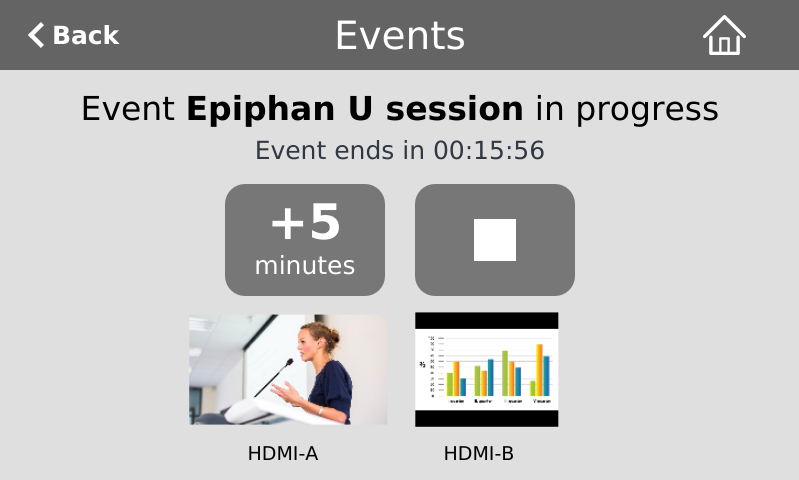
This Events screen displays while a scheduled or an ad hoc session is in progress. To stop the event early, tap the square stop button. To extend the event, tap +5 minutes. The extend event button can be setup to add 5, 10, or 15 minutes each time it is selected. See your Pearl-2 administrator. For Panopto, and YuJa, events an additional pause button lets you pause and resume active recordings and webcasts. |
|
If configured, the Pearl-2 mutes the audio and displays an event paused image when a Panopto CMS recording or webcasting event is paused. For more information about pausing Panopto events, see Extend or pause CMS recordings and webcasts. If mute on pause and the on-screen pause illustration are not enabled on the Pearl-2, your viewers watching the stream can see and hear the live webcast while the event is paused, as well as in the recording in Panopto. |

Authenticating using the touch screen lets you create unscheduled ad hoc recordings and webcasts.
Unscheduled ad hoc event screens
| Unscheduled ad hoc event screens |
|---|
|
The authentication screen appears when you tap Create event from the Events screen. When ad hoc authentication for Panopto is configured, the Panopto login screen displays on the touch screen. Tap in a field and enter your credentials, then tap Sign in.
TIP: To check the Keep me signed in check box using the built-in keyboard or an externally connected keyboard, press the space bar. For Kaltura, tap in the Event owner field and enter your Kaltura user ID or a valid Kaltura email address as your login credentials, then tap Next. 
|
|
This screen displays after successful authentication. 
To create an ad hoc event, tap Next to go to the next screen and set the event title and details. Tapping Logout logs you out of your CMS session and you return to the Events screen. |
|
Now enter your event details. For Panopto, you can change the ad hoc session title, duration, choose the type of event (VOD or Live Stream), and select the folder in Panopto to upload the file. My Folder is the default. Swipe to scroll down the page. Double tap and use the Back button to navigate nested folders. Tap Start when you're ready to start the ad hoc event.
For Kaltura, you can change the ad hoc session title, duration, choose the type of event (VOD, Live Stream, or VOD + Live Stream), and add a description. Swipe to scroll down to add Kaltura categories and tags. Tap Start when you're ready to start the ad hoc event. 
|
|
This Events screen displays after you have started the ad hoc event. To stop the ad hoc event, tap the square stop button. To extend the event, tap +5 minutes. The extend event button can be setup to add 5, 10, or 15 minutes each time it is selected. Events cannot be extended beyond the start of the next scheduled event. For Panopto events, an additional pause button lets you pause and resume active recordings and webcasts. Note: To log out after stopping an ad hoc event, tap Create event from the Events screen and re-enter your User ID to return to the logout screen. |


