Configure AFU to SFTP server parameters
You can automatically upload recordings to a secure FTP (SFTP) server when you select SFTP as the AFU protocol transfer type using the Admin panel.
The following table describes the parameters to configure AFU to an SFTP server.
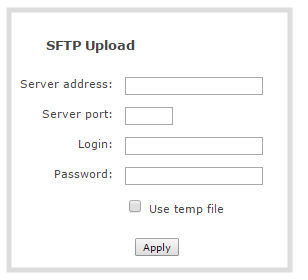
SFTP Automatic Upload Configuration Parameters
| Name | Description |
|---|---|
| Server address | The IP address or fully qualified domain name of the SFTP server. |
| Server port | The port used by the target SFTP server. Standard port is 22. |
| Login | Username for the SFTP server. |
| Password | Password for the SFTP user. |
| Use temp file | Causes files to be named with .part extension on the server during active upload. When the upload completes, the file is renamed to the appropriate extension (.mov, .mp4 or .avi). |
Prerequisites
- Channels and recorders are already added for AFU, see Set channels and recorders to include in AFU.
- AFU is enabled and the parameters configured, see Enable AFU, schedule, and set options.
Configure AFU upload to an SFTP server using the Admin panel
- From the Automatic File Upload configuration page, select SFTP Client as the protocol transfer type.
- Specify the target Server address. If your system is configured with DHCP or has a valid DNS configuration (see Configure DHCP), you can use the server’s fully qualified domain name instead of the IP address.
- Specify the Server Port used for the target SFTP server. The standard port is 22.
- Enter the SFTP account username in the Login field.
- Enter the SFTP account password in the Password field. The characters are masked with dots. Alternatively, you can choose to use a private key instead of a password for authentication.
- Select Use temp file to name files with a temporary filename extension (.part) on the server until upload is complete.
For secure file transfer, you can upload an SSH identity for your Pearl-2. This key must be trusted by the destination server. Details for generating the key and setting up this trust are beyond the scope of this document.
- (Optional) Set up SSH identity for SCP and SFTP clients.
If no identity is uploaded, or to upload a new identity (overwrites the old identity):
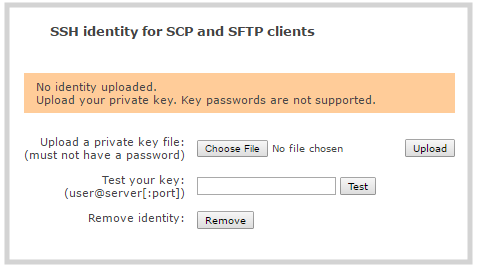
- Click Choose File and navigate to select the private key file from your hard drive, then click Open.
- Click Upload to upload the file.
- (Optional) Use the Test your key field to test your uploaded key against the secure server.
The system accepts RSA keys for SSH-1; DSA, ECDSA, EC25519 and RSA for SSH-2. Keys must be in OpenSSH format.
- Click Apply
