
Streaming live Church services doesn’t have to be complicated. There are some easy, volunteer-friendly live streaming solutions available for every budget and many specialized Church streaming services with great features for Churches that live stream sermons. Before we look at how to live stream a Church service, let’s start with some live streaming basics.
Live streaming Church services has many benefits. It lets you connect with people who can’t otherwise attend services in person. Church live streaming is also a convenient way for people to check out your Church and helps your congregants stay connected. It’s also a way to broadcast your sermons in multiple languages.

Speed up your church live stream setup with a FREE consultation
Consult an Epiphan Solutions Expert to learn how to produce a professional, multi-camera live stream for your church. You’ll hear about live streaming equipment, professional audio equipment, how to setup and secure your church’s local area network, and more.
Get free consultationChurch live streaming basics
The first thing you need is a good connection to the Internet. How much upload bandwidth you need depends on the video resolution and framerate you set on your camera. Also important is the bitrate you use to encode the video and the audio for streaming. Let’s step through it.
1. Choose a video resolution and framerate in your video camera settings
Those options are located somewhere in the camera’s menu (see the camera’s user guide). The video resolution you select determines the size of the video image. The higher the video resolution, the larger and more detailed the image. So the higher the resolution setting, the more upload bandwidth you need to live stream because the image is bigger and is better quality. Common video resolutions for Church live streaming include:
- 1920×1080 – Called full HD (high definition)
- 1280×720 – Called HD
- 640×480 – Called SD (standard definition) with a 4:3 aspect ratio (i.e. more square like older television sets)
- 854×480 – Also called SD but with a 16:9 aspect ratio (i.e. widescreen)
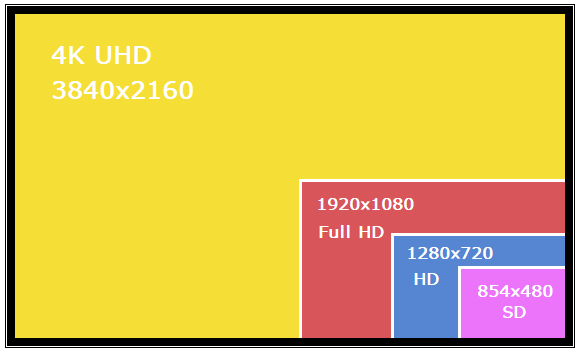 A higher resolution live stream needs more upload bandwidth and viewers need more download bandwidth to watch the stream. If your viewers don’t have high-speed Internet connections, they could experience problems watching a high definition live stream. If you have the option to stream both a high definition and a standard definition stream at the same time (called multi-streaming) – that’s definitely a nice feature.
Common frame rates to use are 24 fps (frames per second), 30 fps, or 60 fps. The same principle applies here. The more video frames per second, the better “quality” image you get. But just like video resolution, a higher frame rate means the video signal contains more data, which adds up to needing more upload bandwidth to stream it well.
If you’re planning on using more than one camera, make sure you use the same settings on each. Here’s a tip. For better looking video, select the progressive and not interlaced video in your camera settings. It’s often indicated by a letter, such as 720p for progressive or 720i for interlaced.
2. Set the audio and video encoding bitrates
After you’ve set your camera’s resolution and framerate, you need to choose the bitrates to use when encoding the signal before it’s streamed. The bitrates you choose determine the amount of data that’s packaged in one second of audio and one second of video being streamed (or recorded). And of course – the higher the bitrate, the more upload bandwidth you need.
When live streaming Church services to the Internet, you’re probably using a separate hardware encoder or a software encoder to process the live stream. You set the audio and video encoding bitrates in the hardware encoder settings (or in the software encoder settings) NOT your camera.
Typical audio bitrates are 64 kbps and 128 kbps. When live streaming to YouTube, Facebook Live, or other CDN such as StreamingChurch.tv, they usually provide recommended encoding settings like the audio bitrate, so check with them. For example, YouTube supports audio bitrates up to 320 kbps. You can read this blog for more about audio codecs and bitrates, and we did this bitrates demystified video that talks all about bitrates and resolutions. Here’s a nifty demo video that shows how important it is to choose the right bitrate. Notice how more movement and elements added to the video affects the quality, which means a higher bitrate is needed to get a good sharp image when there’s a lot going on. Here are video bitrates that work well for most Church live streaming situations:
- 5 Mbps for full HD (1920×1080)
- 3 Mbps for HD (1280×720)
- 2 Mbps for SD
3. Calculate your upload bandwidth requirements
To calculate the minimum amount of upload bandwidth for Church live streaming, add the audio and video bitrates and then multiple by 1.5 or by 2 for some extra headroom (i.e. 5 Mbps x 1.5 = 7.25 Mbps).
Test your network’s upload bandwidth speed on different days and at different times to get an average. There are plenty of free Internet speed tests online you can use, such as the Google Fiber speed test. Then determine if you need to order more from your Internet provider. Not enough bandwidth will cause your live stream to drop.
4. Choose a Live streaming platform
You could start with a popular free platform. For example, if your Church already has a Facebook or YouTube account, you can live stream to those platforms for free. If you’re ready to step up to a live streaming hosting service with more features (for a monthly subscription fee), here are some popular ones to investigate (remember to check for any overage charges): DaCast, Wowza, Vimeo live streaming, Boxcast, Streamspot, and Stream Monkey!
There are also Church specific live streaming services that offer a range of features, like multi-streaming, embedded players, options to collect online donations, chat so that online greeters can interact with viewers, interactive Bible resources, online bulletins, and multi-streaming just to name a few. Some popular services include: StreamingChurch.tv, SermonCast, Streaming Video Provider, Sunday Streams, ChurchStreaming.tv, and Worship Channels.
TIP: Already using a Church presentation software like EasyWorship? Check out this simple streaming solution using EasyWorship with an AV.io HD and the Webcaster X2. It shows you how to take the HDMI output from a camera, feed that in to the USB port on your laptop and then split the laptop’s HDMI output between the overhead projector and your live streaming encoder.
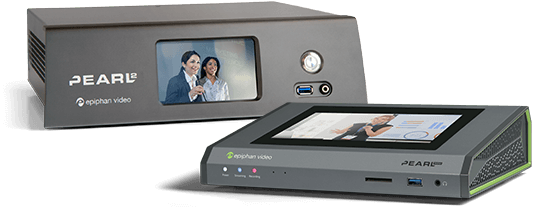
Everything you need for church live streaming – all in the box.
Pearl-2 and Pearl Mini are the easiest all-in-one video production systems for your live church productions.
Learn more about the Pearl familyChurch live streaming gear
From volunteer friendly and affordable options to complex and high-budget multi-camera, multi-streaming broadcast-style options, there’s a big range of video mixing and live streaming solutions. Here’s what you need to know to help you choose a live streaming solution, plus some ideas for simple, volunteer-friendly live streaming solutions that let you get the look of a big budget live streaming system for less. Let’s start with the basic gear.
Camera
Grab your tripod and a camcorder, DSLR, or PTZ (Pan Tilt Zoon) camera and some HDMI cables for a very basic live streaming setup. For longer distances between your camera and live streaming encoder, consider optical HDMI cables. They’re a bit more expensive and delicate (don’t tie them in a knot), but they’re easy to run long distances and come in 100’ lengths. Be aware that more than 100’ will cause signal strength loss. And optical cables also only work in one direction. It matters which end of the cable you connect to your HDMI source (i.e. a camera).
If your video has to travel over a really long distance from your camera to your live streaming encoder, consider cameras with an SDI output. They’re more costly, but SDI cables can be used over much longer distances. An SDI to HDMI adapter easily connects the SDI cable to the HDMI input on your live streaming encoder (if needed).
Another option for longer distances are cameras that support NDI. They’re also more expensive, but they let you use a dedicated sub-network on your Church’s LAN to get the video from the camera to your live streaming encoder over Ethernet.
Watch out for cameras that don’t have a setting to turn off the on-screen display overlay on the HDMI output. You want a camera that outputs a “clean” signal. With some older cameras, you can run into other issues like cameras that don’t output audio with the HDMI video (i.e. the Canon T5i and T6i, or the Nikon D3200 and D600) – or cameras that only let you play back recoded video on the HDMI output and not a live video stream. You can check this list of cameras we’ve tested. We also did a Live @ Epiphan episode all about cameras and audio considerations for live streaming.
TIP: Connect the HDMI output from your camera to a television to test it and see if there’s audio on the live video output.
Audio
Connect an external microphone (or a lapel mic that has volume control) directly to your camera for easy audio. Another alternative is an inexpensive HDMI audio inserter that adds the audio feed from your Church’s sound board to your video signal. Alternatively, a small mixer dedicated for the live stream is a nice to have.
Video switcher
If you have more than one video source, you’ll likely want to do some live switching between them. A basic video switcher (from one source to another) can be relatively cheap. They can also cost a small fortune depending on the number of inputs, support for nice transitions, pro features like NDI support, and (of course) the brand name. There are simple, low-cost video switchers available. Just make sure it doesn’t tear the video as it switches from one source to another (it actually looks like the video image is torn between each switch). Cheap video switches can also insert a black frame between each switch. If you’re looking for features like custom backgrounds, transparent logos and titling, you need a separate effects computer or move to an all-in-one solution that has a built-in layout editor.
To switch multiple video sources and get the look of a custom broadcast-style live stream, an all-in-one video switching and streaming solution with a built-in layout editor is a great option. For example, the Epiphan Pearl Mini offers video switching, recording and multi-streaming with a custom layout editor. It supports custom backgrounds, text overlays and transparent graphics. The large, built-in touch screen makes for easy switching and it only takes up a small amount of space in your sound booth.
You could also choose to go the software video switching route. Most software encoders like OBS, XSplit, and VMmix let you switch as you stream and create interesting layouts. Some packages support special effects and animated titling. But remember, you need a computer that’s built for the heavy amount of processing needed for video streaming and processing. Plus, you need a video capture card for each video source you want to bring in to your computer – which can add up quickly.
Church live streaming encoder
Making a decision to use a hardware encoder or a software encoder is important. There are pros and cons for each. A dedicated hardware encoder is more reliable and you never have to worry about a Windows update in the middle of your Church’s live stream. On the other hand, there are economical (even free!) software encoders that you can install on a computer. Common live streaming software packages include OBS, XSplit, and VMmix.
It’s important to know that live streaming software can be challenging to use and expensive. You also need to purchase a computer that has at least an i7 processor and 4 GB of memory, plus a video capture card like the AV.io HD to get the video in to your computer. When you add up the cost of the computer, streaming software, and the extra video capture cards, you’re looking at around the same cost as a really nice hardware encoder like the Pearl Mini that does recording, streaming, and switching all in one easy package.
A live streaming hardware encoder really can make your live streaming experience pretty easy. For example, the economical Webcaster X2 can live stream to YouTube, Facebook Live, StreamingChurch.tv, or Twitch among other integrated streaming platforms with very little setup. It’s a simple-to-use encoder with one HDMI camera input and a USB (UVC/UAC) input for a webcam or external audio.
Stepping up to an all-in-one hardware encoder like the Pearl Mini, you can connect a couple of HDMI sources like a camera and the HDMI output from a laptop and it supports connection of an SDI source. Pearl Mini accepts audio from multiple sources including microphones and a professional line-level feed from your Church’s sound board.
It’s like a TV production system in a box! You can create custom layouts like PiP (picture in picture) with transparent images for a dynamic, switched live program. Pearl Mini supports multi-streaming and has a volunteer-friendly interface for easy control of switching and recording using either the built-in touch screen or a web-based app on an iPad or laptop. Plus there’re other volunteer-friendly features, like the one-touch starting and stopping of streaming and recording from the touch screen or the web-based app. You can get the look and feel of a fully switched, broadcast-style stream without the high cost and complicated equipment – and it’s compact so you don’t need a separate room to put it all in.
Everything you need for church live streaming – all in the box.
Pearl-2 and Pearl Mini are the easiest all-in-one video production systems for your live church productions.
Learn more about the Pearl familySample Church live streaming solutions with switched program
Pearl Mini is a flexible and affordable solution to live broadcast Church services with volunteer-friendly features that anybody can operate. If you need just a couple of video inputs but still want the look of a broadcast-style switched program, Pearl Mini can do that with a simple, two channel setup and some custom layouts for easy, dynamic switching. Stream using custom RTMP (or RTMPS) to multiple destinations at different resolutions or have different streams in different languages! It’s up to you and is completely customizable. You can add transparent images, custom backgrounds, and text overlays to personalize your layouts for your live broadcast Church service.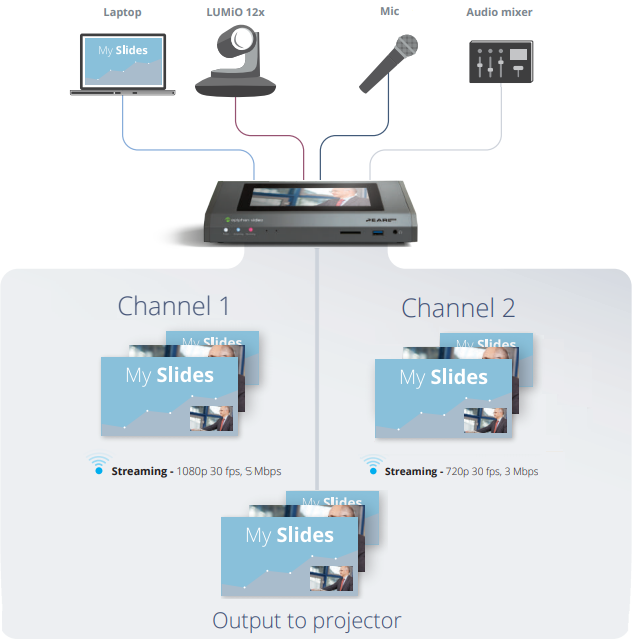 Need more inputs? The larger capacity Epiphan Pearl-2 can handle multiple audio sources and up to 6 video sources, including: HDMI, SDI, and USB. Check out the Pearl-2 multi-streaming video switching and recording encoder and learn why StreamMonkey recommends Pearl-2 as a streaming encoder for their clients in the worship space and see what happened when CHRI 99.1 FM family-friendly Christian radio used Pearl-2 for their fundraising event.
Pearl-2 also comes in a rackmount twin version that offers even more inputs and is great to load balance high-density recording and streaming needs. Epiphan’s support team is ready to help you work through your Church’s video production requirements and come up with a solution that is affordable, reliable, and easy to operate.
To learn more about streaming solutions for Churches, you can watch this short video that shows some options for simple Church live streaming set ups for different budgets.
I really like what you said about live streaming church services lets you connect to people that can’t get to church services in person. I travel a lot, and I have been looking for a way to still listen to sermons while I am on the road or in another country. I think I will look into finding a church service that streams or broadcasts their meetings that I can listen to wherever I am.