YouTube Live Events allows live streaming of video to your audience via YouTube, similar to other commercial Content Distribution Networks (CDNs). The data sent to YouTube Live starts as an encoded video stream and is transcoded by YouTube into the format(s) and resolutions it needs. Pearl and Pearl-2 work with YouTube Live Events by providing the encoded video stream. Using a feature called RTMP (real-time messaging protocol), your live broadcast, lecture or event is pushed from your Pearl system to YouTube.
For our latest primer on how to live stream on YouTube, check out our blog on the topic.
To stream a video to YouTube you need:
- A YouTube account in good standing
- Epiphan Pearl or Pearl-2
- Pearl-2 with access to your YouTube network
Before getting started with the YouTube Live Event, configure your encoding settings to the values recommended by YouTube:
- Login to Pearl-2 as admin.
- Go to the Encoding page for your channel.
- Verify the following encoding settings (the ones below are current at the time we wrote this article). All other options can be set any way you wish:
- The codec is set to H.264
- The key frame interval is 1/2 second, 1 second, or 2 seconds
- The frame rate is between 5 and 30 (the live stream will fail if this value is too low)
- The stream has audio enabled (the live stream will fail otherwise)
- The audio codec is MP3 at 44kHz or AAC
- If any changes are made to the stream setup, click Apply.
- You may need to return to this page to set your bitrate after you create your YouTube live event in the following steps.
.Open a new browser window or tab, so that you can switch easily between Pearl’s admin interface and the YouTube Live control panel.
- Log into your YouTube account.
- Select My Channel.
- Select Video Manager. The YouTube Video Manager opens.
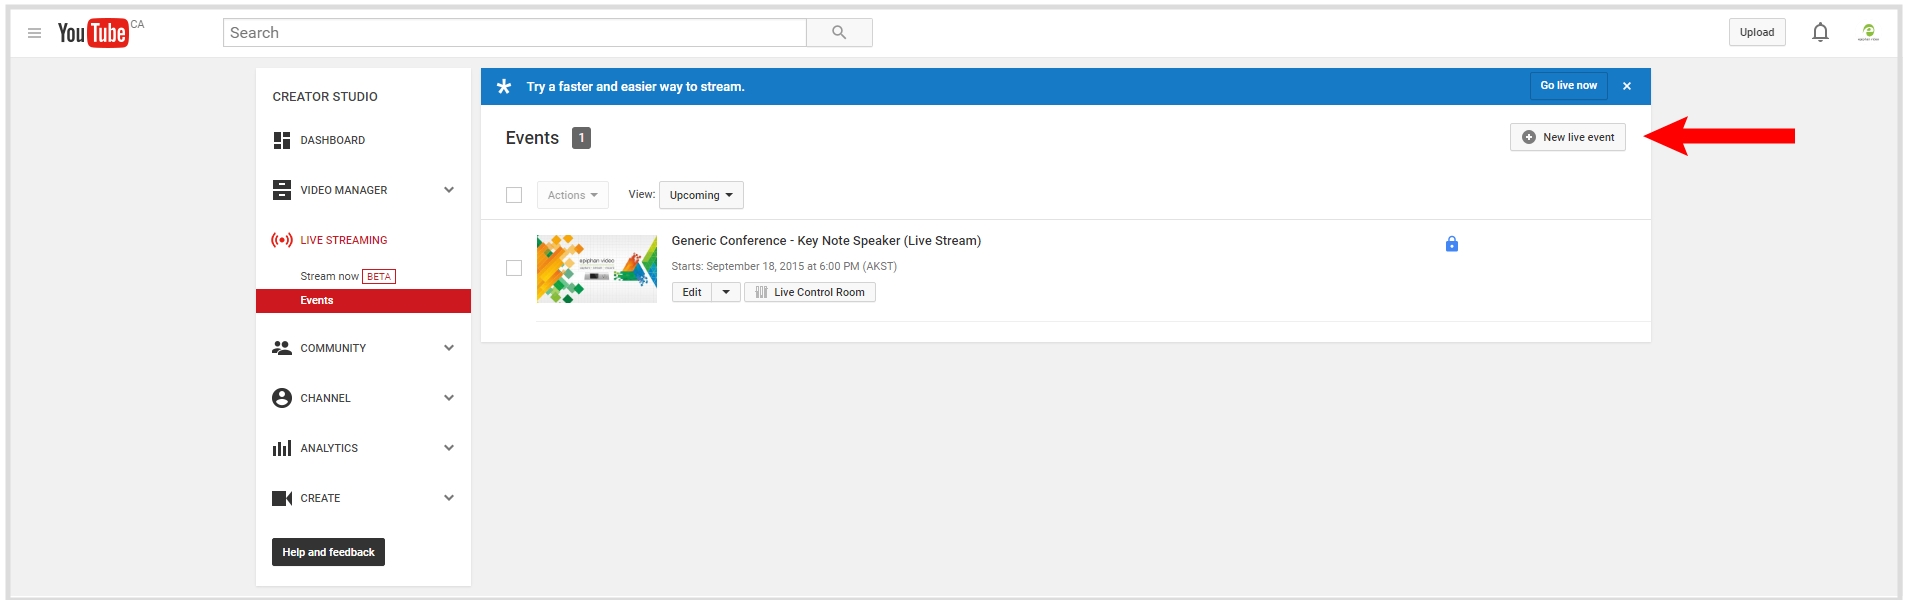
- Select Live Streaming from the video manager. Go to Events, just below the Stream now page.The Live Events page opens.
- Click New live event. This creates an event, and opens the Live Event Info and Settings configuration page.
- Add the event information including title, start time, description, tags, etc. If needed, read the terms and conditions and click the check box if you agree to them.
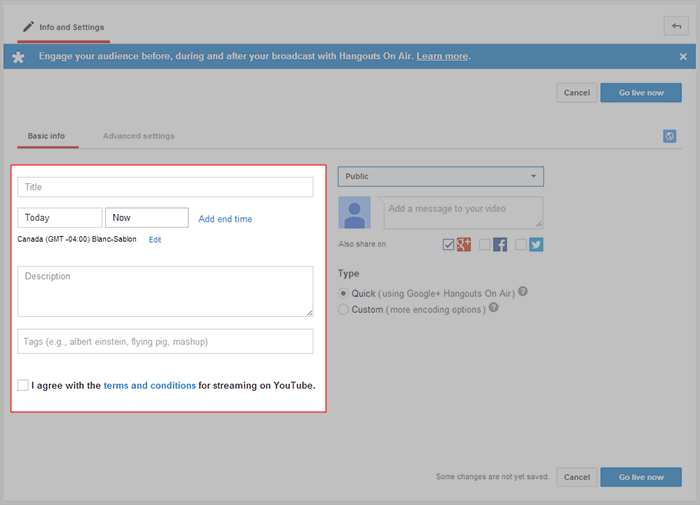
-
If desired, select the Public drop down and pick Private (this is a good idea when testing).
- Select Custom under Type.
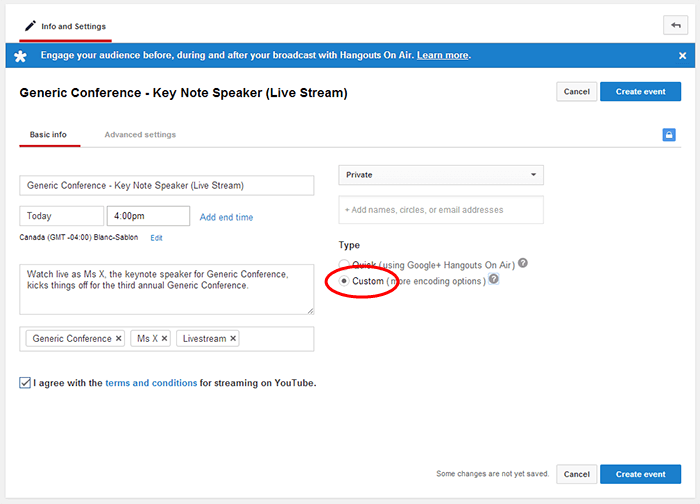
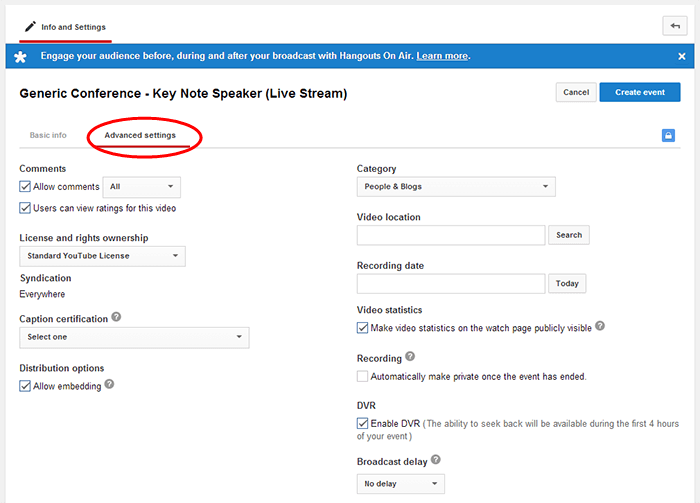
- Optionally, select Advanced Settings and enter more information about your live event such as video category, types of promotion, whether or not comments are permitted and if the recording should be made private after the event completes.
- Click Create event; YouTube saves the changes.

Next, you’ll pick an Ingestion Setting in YouTube. This tells YouTube what frame size and bitrate you’d like to stream to their service. Pearl-2 (or Pearl) is called the encoder in this streaming transaction.
- After creating the event, the Ingestion Settings page opens.
- If wanted, you can upload a thumbnail for your event.
- Select a Basic ingestion bitrate. YouTube provides suggestions based on the frame size of your content. If you know your network bandwidth is limited, select a smaller bitrate, otherwise, pick the value that most closely matches the frame size of your content.
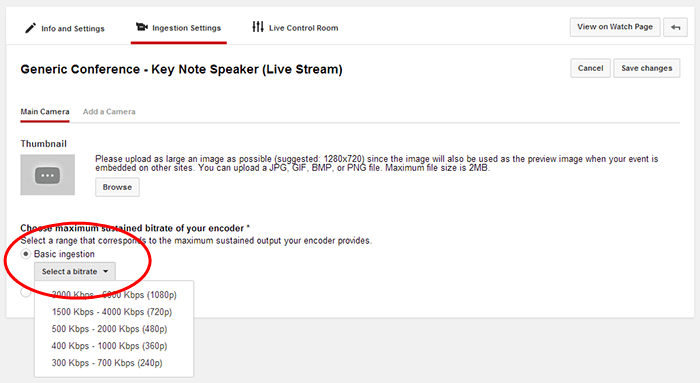
- After selecting a bitrate, the page expands providing the details needed to configure Pearl-2 for RTMP push streaming.
The next step is to transfer the RTMP configuration data to Pearl-2 and ensure the stream is set up correctly.
- YouTube displays encoder settings.

- Highlight and copy the data in the YouTube Stream name field.
- Return to your Pearl-2 Admin interface.
- If you haven’t already, create a new streaming destination for your channel. From the Streaming configuration page, click New Stream, and select RTMP push from the drop down list.
- Paste your Stream name from YouTube into the Stream name field on Pearl-2.
- Return to YouTube’s encoder settings and copy the YouTube Primary Server URL field.
- Paste this into the URL field on Pearl-2. (Leave the username and password fields blank.)
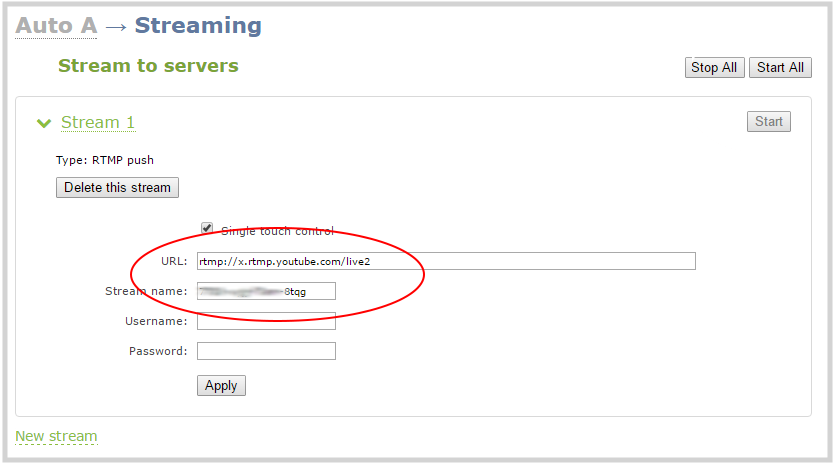
- Click Apply.
Everything is configured! You’re almost there.
When your event is about to begin, start streaming from Pearl-2 to YouTube (this will only be visible to you until you make it live in YouTube).
- Use the Start and Stop buttons (or the Stop All and Start All buttons) to begin and end the stream when you like.
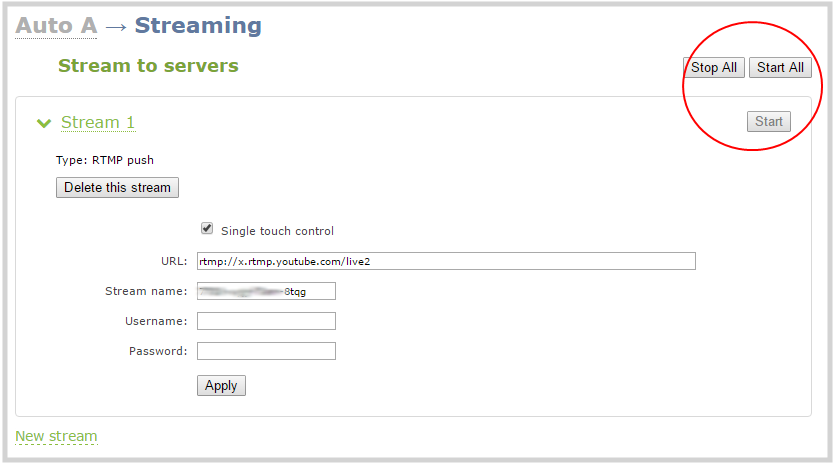
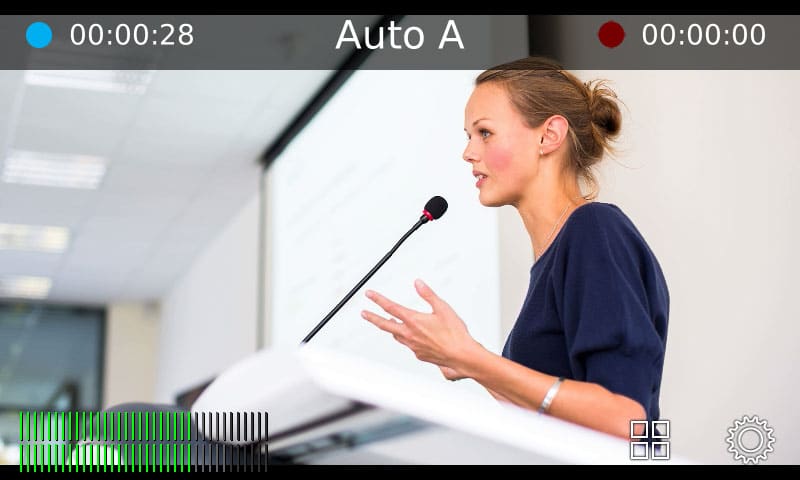
- Alternatively, you can use touchscreen controls to start the stream. Touch the grey circle in the top left-hand corner of the touchscreen. It turns blue and times how long you are streaming. Press the blue circle again to stop the stream. Pearl-2 also gives you the option to use the One-Touch control to simultaneously start any other streams you might have.

Time to make sure that YouTube is receiving your live stream and that everything looks how you expect.
- From your YouTube Live Event page, go to the Live Control Room. This is the best place to preview your video to see how it will appear when you go live.
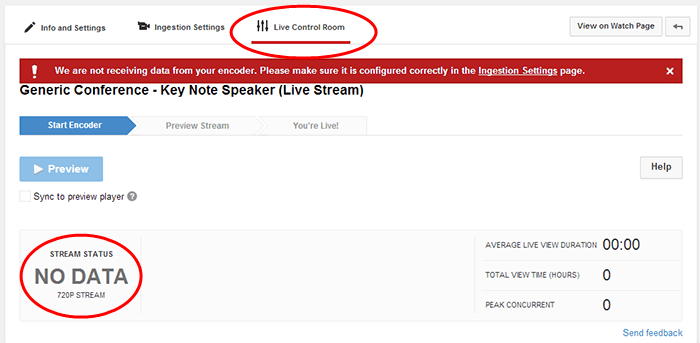
- The video preview is not available immediately after the stream is started. Depending on network bandwidth, it might take one to five minutes after starting the stream on Pearl-2 until YouTube indicates that the stream signal is being received. Refresh the page at intervals to check.
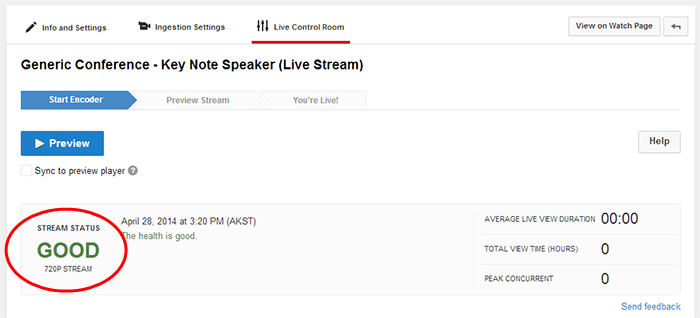
- When YouTube says the signal is Good, you know Pearl-2 is sending your video stream to YouTube. Nearly there!
- Click Preview to prepare your stream for preview on the Live Control Room page; YouTube processes the stream for a moment.
- Press play in the preview player to begin to play the event preview.
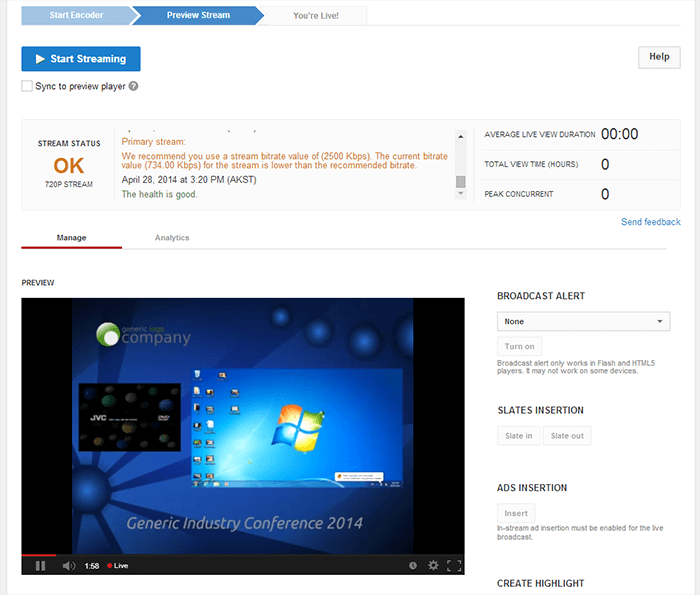
- Verify the STREAM STATUS section for any problems or warnings. In the example above, Pearl-2 is set to stream a bitrate of 700 kbits/sec, but when selecting the Ingestion Settings, a higher bitrate was selected. The system warns us of this discrepancy. It’s not possible to change the Ingestion Settings, so return to the Epiphan admin interface and make any recommended changes (such as increasing the bitrate).
- When you are ready to begin sharing your live presentation, click Start Streaming. You’re streaming live!
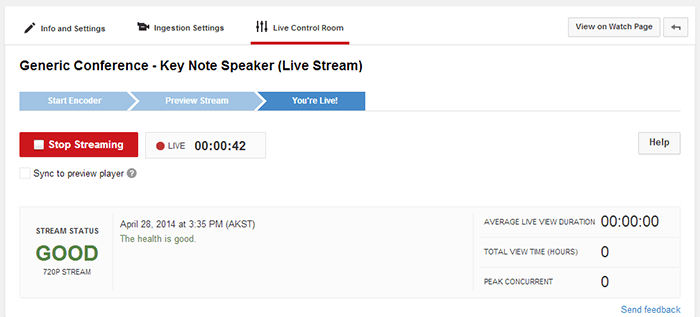
- When your live event is complete, click Stop Streaming in the YouTube live control panel; the event will be closed.
- Stop streaming from Pearl-2 using the Admin panel or the touchscreen, as described in Step 5.