This article explains how to capture, record, and stream high quality and high resolution gameplay video from Xbox One™ and Xbox 360™ video game consoles. Xbox gameplay capture is easy using AV.io HD and any capture/streaming application like OBS.
Want to capture 4K gameplay

Playstation 4 Pro™
4K capture tutorial
Xbox One S™
How to capture 4KWhat you’ll need
To record and/or stream video from your Xbox One or Xbox 360 you will need the following hardware:
- Xbox One or Xbox 360 and the game or content you want to stream.
- An HDMI splitter to send the HDMI signal to both the capture device and your TV.
- Three HDMI cables for the splitter setup.
- A display or TV for viewing/playing your video game (see note below).
- AV.io HD, Epiphan’s simplest to use external USB 3.0 video grabber.
- A capture computer with Open Broadcaster Software (OBS) installed. You can use a Mac, Windows or Linux-based computer.
- Network connection for optional streaming.
For simplicity, this article describes the process for connecting and working with your Xbox One console and uses a Windows computer for capture. The process is the same when working with XBox 360, and other consoles with HDMI output.
Important notes
1. You may wonder why we’re using a splitter for this process. Like Epiphan’s other video grabbers, AV.io HD has an extremely low capture delay: usually just one frame! But when playing high-action games, particularly shooters, a delay of a single frame could mean the difference between life and well… death for your game character. If you’re capturing something other than a video game, or you know the pace isn’t high-speed, you can try without the splitter and see how it works for you. Your results will depend on the software you use for capture and encoding.
2. Epiphan’s video grabbers will not capture HDCP-protected content. Microsoft might turn on and off HDCP encryption depending on the content being played. Gameplay is generally not protected, but, for example, movies usually are.
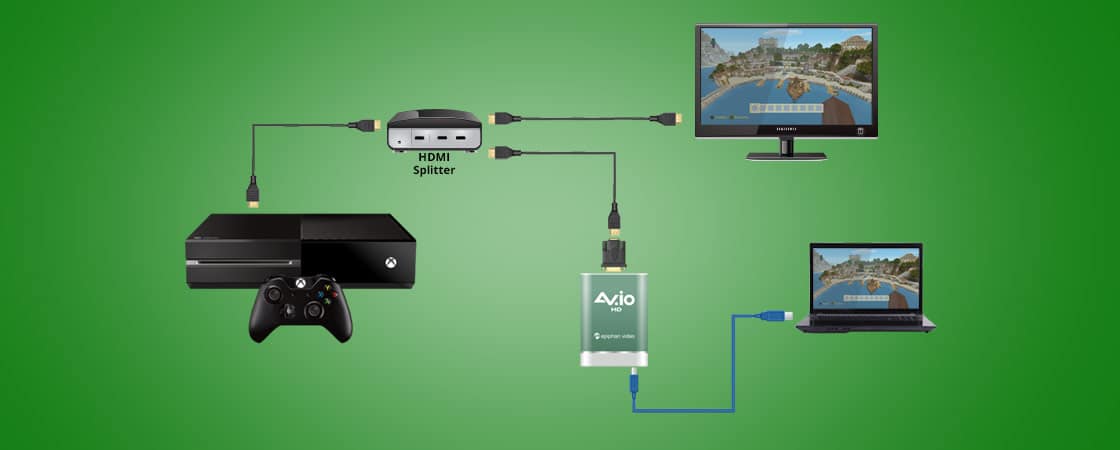
Step 1: Connect your Xbox One to your TV, through the splitter
To get started, let’s make sure your Xbox One is properly set up and working with your TV.
Using the directions that come with your Xbox, connect the power supply and network cables. Instead of connecting the HDMI cable directly from the Xbox to your TV, connect it to the input port on your HDMI splitter, then use a second cable to connect from one of the splitter’s output ports to the TV’s HDMI input port.

Power on the Xbox and test this configuration and make sure it’s working before proceeding.
Step 2: Connect the AV.io HD
The AV.io HD needs to be connected to the HDMI splitter and to your capture computer.
- Connect your third HDMI cable to another output port on the HDMI splitter.
- Attach to the other end of the cable the HDMI to DVI adapter that came with your AV.io HD.
- Connect the cable (with adapter) to the DVI-I port on the top of AV.io HD.
- Connect the USB 3.0 cable that came with your AV.io HD to the bottom of AV.io HD.
- Connect the other end of the USB 3.0 cable to a USB 3.0 port on your capture computer.

There are no drivers to install for AV.io HD. When you connect it to your capture computer, it is automatically recognized using the UVC/UAC drivers that are part of your OS.
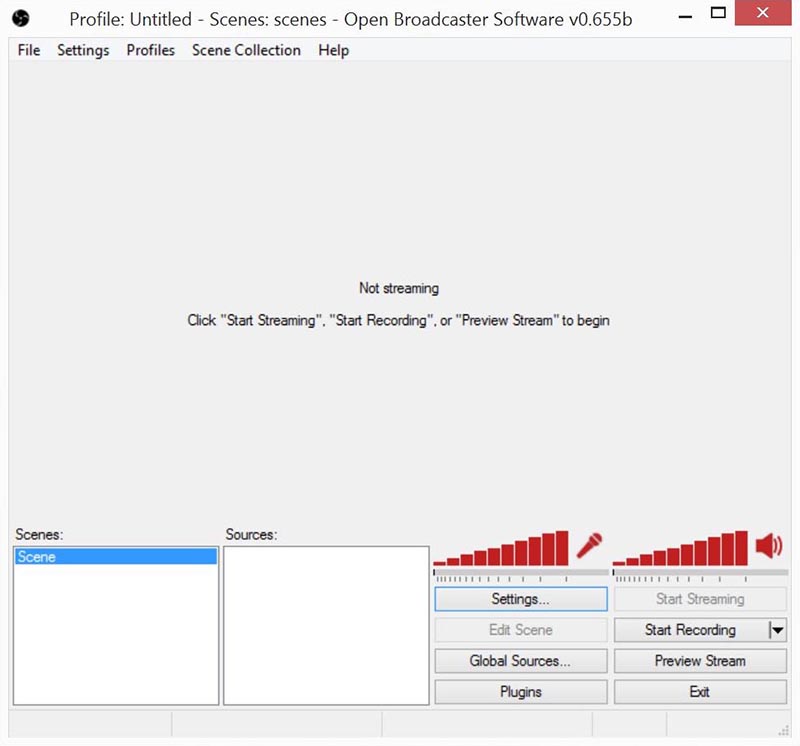
Step 3: Start the capture software
This example uses (OBS) as the capture and streaming software. You can choose to use any software that supports UVC inputs. Generally these include anything where you could capture from a web camera. Some examples are Skype, Adobe Flash Media Live Encoder, Windows Media Encoder, QuickTime and Wirecast.
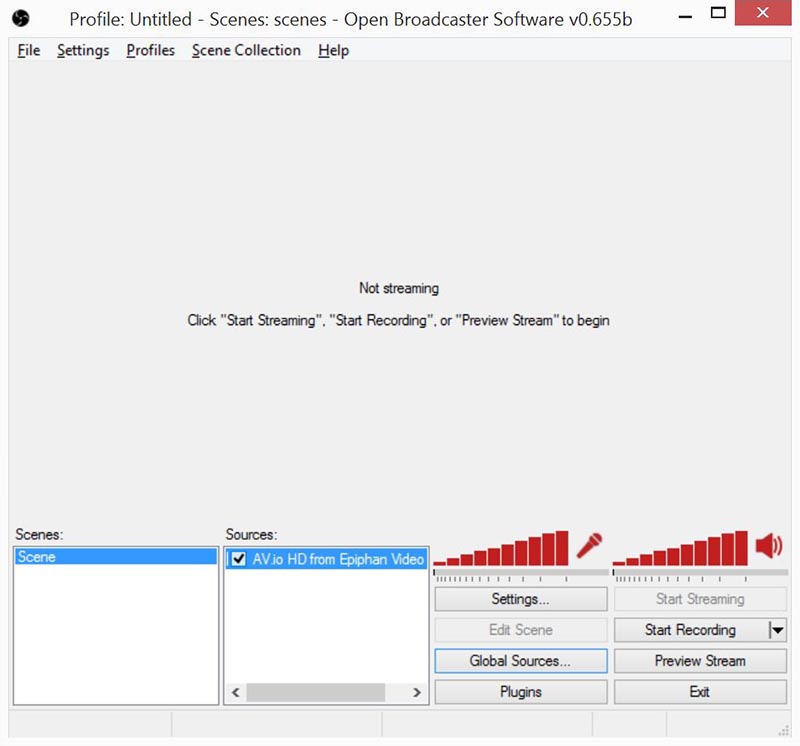
Ensure OBS is installed on your computer and start the application. For this tutorial we used OBS 0.655 Beta.
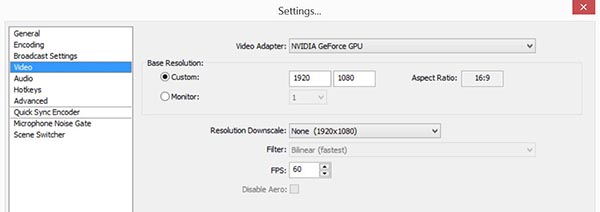
Step 4: Configure the capture software
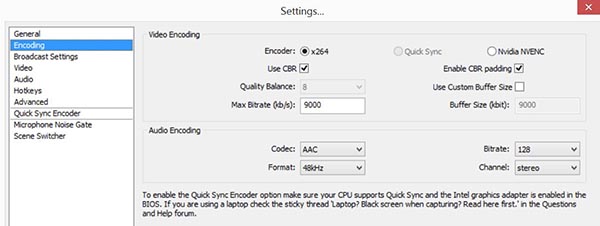
For this tutorial, we’ll capture Xbox One gameplay at 1080p and 60 frames per second. We’ll encode the video at 9000 kb/s and audio at 128 kb/s. Determining the best video rates for your computer and network is a bit beyond the scope of this page, but OBS provides a nice estimator tool you can access here.
- Click the Settings button at the lower right side of the main OBS window; the settings screen appears.
- Select the Video settings tab from the list on the left.
- Configure the base resolution, downscale (if wanted) and FPS. We used 1920×1080, no downscaling, 60 FPS.
- Switch to the Encoding settings tab (click yes when asked if you’d like to save your work).
- Set your encoding settings. We left the default settings except Max bitrate, which we changed to 9000 kb/s.
- Click OK at the bottom of the window to save your configuration changes.
Hint: In my copy of OBS, recordings were being saved as .flv files. If you want to change this to .mp4, open the Settings screen again, and in the Broadcast Settings section, click Browse next to the File Path and select mp4 from the Save As drop-down, then click OK.
Step 5: Add AV.io HD as a Global Resource in OBS
To begin capturing from AV.io HD you can add it directly as a source (that you’ll need to configure each time you want to use it), or set it up as a Global Source so you can re-use your configuration. We’ll walk through adding it as a Global Source.
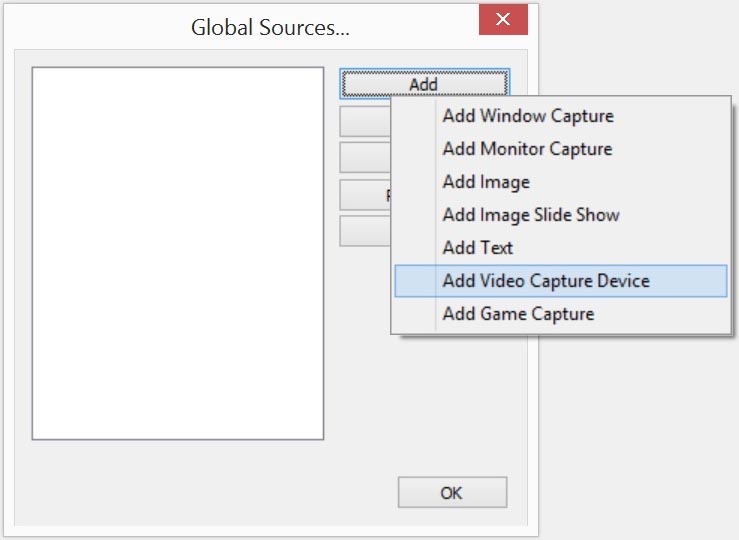
- Click the Global Sources… button at the bottom right corner of the main OBS screen; the Global Sources screen appears.
- Click Add. From the drop-down that appears, select Video Capture Device; a pop-up appears asking you to name your new resource.
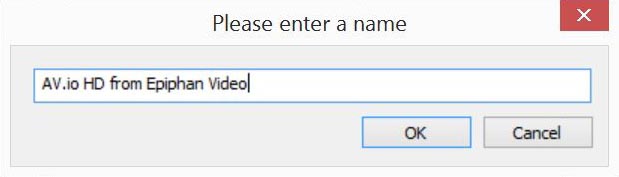
- Specify a useful name like AV.io HD from Epiphan Video and click OK; the capture device selection page appears.
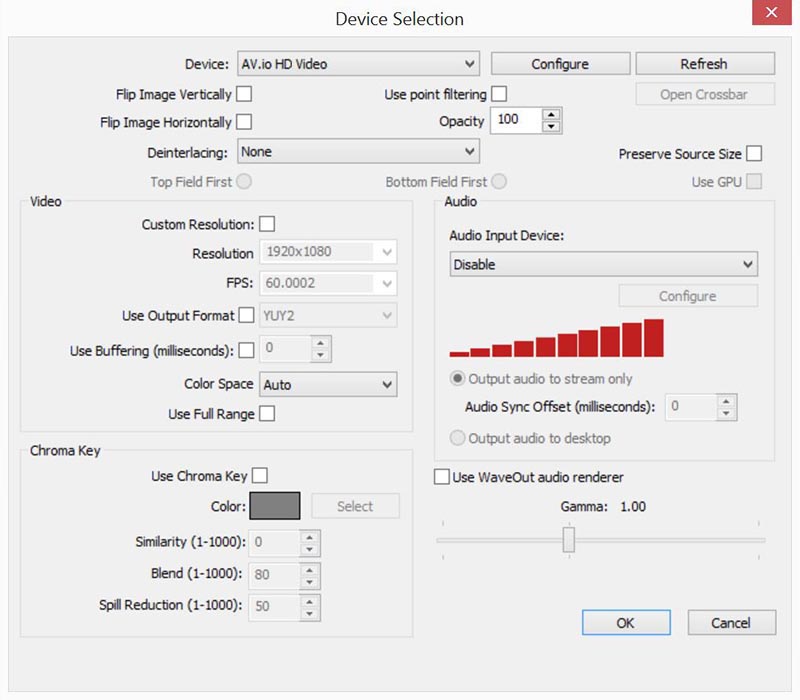
- Using the Device drop-down at the top of the page, select AV.io HD Video.
- Click OK.
No further configuration is necessary for AV.io HD. If you want, you can change the capture resolution, frame rate, color space, audio settings and more from this page.
Step 6: Add AV.io HD to your scene’s sources
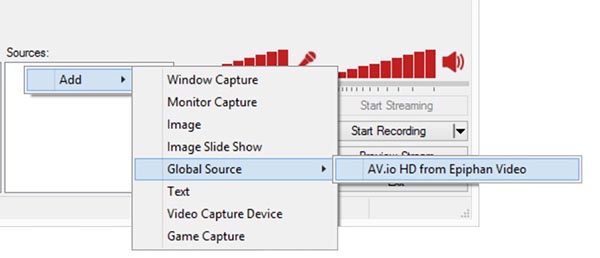
You’re nearly ready to start capturing! All that’s needed is to add the source to the default scene’s source list.
- Right click on the Sources list area.
- From the resulting drop-down pick Add > Global Source > AV.io HD from Epiphan Video (or the name you provided in the last step)
- A pop-up asks you to name the source. Keep the default name and click OK.
You’re ready to capture and record video!!
Step 7: Preview capture
You can start recording right away if you like, but it’s handy to use the preview function to make sure everything is working exactly as you expect.
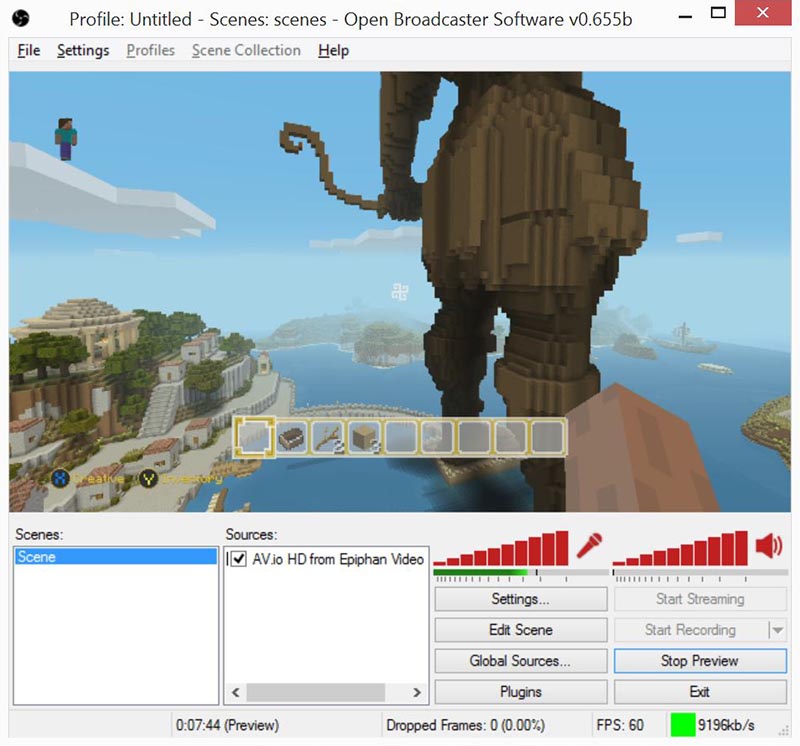
Click the Preview Stream button from the bottom right side of the main screen and your captured gameplay appears in the preview/capture window area.
Note that in the bottom right corner of the window you’ll see the capture rate and encoding bitrate.
Step 8: Record!
You’re ready to start recording. Click the Start Recording button at the bottom right side of the main screen. After a moment, your captured gameplay appears in the preview/capture window area and your recording starts.
Click Stop Recording when you’re done recording.
Your recording file is saved in the location specified in the Settings > Broadcast Settings page.
Step 9: Configure streaming to YouTube
If you have a YouTube channel in good standing, you can create Live YouTube streaming events and stream your gameplay live to your audience.
- Login to your YouTube account and go to your Channel.
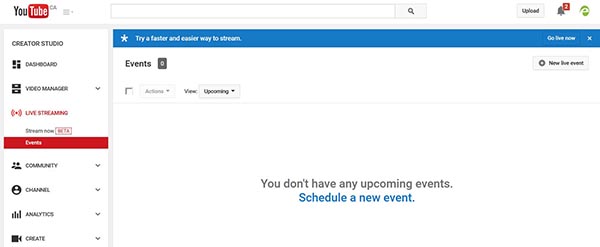
- Click the Video Manager link; the video manager opens.
- Click Live Streaming, then Events; the right side of the page shows any planned events and has a link to schedule a new event.
- Click Schedule a new event or the New live event button at the top right.
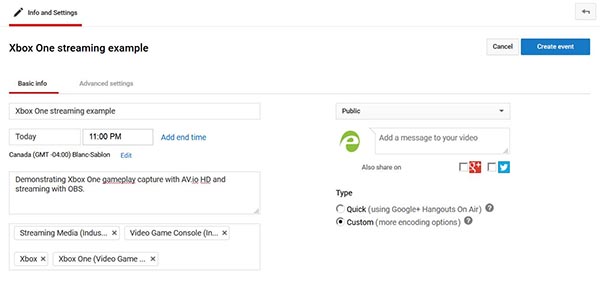
- Specify a Title, start date and time, description and keywords for your event.
- Click Create event.
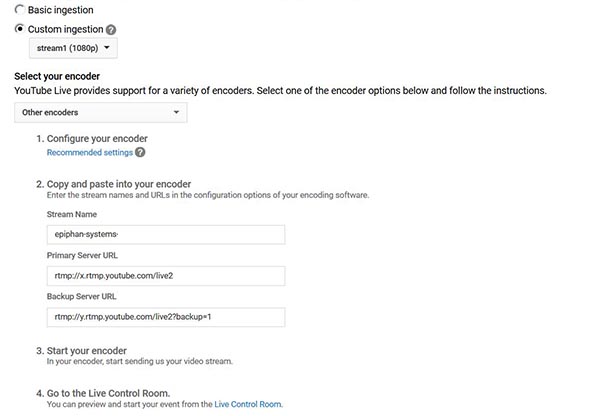
- On the next screen, select Basic ingestion.
- Choose the 1080p option from the dropdown; text appears below this that includes a bunch of pre-filled information.
- Highlight and copy the Stream Name.
YouTube is now ready for your live stream. You just need to set it up in OBS then return to YouTube to see it work!
Step 10: Configure OBS for YouTube Live streaming
Next, you’ll need to give OBS those live stream details you copied from YouTube. This lets the software connect to YouTube and forward the gameplay captured by AV.io HD from your Xbox One.
- Click the Settings button at the lower right side of the main OBS window; the settings screen appears.
- Click Broadcast Settings.
- From the Mode drop-down, select Live Stream.
- From the Streaming Service drop-down, select YouTube.
- In the Play Path/Stream Key field, paste the Stream Name you copied from YouTube earlier (it will appear masked by dots).
- If any warnings appear in red at the bottom of your screen, resolve them by taking the recommended actions.
- Click OK to save your changes.
Step 11: Control your live stream from YouTube
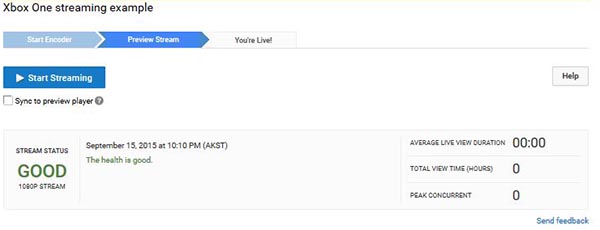
Everything is ready for your live streaming event! Note that it can take 30 seconds or more for YouTube to sort out your connection and start processing the data, so make sure you get things ready well before your go-live time.
- Return to YouTube (you should still be on the Custom ingestion page).
- Click Live Control Room; the YouTube Live Control Room appears.
- Verify that your stream is working by looking at the Stream Status section. The status is Green and says GOOD and the stream resolution (1080p) is properly detected.
- Optionally, use the preview window to preview the live stream (don’t be alarmed if this takes 30-60 seconds to appear)
- When you’re ready, click the Start Streaming button at the top of the page.
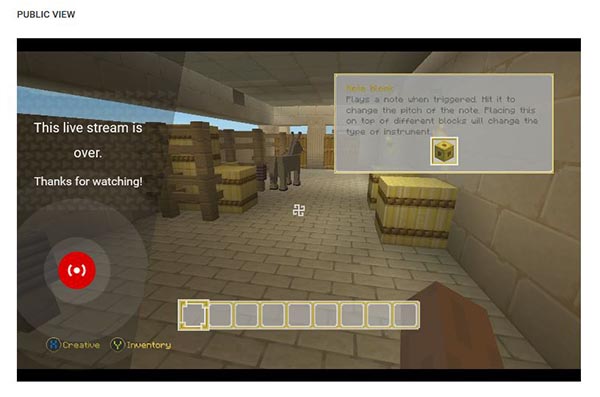
- When your event is over, click Stop Streaming.
The Result
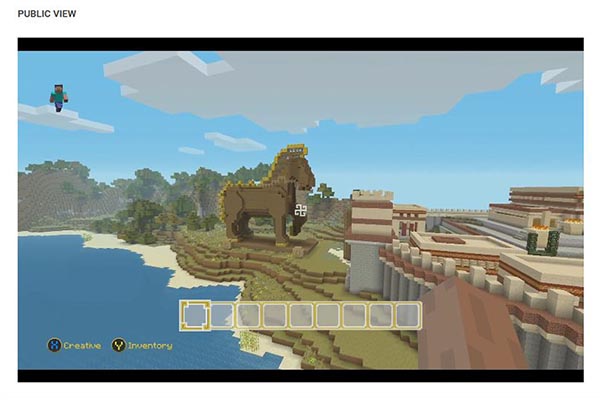
The following Minecraft videos were captured with AV.io HD and an Xbox One. The first one uses all the settings described in this tutorial. The second one gives you an idea of what happens when you have a smaller network pipe and need to encoder at a lower bitrate.
You’ll see that the first video is very clean and smooth. While the second video is also smooth, it has artifacts in the video due to the low bandwidth. If you find yourself in this situation, we recommend you choose a smaller frame size for your video capture so there are fewer bits to encode. Try different settings in OBS to optimize capture for your situation.